With so many exciting features on offer in modern DAWs, it's easy to overlook less glamorous things that you need every day. A prime example is proper monitoring - not sexy, but a crucial factor in successful multitrack recording.
 Good monitoring technique is crucial for successful multitrack projects, and there are many ways to set up monitoring in DP, depending on your gear, the way you like to work and the complexity of your project.
In a nutshell, monitoring is the process of providing a musician with a headphone mix of tracks that have already been recorded, together with a 'live' feed of his or her own performance as it's being recorded. Monitoring is far from being a one-size-fits-all affair, though. In a bedroom studio it might only amount to listening to a virtual instrument-based backing track while adding a vocal track, but in a big commercial studio it could involve providing multiple separate instrumental and live mixes for the musicians in a band. In a project studio, your main 'control room' audio output can easily double as your headphone monitor feed as you lay down tracks, but in a bigger studio, with separate control room and live space, you'd probably want at least one monitor mix in addition to the control room mix, and a flexible talkback system. This month we'll concentrate on how to get monitoring working well in the smaller studio and leave the more complex stuff for next time.
Approaches To Monitoring
Regardless of the complexity of the studio, there are challenges for the engineer. As you set up a monitor mix for your musicians, the relative levels of metronome click, pre-recorded tracks and live signal should be easily adjustable. Noticeable latency or other delay on the live signal is often unacceptable, and singers often like reverb added to their live signal while that signal is recorded to the track dry. The exact approach you use to provide monitor mixes will be dictated by several factors: the external hardware and audio interface you own, the speed of your Mac, the complexity of your project, and how sensitive you and your musicians are to latency. But when it comes down to it, you have basically three ways forward when using a DAW such as Digital Performer.
The first is to monitor 'in the box'. This is something you have to do if you've no hardware other than the Mac's built-in audio, or your audio interface has no monitoring facilities and you don't have an external mixer. Everything you record and want to monitor goes into your Mac, through DP, and back out again, so you'll be working only with DP's Mixing Board for routing and balancing pre-recorded and live signals. For simplicity this method is great: you only have to deal with one mixer for balancing pre-recorded and live tracks. But wherever live audio signals have to take a round trip through your Mac the spectre of latency looms. Essentially, any monitor signal set up in this way will be affected by latency, and you'll need to make certain settings to deal with it. Some musicians might find even very small amounts of latency unacceptable, so you'll also need an alternative strategy.
The second approach is to do all your monitoring using external hardware. For this you need a reasonably flexible external mixer or an audio interface with zero-latency monitoring and mixing facilities. DP is used to simply record and play back audio, all monitoring signals being set up on the mixer or interface. This approach resembles the 'traditional' studio monitoring technique that was the only option from the 1950s to the early 1990s. The best thing about it is that the live monitor mix is latency free. But there are disadvantages. You often need to look after two separate mixes — one in DP for the pre-recorded tracks and one on your hardware or audio interface's software mixer for live sources. Consequently, quick adjustments to the levels of pre-recorded and live signals are that bit harder to make. Also, if you want to add reverb to your live signal this will have to be supplied by an external unit, effects built into your mixer, or DSP processing built into your audio interface.
Finally, you can combine hardware and 'in the box' monitoring. This can suit some people very well, especially those using audio interfaces with zero-latency monitoring facilities but no onboard DSP for adding effects to monitor signals. The idea is to use a hardware mixer or audio interface to set up zero-latency monitor mixes, but at the same time use DP for effects, if needed, on the live signals. You get to enjoy zero-latency performance, and even though latency is unavoidable for reverb signals that come from DP, it simply manifests itself as a bit of pre-delay. Consequently, you can even safely use CPU-saving large buffer sizes. The down side is the challenge of essentially juggling three different mixes: one for the pre-recorded backing tracks, one for the zero-latency monitor, and a separate one (albeit not extensive) for the reverb signal.
We'll take each of the basic approaches in turn and look at DP's monitoring-specific features along the way. In each case we'll imagine a simple recording scenario: first of all, laying down an acoustic-guitar backing track whilst listening to DP's metronome on headphones, and then adding a vocal track while listening to the guitar backing. (If you want to try this out you can use any other live sources you like: just make sure you have a metronome click set up to play through your main hardware outputs and your sequence tempo is appropriate).
Audio Patch Thru Modes
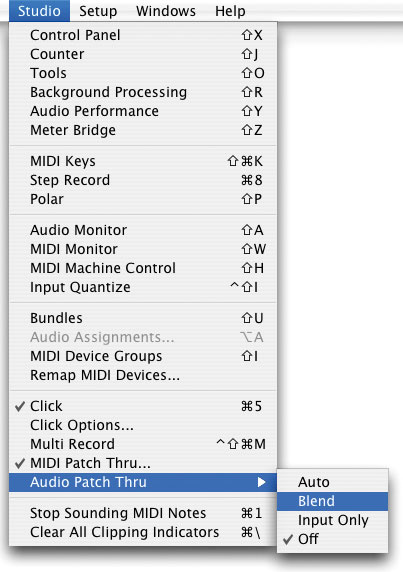 Audio Patch Thru, DP's live routing of a track's input to its output, is basically either on or off. But in fact there are four Audio Patch Thru modes and you choose between them in the Studio menu / Audio Patch Thru sub-menu. As I've described elsewhere, you might well select Off when you're doing all your monitoring on external hardware, as it keeps things simple. The other three modes all turn Audio Patch Thru on, but they also control what signals you'll hear when DP is in playback, or you're performing an Auto-Record but DP hasn't yet punched in. In Auto mode you hear only track audio on the run up to a punch-in, and your input during recording. In Blend mode you hear track audio blended with your own input in the run-up, and only your input during recording. In Input Only mode you never hear track audio, and only ever hear yourself. Auto mode is the default setting, but Blend and Input Only are very useful in different circumstances. Why not experiment to see what you or your musicians prefer?
Monitoring 'In The Box'
If you have zero-latency monitoring facilities available and want to try out this technique, disable them first. Then, in a new project, create a couple of mono audio tracks and configure them with the appropriate input to record from your mic, and your main output pair of channels.
You want DP to handle monitoring, so go Setup menu / Configure Audio System / Input Monitoring Mode, and in the dialogue select 'Monitor record-enabled tracks through effects'. This ensures that your input signal will pass through DP's MOTU Audio System before heading to the outside world once more, which is the key to this 'in the box' approach. Also, in the same sub-menu, go to the Configure Hardware Driver dialogue and choose a buffer size of 128 to keep latency at a workable level.
To get a monitor signal going we have to ensure DP will directly route audio tracks' inputs to their outputs. This is called Audio Patch Thru and it'll need to be enabled. Go Studio menu / Audio Patch Thru, and from the sub-menu choose Blend. (For an explanation of the other options, see the 'Audio Patch Thru' box.)
Now record-enable one of your audio tracks. Doing so makes Audio Patch Thru 'live' for that track, and you should hear your mic signal through your headphones. Now could be a good time to check the mic gain setting, so open DP's Meter Bridge and observe the input levels as you adjust your mic preamp's gain. When this is set, adjust your headphone volume control to an appropriate level.
We're ready to go. Hit Record and you should hear the metronome and be able to lay down your track. You can make quick changes between the relative levels of your input and the metronome click by adjusting the audio track's fader in the Mixing Board. Remember, there's a separate volume control for the metronome, accessible by double-clicking the metronome button in the transport Control Panel.
After recording, rewind, take the guitar track out of record-enable, then record-enable and set input gain for the vocal track. You can check the monitor mix by playing back your sequence and adjusting volume faders on the pre-recorded guitar track and the 'live' vocal track, altering headphone volume, if necessary, on your audio hardware. If your singer wants reverb on their live signal, put a reverb plug-in on the vocal track and set it up to suit. The wet/dry mix will be a crucial parameter. Because this reverb is applied as the signal is 'leaving' DP, it won't be recorded.
That's the basic approach for using DP to co-ordinate monitoring. After you've done your tracking, you might want to dive back into the Configure Hardware Driver dialogue box and set buffer size to 512 or higher, to ease CPU use for mixing.
DP5 Vs Earlier Versions
The fundamental monitoring principles I've described this month hold true for any version of DP, and indeed almost any DAW. But some specifics — the Audio Patch Thru modes, for example — don't apply to versions of DP prior to DP5. Previously, Audio Patch Thru was enabled globally by clicking a little 'headphones' button in the Audio Monitor window. If you're committed to DP4 (or earlier) you might like to check out my previous monitoring-related Performer feature from December 2005. You can find it at www.soundonsound.com.
Monitoring In Hardware
If software monitoring doesn't suit you, perhaps a hardware-based zero-latency technique might. For this you can use a hardware mixer or an audio interface with zero-latency monitoring facilities, such as MOTU's CueMix system.
To prepare DP for the same guitar-then-vocals recording task, go Studio menu / Audio Patch Thru and select Off. This means that when you record-enable a track the input will not be routed to the output, so DP itself will never contribute anything to the monitoring process. Instead, monitoring must be set up as a separate mix, using your hardware mixer or audio interface. In my own project studio setup I use a MOTU Traveler, which has the CueMix Plus monitoring system. So my approach would be to fire up the CueMix Console application and use its on-screen digital mixer to get a live feed of my acoustic guitar. On a hardware mixer you might do your monitor mix via aux sends, or if you have another manufacturer's audio interface, use the zero-latency routing software that's made for it.
In DP, record-enable your guitar track and check input level. Nothing monitoring-related happens when you record-enable, as Audio Patch Thru is turned off. With the input level correct, go for a take. DP's metronome outputs as usual, mixing with your live monitor signal. If you need to adjust the relative level of metronome and live signal it's probably easiest to change the volume of your zero-latency live mix using your mixer or monitoring software. Finally, take the guitar track out of record-enable.
Next, set up a monitoring signal for your vocal track. Check the monitor mix by playing the guitar track while rehearsing the vocal track. If the relative levels are wrong, be prepared to adjust the guitar track fader in DP, the zero-latency mix level and even DP's metronome volume, along with the overall headphone output. Now record-enable the vocal track and go for a take.
It's worth noting that if you had a lot of audio backing tracks in DP and needed to reduce them all in volume relative to your live mix, the easiest way would be to create a Master Fader Track for your main audio outputs, then use that to change the 'from DP' audio with a single fader.
Direct Hardware Playthrough
If you use a compatible MOTU interface, you might find you've an extra option in the Input Monitoring Mode dialogue box (in the Setup menu): Direct Hardware Playthrough. It's a nifty feature too. When you select it (and Audio Patch Thru is turned on) DP makes temporary CueMix routings on your interface to route track inputs to their outputs, with zero latency, using the fader and pan settings you make in the Mixing Board. This means that for many recording tasks you can take advantage of CueMix without ever booting up CueMix Console. Direct Hardware Playthrough routings are made in addition to anything you might have already set up in CueMix Console or on the interface itself, so 'zero' those first to avoid confusion.
Combining Software & Hardware Monitoring
This is the hybrid approach, using a zero-latency monitoring system but adding reverb or other effects to your live mix using DP.
In DP, ensure your Input Monitoring Mode is set to 'Monitor record-enabled tracks through effects', to use DP's effects processing in real time. Set Audio Patch Thru mode to Blend again, so DP can route audio track inputs to their outputs (which we'll need for a bit of vocal reverb). Then set up a zero-latency monitor mix on your mixer or audio interface, ready to record the guitar backing track, and record-enable the guitar track.
Something undesirable happens at this point: we get two monitor signals, one via the zero-latency mix and one via Audio Patch Thru in MAS (which could have a little or a lot of latency, depending on buffer size): almost certainly phasey-sounding, and not very nice! This guitar track is best monitored via the zero-latency mix, so in DP mute the guitar track to silence the Audio Patch Thru output. Hit record and lay down your track.
Now for the vocals. Take the guitar track out of record-enable and un-mute it so it'll play back. Set up a zero-latency mix for the vocal take and record-enable the vocal track. Once more there are two monitor signals, one with latency and one without, but this time you can use this to your advantage. On the vocal track in DP, instantiate a reverb plug-in, call up a preset, and set wet/dry mix to 100 percent wet. Now the zero-latency mix is providing a dry monitor signal and DP is providing a reverb signal. Adjust reverb level by dragging the vocal track's volume fader in the Mixing Board. When the balance is right, go for a take.
As I mentioned before, there are multiple levels to juggle with this approach: the live monitor mix, backing track levels, the metronome click track, and temporary reverb levels. But once you've established a working method it's pretty easy to co-ordinate. Changing the level of backing tracks with a Master Fader is not so suitable for this approach, as it'll also affect the monitoring reverb level. But a good alternative approach is to create a Track Group of your backing tracks and configure it so that one track's volume fader controls all the others.
In Next Month's Episode
Monitoring is such a big and important subject that it just won't fit in a single copy of SOS! Next month, we concentrate on monitoring in a bigger studio, working with multiple monitor mixes, and how best to use DP5's Input Monitor and Aux tracks.
News In Brief
- Leopard & DP: Following the release of Apple's newest operating system, OS 10.5, or 'Leopard', MOTU have updated most of their software. DP is now up to version 5.13, and introduces no noticeable changes, except Leopard compatibility. MIDI and Audio interface drivers are also now Leopard-friendly, and MOTU's virtual instruments need no updates as long as you have the most recent versions. All are available from www.motu.com. Life in Leopard seems good, too — the Finder is better all round, the QuickLook feature is superb for browsing folders full of samples, and there seems to be no performance penalty, at least on my dual-2GHz G5 and MacBook. The multiple-desktop Spaces feature is also promising, but DP's Consolidated Window scheme isn't quite settled with it yet. More on all of this next month. (We also have an extended Apple Notes column all about Leopard starting on page 218 of this issue.)
- Waves plug-ins for Performer? The situation regarding Waves plug-ins and DP has been quite confusing in recent times, with no official support for Intel Macs, and potential AU/MAS mix-ups on Power PC machines. At long last, though, Waves have released a special beta version Waveshell for DP users, compatible with both Power PC and Intel Macs. Interestingly, it's in the Audio Unit format, so it looks like it's the end of the road for DP-specific MAS versions — perhaps no bad thing. Version 5.9.7 installs new Waves plug-ins and a single AU Waveshell, and requires that you're a Waves Upgrade Plan subscriber, as it relies on the installation of an Enabler on your Waves iLok. www.waves.com


