The plug-ins that come with Pro Tools are more powerful than you might think.
All too often, people dismiss factory-supplied plug-ins in favour of third-party offerings — but a lot of the free plug-ins supplied with Pro Tools are great, and you can do a huge amount without spending money adding to them. Even though Avid arguably have a reputation for not being generous when it comes to giving things away, there are some gems that ship with Pro Tools that you should not ignore.
EQ III
The one-band EQ III plug-in is surprisingly useful. It uses very few processor resources, so you can use instances across every channel in your mix as versatile high-pass filters, for example, or to flip the polarity of channels where required — the Pro Tools mixer does not have polarity switches of its own, so it’s necessary to use a plug-in for this. In post-production work, or indeed on anything recorded on location, I will use it across every track to filter out all the low-end rumble.
The seven-band version is a great, neutral EQ plug-in with a friendly user interface that enables you to get good results very quickly. For me, it takes a lot of beating, and has the added advantage of being installed on every Pro Tools system, so there are never any problems when you’re collaborating with other users who might not have the same expensive third-party plug-ins as you. It is easy to get a telephone effect for vocals by just using the low- and high-pass filters, on the 24dB-per-octave setting. Adjust them until you are left only with the mid-range. Another thing you can do is to automate the frequency of the low-pass filter to give you that sweep effect you often get on dance tracks.
One last tip is that if you hold down Ctrl and Shift and then adjust a parameter, the plug-in will temporarily operate in band-pass mode as long as you hold down the modifier keys. As soon as you let go, the plug-in goes back to normal, but it’s a really useful feature to help track down problem frequencies.
AIR Vintage Filter
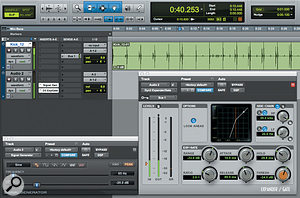
 In the setup shown in this screenshot, the Signal Generator and AIR Vintage Filter plug-ins combine to create a filtered noise rise.
You can use this plug-in on synths, guitars, bass, drums and anything else where you want to add character. By automating its controls, you can create familiar dance-music effects like filter sweeps, and to give you some ideas, I am going to show you a way of creating noise rises by combining the AIR Vintage Filter with two other factory plug-ins.
You can see in the screenshot that I’m using the Signal Generator plug-in as a sound source. You will find this in the Other submenu in the plug-ins list, but note that it is only available in mono and multi-mono formats, not multi-channel. In this application, you want to choose the White Noise option. Instantiate the AIR Vintage Filter plug-in in the next insert slot, and enable automation for its Cutoff control. Now draw a ‘sawtooth’ automation shape for this parameter like the one you can see in my automation lane. Try it first with the Resonance control off, then experiment with different settings for a more musical sound. You could even automate that control, to get more variety and character to the sound.
If you don’t like the way the sound cuts off sharply at the end of the sawtooth, you can try adjusting the automation so it isn’t a vertical line, but for me, the nicer solution is to use some reverb. In this example I have simply used the AIR Reverb plug-in with an RT time of over three seconds and maximum room size, but of course you could use any reverb plug-in you have at your disposal. Finally, try changing the Signal Generator to output pink noise: pink noise has much more low-frequency content than white noise, so the sweep effect will be a lot deeper and you will hear it earlier in the sweep.
Bomb Factory BF76
 BF76: beware the backwards controls!
There are a lot of plug-in versions of the brilliant Urei 1176 compressor, which has been used on more recordings than I’ve had hot dinners. You may think that the free one that ships with Pro Tools is not worth considering, but in fact it’s a great little plug-in which compares very well with some rivals costing hundreds.
Like the original hardware, the BF76 works differently from most normal compressors in that it has a fixed threshold control. To determine how hard the compressor will work, you adjust the input control: the more you turn it up, the more the signal exceeds the threshold, and the more compression is applied. The other slightly unusual thing is that the attack and release controls work backwards: on most compressors, you would turn the controls fully anti-clockwise for a very fast attack and release, but here it’s the other way around. Talking of very fast attack and release times, the 1176 is famous for its speed: push things too far and you can get distortion, especially on low frequencies. For a free plug-in, this is an excellent and very usable emulation of an 1176 hardware unit.
Signal Generator
Its primary application may be as a tool for creating test tones — after all, that is what it was designed for — but the Signal Generator plug-in does have some musical uses, as we have already shown with the AIR Vintage Filter. Another application is to couple it with a side-chained gate to give kick drums some real low-frequency energy. In the screenshot, I have a kick-drum track and a second track with the Signal Generator inserted on it. Another musical application for the Signal Generator plug-in: adding low end to a kick drum. I have set the plug-in to Sine Wave and set the frequency to 65Hz (you can play around with the exact frequency, and even set it to the root note of the key of the song if you want). Next insert an expander or gate plug-in: I have used the Avid factory plug-in, but you could use any gate as long as it has a side-chain key input feature.
Back on the kick drum track, I have set up an aux send to send out the kick drum audio to a bus, in this case bus 1. Now in the Gate plug-in, I’ve switched on the key input and set it to bus 1, then enabled the key input into the side-chain. When you play the track, the kick drum will open the gate and let a burst of the Signal Generator’s output through, then close. You can adjust the threshold, attack, hold and release to get the best sound for the gated tone.
Pitch II
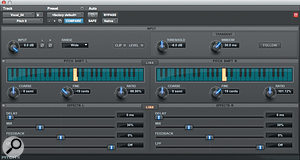
 Avid’s Pitch II offers a variety of widening effects.
A relative newcomer, Pitch II is a long-overdue replacement for Avid’s lamented Pitch plug-in, and is already a favourite of mine when mixing. You can use Pitch II to widen guitars, vocals and synths, or to change the pitch of an instrument in real time, and because it uses granular technology, it sounds remarkably good.
I am old enough to remember using the iconic AMS RMX16, and one of the settings that we used back then was ‘99s’, in which we took a track or an instrument and applied a stereo detuning effect, taking the left-hand pitch down to 99 percent and the right channel up to 101 percent. This creates a great thickening effect that works really well on all kinds of audio. I especially liked using it on brass, but it works on vocals, guitars and synth pads too.
We can reproduce the ‘99s’ effect described above using Pitch II, either as a send and return effect or, as in this case, by inserting it on a track. First, you need to unlink the pitch section, because we want to pitch down the left channel and pitch up the right. I have got very close to the ‘99s’ effect by setting the left ratio to 98.9 percent and the right to 101.12 percent (or 19 cents in both directions). You can adjust the Mix control to add as much of the effect as you like.
You can also experiment with adding small amounts of delay — try around 15ms — and using the low-pass filter (LPF) to take off some of the brightness from the effected signal. On guitars you can use much longer delays to get a slapback effect, and you can often get away with more extreme detuning and filtering too. It’s also worth experimenting with delinking the audio controls, so you get different amounts of delay, feedback and LPF on both sides. You could automate them to give you some extra colour and movement, too. This way you can end up with something very dreamy, more like a tape-echo effect.
Next month we will take a look at some more under-used plug-ins that come bundled with Pro Tools, such as Sansamp, Eleven Free and AIR Lo-Fi. Until then, have fun!


