 Screen 1: These layered vocal parts are clearly out of time.
For the most effective time correction in Pro Tools, you need to choose your weapon carefully...
Many of the features within Pro Tools were developed to solve perennial problems that arise during recording, editing or mixing. One issue that crops up time and again in the editing phase is the need to correct the timing of recorded audio.
There are three basic techniques that you can employ in Pro Tools. All have their places, and depending on your circumstances, there are times when each of them will be the best.
Cut & Shut
One of the most well–known editing tools in Pro Tools is Beat Detective, which in essence automates the process of chopping up an audio file at transients or ‘hit points’ and moving each little chunk into time. As the name implies, this tends to work best with drums and percussion, where you are aiming to get the start bang on the beat and the duration of the sound is unlikely to need modifying. However, it isn’t just for drums, as I demonstrated back in the December 2005 Pro Tools workshop, where I used Beat Detective to fit a piano part to an existing track. Once I’d created a correct tempo map, the technique worked surprisingly well.
Elastic Audio
Introduced in Pro Tools 7.4 back in 2008, Elastic Audio offers an alternative way to modify the timing of recorded audio, this time using one of a variety of high–quality time–stretching algorithms. In the January 2010 Pro Tools workshop I revisited my problem piano, this time using Elastic Audio to quantise the piano part rather than cutting it up with Beat Detective as I had done before. With a little work and the X–Form Elastic Audio algorithm, I was able to get an even better–sounding result.
Warp Speed
In this month’s workshop, we’re going to look at the third technique Pro Tools offers: Warp Audio. Screen 1 (above) shows a stack of three harmony takes of the same vocal part. As you can see, they are not all in time, and so they sound messy. ‘Vocal 1’ was pretty well in time with the backing track, so my plan was to take it as my reference and use Warp Audio to bring the other two takes in time with it.
To make things easier, the first thing to do is to separate each phrase out as an individual clip. If there are a lot of gaps to be cut out, you can use Strip Silence from the Edit menu, but depending on the settings and the audio, you might find it doesn’t identify the start of each phrase reliably enough. An alternative is to enable Tab to Transient using the button in the toolbar under the Trim button, then place the edit cursor at the start of the recording. Now, when you press the Tab key on your computer keyboard, the cursor will jump to the next transient and you can make an edit by pressing Command+E on a Mac, Ctrl+E on Windows, or hitting ‘B’ with the Keyboard Command Focus enabled. Next, delete the unwanted audio before the first phrase before moving onto the second phrase.
 Screen 2: I have manually edited the second and third track to put the start of each phrase in time, but timing discrepancies within the phrases remain.
Once that is all done, switch to the Grabber tool and move each phrase so that it lines up with the reference track. I’ve done this in Screen 2, and you can see they are much closer. However, the phrasing within each phrase doesn’t quite match, and this is where Elastic Audio and Warp Audio can help.
 Screens 3A–3C: These three screens show step by step the results of moving the two warp markers positioned next to the last and penultimate notes.Next we need to change the tracks into Elastic Audio tracks. Click on the Elastic Audio button, which is just below the Voice Allocation ‘dyn’ and Automation Mode (currently in Read) buttons, and you will see a pop–up menu offering you a choice of algorithm. Even with a monophonic source, such as the vocals in this example, it can be worth trying polyphonic mode as well as monophonic mode to see if you get better results. As you change the algorithm, each track will grey out for a short period of time whilst Pro Tools analyses the audio, but very shortly everything will be back online.
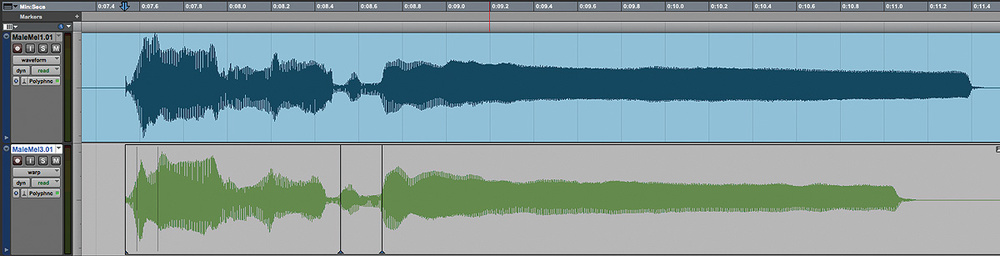
 Now change the track display from Waveform to Warp. You will see a number of warp markers: thin vertical lines which appear where Pro Tools has detected key points in the audio. Be careful: by default, moving one of these will cause all the audio after it to move left and right too! In this case, that isn’t what we want. Instead, hover over an appropriate warp marker and hold down the Shift key. The cursor will change mode: now, when you move the warp marker, Pro Tools will lock the markers both sides of it, and only stretch or squash the audio within these outer markers.
 Screen 4: Warping the last note to match the reference requires a lot of time–stretching, hence Pro Tools’ warning red flag.To demonstrate how this works in practice, take a look Screens 3A–3C. These show the last phrase, which clearly remains out of time even after the start has been lined up. First, holding down the Shift key, I will move the warp marker at the start of the last note so it lines up with the reference. The preceding note is also out of time, and moving this note later also has the advantage of stretching the first section and putting it in time.
Finally, I need to stretch the last sustained note so that it finishes at the same time as the reference. Pro Tools hasn’t created a warp marker automatically, so I need to add one. I place the cursor at the end of the note, right–click and select Add Warp Marker from the contextual menu. When I hold down the Shift key and move this, I can stretch the note to fit. Notice that a small section of the clip has turned red: this is the way that Pro Tools tells us that we have overdone the stretching or squashing. In this case, the red section is silence, so it’s not a problem.
Tightening up the timing on all the parts is just a matter of working through the tracks, lining up by ear and adding warp markers where necessary until it’s done. It may sound long–winded, but once you get into a pattern, you can work very quickly.
An Alternative: Revoice Pro
If you have to line up a lot of vocal tracks, you might want to investigate a third–party option: Revoice Pro from Synchro Arts (www.synchroarts.com). This is a stand–alone application that is integrated with Pro Tools and other DAWs using a plug–in. It can automatically match the timing of multiple audio parts to a reference, and will also match the pitch as well if you need it to.
 Revoice Pro and its associated AudioSuite plug–in within Pro Tools.
To use Revoice Pro within Pro Tools, you need an AudioSuite plug–in that will send the audio out of Pro Tools into a session in Revoice Pro. Highlight the reference audio, open the AudioSuite plug–in and the Guide option is already selected. Press the Capture button and and the clip is sent over to Revoice Pro. Now select the first of the other tracks within Pro Tools and you’ll see that the plug–in has automatically switched to Dub; press Capture, and this part will also be sent across to Revoice Pro. Revoice Pro then automatically analyses the audio and produces a time– and pitch–aligned version ready to send back to Pro Tools. With this automated workflow you don’t even need to look at the audio in Revoice Pro — just press the Spot button in Pro Tools and the processed version will be brought back in from Revoice Pro onto the selected track. Then you can repeat the process again for the third track and in a couple of clicks it’s done.
This technique is just scratching at the surface of what Revoice Pro can do. You can use it to create doubled tracks if you haven’t got them, as well as in audio post–production to get rerecorded dialogue to fit the original, so maintaining lip sync. You can use it to pitch correct audio as well. If you do a lot of this kind of work then Revoice Pro is well worth taking a look at. But hopefully I have also shown that it is possible to get different audio takes in sync with each other just using the tools that are built into Pro Tools.


