Let's face it, patchbays are a pain: there's never enough room for decent labels, they take ages to wire up, and just when you think everything is fine, the damned contacts go all intermittent on you! What's more, most people resent spending good money on gear that doesn't make interesting noises! Yet the alternative of not using patchbays is even worse — your studio quickly turns into spaghetti hell.
One of the first British companies to build serious but affordable patchbays was Signex, whose original Isopatch managed to squeeze 22 pairs of quarter‑inch jack sockets into 1U of space. They also pioneered the replaceable label strip, which is still used on their current models. When the competition designed the 24‑pair jack patchbay using reversible circuit boards for selecting normalised or non‑normalised operation, the rest of the marketplace seemed to follow, but although such designs are very competitively priced, the socket positioning severely restricts the amount of space left for labelling, and if a jack is inserted too hard, the board may come loose.
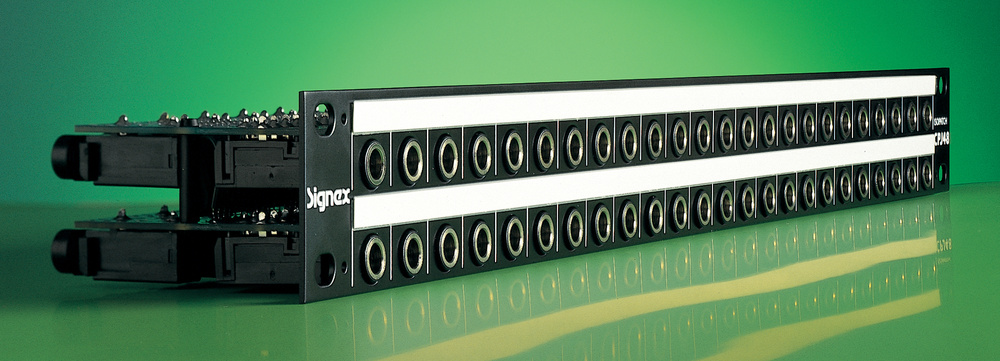
The new Isopatch CPJ48, which supersedes the original Isopatch, gets around all these problems by using fully enclosed, low‑profile TRS jack sockets mounted onto two printed circuit boards, rather like the original model, and these are linked via loops of ribbon cable so that the unit can be opened for socket replacement if necessary. The same type of socket is used for rear connection on the review model, though hard‑wired and phono rear connection versions are also available. All the signal grounds are isolated and there's a chassis ground point for earth‑bonding if required.
One circuit board holds the upper row of sockets and the other the lower row; both boards are fixed with screws to a metal U channel bonded to the front panel, and the sockets themselves seem to be positioned slightly lower than on other patchbays, which leaves more room for the top label strip. The enclosed sockets mean there is less risk of dust collecting on the contacts, although over time, the contacts may tarnish or pick up dirt from jack plugs. As with other patchbays, a quick blast of contact cleaner should help if this happens.
What's Normal?
Obviously you can't turn the individual socket pairs around to normalise them, so instead, the original Isopatch system of applying a blob of solder between the two halves of a 'split' circuit board pad has been adopted. There are five pads per pair of sockets and three of these need to be 'blobbed' to normalise each socket pair. The reason there are five pads is so you can choose to have the patchbay fully normalised or semi‑normalised, and full instructions are provided both in the manual and on the back of the patchbay itself.
Most applications, such as insert points, require semi‑normalised socket pairs, whereas outboard gear inputs and outputs need no normalisation. To de‑normalise a socket normalised by mistake, the solder blob must be removed — something best done with a solder sucker or piece of solder wick. Personally, I like this method of normalising, as it's a lot quicker than having to pull out circuit boards, remove the nuts, reverse the boards, and then replace them.
Solder pads are also provided for the benefit of those wishing to hard‑wire the back of the patchbay rather than using the quarter‑inch jack sockets provided. Hard‑wiring is clearly time‑consuming, but it provides a more reliable connection and saves you the cost of 48 jack plugs for every patchbay you wire! It's also around 20 pounds cheaper to buy the 'rear solder' patchbay version that has no rear jacks. Further evidence of Signex's ingenuity comes in the form of a simple mod that involves cutting a circuit track and adding a wire link; after performing this simple procedure, you can use standard stereo leads to connect to console insert TRS jack points rather than the usual 'Y' lead. This involves a little soldering, but is infinitely less hassle than making up lots of 'Y' leads.
Labelling is via a strip of card that slides into a flattened, transparent plastic tube on the front panel. There is one label strip per row of sockets, and changing labels is simply a matter of inserting a new cardboard strip (several spares are provided). I'd also like to mention that the brief manual provides some practical guidance on planning and wiring your patchbay system and the concept of normalisation is clearly explained.
Summary
Signex's Isopatch CPJ48 is slightly more expensive than the usual budget patchbays, but is extremely solidly built, and the enclosed jack sockets should help extend the working life of the unit. According to the spec sheet, the normalising contacts have a rated life of at least ten thousand insertions. The labelling system is simple but very effective, as is the method of normalising individual socket pairs. The company make budget patchbays if that's what you want, but if you have a system that is used on a regular basis, the more professional Isopatch CPJ48 might be more cost‑effective in the long run.
Pros
- Plenty of labelling space.
- Fully enclosed jacks.
- Very rigid.
- Several normalising options.
- A simple mod enables a single stereo cable to be used to connect to a console insert point, rather than the usual 'Y' lead.
Cons
- Replacing faulty sockets is not quite as straightforward as with simpler designs.
Summary
The CPJ48 incorporates all the best ideas of the original Isopatch, as well as several significant improvements for roughly the same cost per socket.