 To counteract some variability in the degree of proximity-effect bass boost on the recording, Mike used a band of dynamic EQ from ToneBoosters' TB_FLX to compress with a soft knee at 330Hz.
Our engineer applies his mixing chops to put a professional sheen on an unrepeatable vocal-and-piano performance.
A little while ago, I was approached by singer-songwriter and vocal coach Michaela Betts (www.michaelabetts.co.uk) for advice on mixing a performance by talented young singer Alessia McDermott (www.belfieldandward.co.uk/actor/alessia-mcdermott). It was a recording of a simple piano plus voice arrangement which had come out of a vocal coaching session, and although Alessia had used a high-quality Bock 195 large-diaphragm condenser mic, the intention was always to re‑record her 'final' vocal at a later date. As is so often the case, however, there's no controlling inspiration, and subsequent efforts to capture a more refined version were frustrated — there was something special and unrepeatable about the original demo. The problem for Michaela was that she didn't feel she could quite get the mix sonics of this recording to compete well enough with songs of a similar genre — like Adele's song 'Hello', for instance. So she sent me over the raw piano and vocal tracks, and I loaded them into my Cockos Reaper DAW system to see what I could do.
Technical Fixes
The vocal was overdubbed against the piano backing, so there was no spill at all between the two tracks, bar a small amount of headphone bleed that was insignificant in practical terms. Given that this was an obviously vocal-led production, I chose to start off with the singer's track in isolation, the aim being to get the best out of that first of all, and then fit the piano around it as necessary. The first thing I noticed was that there was a fair amount of rumble coming through the mic — not an uncommon problem outside the confines of a purpose-built studio space. Fortunately, it's something that's pretty straightforward to deal with using high-pass filtering. The main concern is judging the filter's cutoff frequency and slope such that it doesn't inflict too much collateral damage on the singer's tonal warmth, especially in arrangements such as this which take advantage of the kind of lovely smokey low-register notes that performers like Alessia can conjure up. The mic's close positioning played into my hands a little, as the cardioid polar pattern's proximity-effect bass boost had slightly overemphasised the low end of the vocal; losing a little of this emphasis to the high-pass filter was no great loss in the grand scheme of things. As such, the default 12dB/octave filter of Reaper's bundled ReaEQ plug-in set at 145Hz was perfectly adequate to achieve the necessary rumble reduction without excessively thinning the singer's low mid-range tonality.
In the event, though, I chose to steepen the high-pass filter for a different reason. Whether because the singer was so close and on-axis to the mic, or because no pop shield had been used, jets of breath from a number of consonants were hitting the mic diaphragm to create strong low-frequency blasts in the audio signal. The most noticeable were on 'p' sounds, but there were also instances on some aspirated 'wh', 'h', and 'cr' consonants too. Now, this is obviously the kind of thing that's best tackled with adjustments to mic technique under normal circumstances, but it's also usually possible to fix retrospectively with high-pass filtering, just so long as the air flow over the diaphragm isn't so severe that it drives the input-chain circuitry into distortion or produces bucketloads of upper-spectrum turbulence noise. Luckily, the blasts here were primarily a low-end issue, so just steepening the high-pass filter to 24dB/octave was enough to address them.
Improving Tonal Consistency
Another concern relating to the proximity-effect bass boost was that Alessia was moving a bit while performing, as most singers naturally tend to do. Thus her distance from the mic, and therefore the degree of low-frequency tip-up, was changing in real time. You'll hear this on most vocal recordings to an extent, but I'm guessing that it was exacerbated here by the comparatively close miking position. (Proximity-effect variations for a given movement become more extreme the closer you get to the mic.) One way to compensate for this at mixdown is to automate a low mid‑range EQ band, and then even out the tonality by ear syllable by syllable. But that's a bit tedious on a full-length vocal track, so I prefer to use a dynamic EQ band instead. My favourite plug-in for this is ToneBoosters' affordable TB_FLX, and I used that to set up a 330Hz peaking band with a soft-knee compression action. For this application, I don't like to have the dynamic EQ's attack time too fast — that can make an exposed vocal like this feel slightly 'flattened' — so I left that at its default 50ms value. That said, I sped up the release to 50ms, to make sure the EQ cut didn't linger on to affect any syllables it didn't need to.
By this point, the tonality was already beginning to feel more stable. But there were moments when Alessia opened up from a breathier delivery into more of a chest voice, at which point some of the mid-range resonances of her vocal cavity began to dominate the tone. This is another thing that's very common, even on 'proper' studio vocal recordings, but it tends also to be strengthened when the mic's used close up. Increasingly, I handle this by applying region-specific EQ to the over-strident snippets, but in this project the transitions between the different vocal characters were so fluid that I decided instead to use SKnote's SoundBrigade spectral resonance processor to track them dynamically. SoundBrigade is a quirky little plug-in which provides an array of 25 equally spaced narrow dynamic EQ bands, and one of the things you can get it to do is rein in strong spectral peaks such as vocal resonances. Just like regular dynamic EQ, it's not something you want to get too slap-happy with, because too much spectral 'flattening' can rob a vocal of all its presence and body, but in moderation it can really help improve a vocal's consistency of tone.
Controlling The Dynamics
When you're trying to extract maximum detail and intimacy from an upfront lead vocal, there's a strong temptation to just hammer it into a compressor and hope for the best. The downside of that approach is that any improvements in level control and detail are frequently outweighed by the combination of unnatural gain-pumping side-effects, and distractingly overemphasised consonants! For this reason, I chose to use parallel compression, sending from the main vocal channel to a heavily driven high-ratio instance of Stillwell Audio's Major Tom, and then mixing that judiciously with the uncompressed signal.
 Stillwell Audio's fast-acting Major Tom compressor plug-in worked well in a parallel configuration to bring out the low-level details in the vocal part, although it did need some de-essing following it in the processing chain to prevent noise consonants becoming too distracting.
A big advantage of parallel compression is that it allows you to draw out lots of engaging low-level information without stomping the signal peaks into the dirt at the same time. However, the unique personalities of specific models of compressor tend to become more apparent under such a strenuous workout, so it's important to experiment with a few to find those that suit your own tastes. I often find myself gravitating towards Major Tom's assertive peak-sensitive feed-forward mode in this application, because of the sense of confidence it seems to add to vocals, but I've also used plenty of other compressors for this in the past.
You have to be wary when critically auditioning a parallel compression setup, though, because fading the compressed signal into the mix inevitably makes the combined vocal sound appear louder — it's very easy to fool yourself into favouring the compressed signal purely on account of loudness bias (the natural inclination of us humans to assume that anything louder sounds better). So what I like to do is route the uncompressed vocal and its parallel compression channel to their own group channel, and then compare that group channel with a duplicate of the uncompressed vocal channel on its own, which allows me to bring down the group channel's fader level to mitigate the effects of loudness bias during comparison. Once I've decided how much compression I want under those conditions, I can jettison the duplicate vocal channel and get on with the rest of the mix.
 ToneBoosters' simple but effective TB_DeEsser plug-in.With the help of that comparison technique, I dialled in enough compression to achieve the additional performance detail I wanted. But despite the aforementioned advantages of the parallel setup, there were still some unwanted side-effects. Specifically, the noise consonants, which were already quite fierce on account of the close on-axis mic positioning, were being aggravated by the compressor's fast release. This aspect of Major Tom's functionality is preset, so there was no way to change it. (I wouldn't have wanted to anyway, as I knew it was integral to the plug-in's ability to enhance fleeting performance details.) Instead, I inserted ToneBoosters' simple TB_DeEsser plug-in after the compressor (in the parallel compression channel's plug-in chain), and hit that fairly hard to redress the balance.
An inherent feature of parallel compression is that it won't control level peaks. So when I decided that I wanted just to restrain a few of the more accented syllables, I knew I'd have to add another compressor to the vocal's group channel. I chose Stillwell's The Rocket compressor, shaving 2-5 dB off the loudest peaks at its lowest 4:1 ratio setting. This left me with a dry vocal that seemed to have decent musical dynamics and sonic consistency, but also a subtle dose of mainstream 'hype' and immediacy. I was cautious of pushing the processing too far at this point — I wanted a chance to fill out the rest of the mix first, and compare it with some appropriate commercial reference material.
Piano EQ For Three Reasons
 The three bands of EQ you can see here on the piano track all serve different purposes: the low shelving boost is compensating for the lack of a dedicated bass instrument; the 330Hz cut is avoiding a woolly mix-tonality build-up between the piano and vocal; and the 2.5kHz cut is to push the piano behind the vocal in the front-back dimension.Bringing up the piano fader and considering its relationship to my newly processed vocal, I ended up using ReaEQ to apply three EQ bands to the piano track, each for a different reason. These days, most mainstream song productions have a good deal of low end, with one or two powerful bass-register instruments dedicated to supplying that energy. Acoustic pianos aren't normally called upon to fulfil that role in chart mixes, so many recorded piano sounds are deliberately quite restrained at the low end —this prevents them interfering with the better-defined low-frequency contributions of things like synth basses and bass guitars. With this in mind, I often find myself hiking the low end of pianos when there's no other bass instrument supporting them in the mix, which is what prompted me to add my first EQ band: a 5dB shelving boost at 125Hz.
My second EQ move was derived from observing that the piano's dense lower mid-range spectrum was combining with the singer's 'warmth' frequencies to make the combination feel a touch woolly. There was no doubt in my mind which of the two sounds benefited more from that frequency region, so I EQ'ed 3dB out of the piano at 320Hz to clarify the overall mix tonality. The final EQ band, a 3dB cut at 2.5kHz, was more a question of depth perspective. The problem is that our ears are extremely sensitive to this frequency region, so it's very good at making instruments seem upfront and present in any mix. The piano timbre had a slightly hard edge in that zone, such that it felt like it was competing with the vocal for the foreground real estate, whereas with the EQ it tucked itself more sensibly behind the singer in the front-back dimension. (For similar reasons I also added a light touch of EQ boost to the vocal in that range, although I used Sonimus SonEQ Pro for that, because I like the smoothness of its high-frequency boosts.)
 Mike's compression on the piano used a very low ratio in conjunction with a low threshold and fairly fast time constants in order to gently squeeze the instrument's entire dynamic range. It may look like it's compressing quite heavily, but in practice it sounds a lot more transparent than it looks!In addition to the EQ, however, I felt that the sparse piano arrangement might also benefit from some sustain enhancement, just to keep the tails of the longer held chords from receding too much in the balance. This is another job I'll often attack with parallel compression, but in this case I achieved a similar result with a regular insert configuration, adding an instance of Reaper's built-in ReaComp directly to the piano track. Since I wasn't wanting to rebalance the musical phrasing, I just set up a gentle soft-knee squeeze with a 1.2:1 ratio, and adjusted the threshold so that chords triggered 2-5 dB of gain reduction apiece. This might seem like quite a lot, but such super-low ratios cause the gain-reduction to track the piano's natural envelope quite closely, so there are far fewer undesirable processing artifacts than you might expect from those kinds of meter readings!
Reverbs & Stereo-widening
 and distancing the effect with heavy cuts to the reverb return channel's upper spectrum.") To keep the singer upfront in the mix, the vocal reverb was tweaked to avoid merging with the dry vocal sound. This involved using a less natural-sounding algorithm (based on an electromechanical plate reverb device) and distancing the effect with heavy cuts to the reverb return channel's upper spectrum.
To keep the singer upfront in the mix, the vocal reverb was tweaked to avoid merging with the dry vocal sound. This involved using a less natural-sounding algorithm (based on an electromechanical plate reverb device) and distancing the effect with heavy cuts to the reverb return channel's upper spectrum.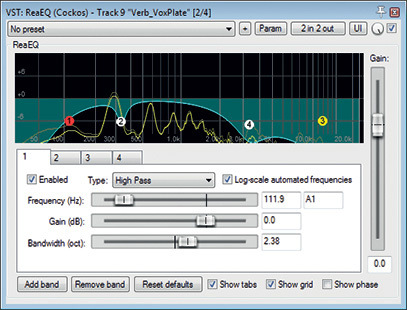 A slow, sultry piano ballad like this one begs for a bit of reverb flattery, and I figured it made sense to draw inspiration from the Adele reference that had already been name-checked. I followed that lead by using a fairly neutral-sounding hall patch from Lexicon's PCM Native Random Hall plug-in for the piano. It's par for the course that I have to tweak a few parameters on any reverb plug-in to get the best out of it — or at least I have to surf a few presets! On this occasion, though, I totally lucked out, because the plug-in's default preset ('Large RHall1') worked like a dream straight away. The rather nondescript, but nonetheless natural-sounding reverb character blended very nicely with the direct sound, giving it extra warmth, sustain and width, and also pulling it further back away from the singer. Mission accomplished — even if I can't take much credit for it!
The vocal reverb required a more concerted effort from me, because I wanted warmth and sustain again, but this time without distancing the voice from the listener. I find it easiest to pull this off with a less natural-sounding reverb algorithm, since it retains more of its own independent identity as an audible 'effect' for the listener, weakening it's ability to merge with the dry sound and drag that backwards into the mix. The 'Large Plate 1 (dark)' preset in Lexicon's PCM Native Plate plug-in provided my raw material, but I extended the algorithm's decay for better sustain, as well as lengthening the pre‑delay to help maintain the singer's upfront mix position.
Another tactic to keep a reverberant vocal upfront is to make the reverb more distant-sounding — in effect, separating the dry and wet mix components by increasing their sonic contrast. The easiest approach is to cut some presence and general high end from the effect, so for I applied a deep 7dB cut at 3.3kHz to the vocal's reverb channel, and also engaged an 11kHz low-pass filter. Even with these HF cuts, though, I felt the sibilant consonants were hitting the reverb too hard, so I also de-essed the reverb send quite assertively using another instance of TB_DeEsser.
Stereo widening offers further potential for bringing vocals more to the front of the mix, because a wider vocal image can imply psychologically that the singer is closer to you. For this, I turned to my usual Harmonizer-style send effect (a stereo pitch-shifted micro-delay that's appeared frequently in my Mix Rescue articles), as that usually works well on vocals, although I made a point of using Voxengo's freeware MSED plug-in to reduce the middle signal of the widener's effect, in order to minimise phase-related tonal interactions with the centrally panned dry vocal.
Finishing Touches
As with most projects, I spent some time at the end of the mix process refining the balance using detailed fader automation. Some issues were technical ones, such as rebalancing breaths that had been overemphasised by the compression, or reining in particularly strong 's' consonants. Others were more to do with overall balance and intelligibility of the vocal line, for example making sure the singer didn't feel like she was wandering around while singing, and that we could identify every word even under adverse listening conditions. But there were also plenty of moments where level rides provided me a means of bringing out lovely internal details in the performance that helped intensify the emotional power of the performance itself.
Returning to the commercial references, I was pleased to find that the mix sounded much more competitive overall, with the one exception that the high frequencies of the vocal timbre felt a little less 'hyped' than the current norm. So, as a final touch, I boosted the vocal a few decibels with SonEQ Pro's 12kHz shelf and added another decibel of 6kHz in Stillwell Audio's Vibe EQ. The difficulty with EQ is that it brightens not only the steady-state vowel sounds but also any noise consonants, breaths, lip noises, and so forth — all of which can quickly start grating on the ear. So it's usually necessary to make the high frequencies more consistent at the same time. With noise consonants, for instance, the quickest solution is to get a de-esser involved (I used ToneBoosters' excellent TB_Sibilance), but in extreme cases you may need to split the consonants off to a separate channel to get enough independent control over them.
 One way to deal with lip-smack noises on a vocal recording is to zoom in so you can see the individual click transients, and then low-pass filter them with region-specific EQ processing — as you can see in the yellow-coloured regions of this screenshot.I usually prefer tackling lip noises with audio edits, either by using copy/paste tools to patch over offending audio fragments, or by applying region-specific low-pass filtering to their little fleeting transients (which you'll see clearly if you zoom the waveform in far enough). Another option, if you have it, is to use a specialised de‑clicker of the kind used in restoration tasks, although I'd caution against applying it as a set-and-forget processor — much better to process just small sections of audio, so that the algorithm doesn't start stripping out transient details indiscriminately. As for breaths, those can be very effectively smoothed using low-pass filtering, but I'd normally set the cutoff frequency higher than when removing lip noises, seeing as I'm just trying to tone them down, not eliminate them completely.
The Proof Of The Pudding
At the end of the day, the sound of any mix has to speak for itself, so please check out the audio examples I've posted at Mix Rescue Audio 0219 and judge the results with your own ears! If you like what you hear, then do try out some of the techniques I've suggested above, because most of them have proved their worth across a range of styles in my own work, not just when mixing sparse duo textures like this.
Stacking High-pass Filters
I do the majority of my EQ'ing with Reaper's built-in ReaEQ plug-in. Although it's commendably flexible in many respects, one option it doesn't provide is a slope selector for its high-pass filters — they're fixed at 12dB/octave. However, there is a workaround for this, in case you find yourself in a similar situation in your own mixing system: simply stack up more than one filter at the same cutoff frequency. If you stack two 12dB/octave filters, they act like a single 24dB/octave filter; stack three and you get a 36dB/octave slope; and so on.
Remix Reaction
 Vocal coach Michaela Betts.This month, Mike helps vocal coach Michaela Betts buff a vocal demo to compete sonically with commercial releases such as Adele's 'Hello'.
Michaela: "What strikes me more than anything is that you have nailed the mix! The piano and vocal can be heard clearly and do not fight, yet I am not struck by there being any compromise in either. The piano is fuller, and the vocal sits in its own space larger than ever. The overriding impression: your mix is smooth and more inviting.
"Overall, I feel very optimistic going forward, because you've helped me see mixing in a new way, and I can see how this will influence my approach to all instruments I have to work with."
AUDIO EXAMPLES
It's all very well reading about how Mike approached this mix, but you can also hear the mix for yourself if you download the ZIP file of hi-res WAVs, low-res MP3s and accompanying notes. Or check out the audio examples posted at Mix Rescue 0219 Audio and judge the results with your own ears.
Download| 118 MB