Steven Slate's drum samples are already a staple of rock and pop production. Their latest product makes it easy to use these to augment or replace live drum parts.
Steven Slate Trigger is a drum‑replacement plug‑in that combines some clever hit‑detection algorithms with a library of replacement drum samples taken from the impressive Steven Slate Drums collection. It can also output MIDI messages for triggering external sample players, but as some DAWs don't support the sending of MIDI data from processing plug‑ins, you can also use your own samples from within Trigger's player, and even set up your own multisample sets using the free Trigger Instrument Editor software, downloadable from the slatedigital.com web site. Using the supplied samples is often the preferred option, however, as the sets have been designed to minimise phasing issues when samples are layered. Where your DAW supports the sending of MIDI data to processing plug‑ins, Trigger may also be used as a sample player for its included samples.
On first opening the plug‑in, you'll need to select a file path to the sample folders, after which they appear every time. A browser window lets you peruse your samples, load them, load existing presets and save new Trigger presets comprising the loaded samples and their settings. The drum samples are arranged in folders by type — kick, snare, toms and so on — and samples can be loaded into any one of six slots. This arrangement permits up to six samples to be layered simultaneously, and the library includes phase‑accurate sample sets that can be layered without the risk of frequency cancellation. Where sounds from different sets can't be guaranteed to be phase‑accurate, the manual tells you. Trigger has its own, data‑compressed sample file format (.tci), but you can use third‑party drum samples as long as they are in WAV or AIFF format.
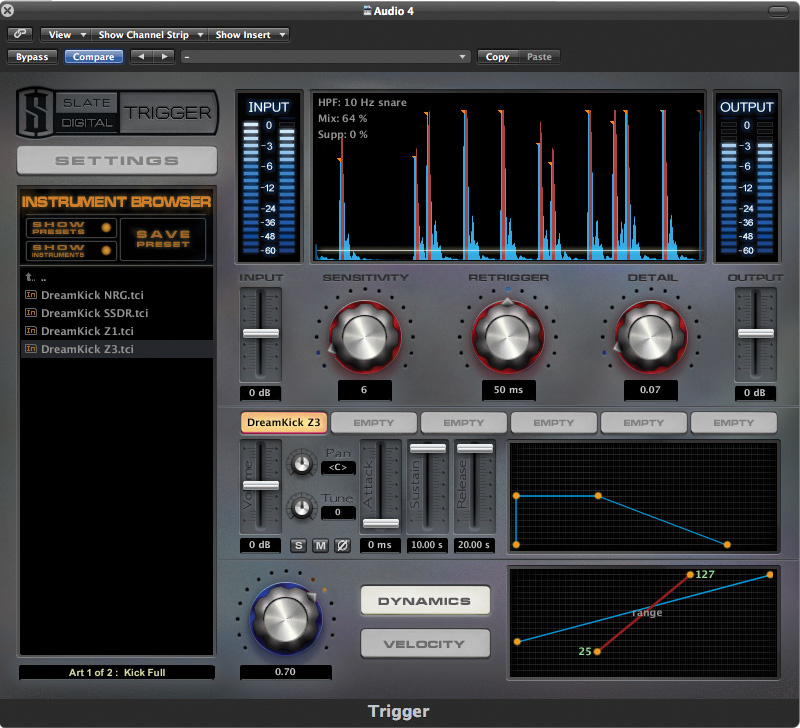
To the right of the browser is the main display. This shows the incoming waveform from the drum track you wish to replace or augment. So as to capture only the intended hits, while keeping the dynamic range as wide as possible, the input level slider should be adjusted so that the loudest hits are close to the full screen height. Hits resulting in a trigger are displayed with a small orange flag on top, and a red area to the right corresponding to the retrigger inhibit time, which is set using the large Retrigger dial.
The Sensitive Type
Setting up Trigger is not unlike using a gate: you set a threshold or Detail value that distinguishes 'wanted' hits from spill and noise, then set a 'retrigger inhibit time' to prevent unwanted flam‑like retriggering directly after a hit. The Detail value is shown as a horizontal line across the display, representing an absolute level below which no triggers will be detected. However, there is also a Sensitivity control, which helps to minimise triggering on low‑level spill for signal levels above the Detail threshold. Where bleed from other drums exceeds the Detail threshold, you can set a lower Sensitivity to prevent it from generating triggers, but at the same time you may lose wanted low‑level detail if the performance has a very wide dynamic range, so this parameter needs to be set according to the drum track's original dynamics. According to the designers, you may need to lower the Sensitivity value if you find kick drums causing double triggers, though I found that setting a longer retrigger time often solved this sort of problem. Where the level of background spill and noise is very high, triggers can actually be generated before the original hit — again, something that can often be solved by lowering the Sensitivity value.
The Mix control adjusts the balance between the original track and the samples being triggered, while the Output Level control sets the volume of the triggered sample or sample layers. The Leakage Suppression function is one of Trigger's secret weapons, allowing more reliable triggering in the presence of spill — but I'll come back to that later. There are also some important settings in the top left‑hand corner, including a built-in high‑pass filter that can help improve separation between drum sounds. As you adjust the frequency, the text changes to tell you what drum the setting might be suitable for.
The lower half of the window is where you adjust parameters relating to the sample playback. Though the outputs from the six sample instrument slots can be mixed, there's no separate mixer page: the volume slider always adjusts the level of whichever of the six is currently selected. Similarly, pan, solo, mute, phase invert and envelope settings always relate to the selected instrument. Envelope adjustment provides control over a drum's attack, sustain and release characteristics, with a graphical display of the envelope parameters. Each of the six instruments has its own independent dynamics and velocity curves, which define how closely the dynamics of the replacement samples should reflect those of the original source.
All the Steven Slate sample instruments have articulation presets, referred to in the manual as modes. Kick drums and toms have two modes, the first containing a full set of velocity layers and the second omitting the quieter hits. Snare drums have four modes: all velocity layers; full dynamic rimshot; soft mode, missing out the louder hits; and hard mode, omitting the softer velocity layers. These can save on both loading time and memory if you only need loud or soft hits. An Articulations/Modes display shows the number and name of the instrument articulations or modes, and you can change mode either by using the mouse or automatically via plug‑in automation or MIDI Continuous Controllers (set up via the Settings menu).
The samples are categorised into several groups. With up to 127 velocity layers per hit, the Z1 mono samples combine overhead and close miking, but if you prefer something a little more processed, the Z2 mono snare samples have some dynamic compression to make them easier to place in a mix, while the Z3 samples were recorded with close mics only. SSDR are stereo samples with ambient room mics plus a little creative post‑processing, which can sometimes be quite obvious. However, these samples are designed to layer well with the Z1 mono samples. The NRG samples were recorded in a large room at the NRG North Hollywood Recording Studio, using room mics, and so are pretty ambient. These have no further processing.
Most samples can be mixed, other than the Z1 and Z3 categories, in which phasing issues are likely. The designers recommend choosing either Z1 or Z3 samples and then blending these with the NRG or SSDR room samples. You can also mix multiple Z1 samples or multiple Z3 samples.
Fix That Leak
Trigger has two detection modes, designated Accurate and Live, and either may be used with or without Leakage Suppression. Live mode has minimal latency and is designed for real‑time use, whereas Accurate has 11ms latency but offers the best dynamic tracking. Where the host application has latency compensation, it is necessary to re-instantiate the Trigger plug‑in after switching between detection modes, so that the DAW can update its plug‑in delay information.
The secret weapon in Trigger's arsenal, as I said earlier, is its Leakage Suppression capability. Like most good ideas, it is so simple that you wonder why somebody didn't think of it already. In essence, you take feeds from the sources that are responsible for the spill, and feed these into the detector side‑chain to cancel out the spill on the track being processed. So, for instance, if you're having problems with hi‑hat leakage on a snare track, you could send the hi‑hat mic or perhaps the overheads to the side‑chain. Of course, this assumes that you've recorded all your drums on separate tracks, but that's a prerequisite for reliable drum replacement anyway.
You set this up by putting Trigger in an aux track, then sending the drum part you're processing to the left input and a mix of the drums that are causing spill problems to the right input. In this mode, the blue waveform depicts the original track, and the red portions show where Leakage Suppression is taking place. You then adjust the levels of the spill signal and overall Suppression level until the red peaks are slightly higher than the leakage peaks. When adjusted correctly, this also allows the Detail control threshold to be set lower than usual. The high‑pass filter can also be used at this stage to further improve separation if the drums are at very different pitches. This procedure works very well, though it can take a while, as you need to make separate level adjustments for each source of spill.
Using Trigger
With the typical amounts of spill expected when close‑miking a drum kit, Trigger works pretty well using its default 'non suppression' mode, with the Detail level set so that it's just above the spill floor. The Sensitivity control is generally best at around 50 percent, but higher settings may be needed if the parts have unusually wide dynamic ranges. It is worth pointing out that Trigger is very good at following the levels of the original drum sounds, even where the dynamic range is fairly wide, and if the parameters need adjusting for specific parts of a track, you can always automate them as you can with most plug‑ins. One instance of Trigger is required for each drum-mic track, and the sample-hit replacements come out on the same audio track.
 and Trigger's replacement. The timing is very precise, but in this case it might be better to manually flip the polarity.") This screen shows the original kick drum hit (top) and Trigger's replacement. The timing is very precise, but in this case it might be better to manually flip the polarity.When layering the sound with the original, it seems unreasonable to expect perfect phase accuracy, because the exact trigger point will depend on the threshold setting and what else happens to be playing at the same time. Even so, Trigger manages very tight timing, and often produces better‑sounding results than aligning the waveforms visually. In the screen above, for instance, you can see that it places the replacement sample starting in perfect sync; however, its initial transient is opposite in polarity to the original kick, which highlights one area where manual intervention may be required. Trigger doesn't adjust the polarity of its samples to match the original drum hit, so if you come across this problem when mixing the original hit with samples, you should invert the polarity of the source track before setting Trigger to work. Normally a kick drum will start with a positive‑going waveform, assuming that it is miked from the front and there are no inversions in the recording chain.
This screen shows the original kick drum hit (top) and Trigger's replacement. The timing is very precise, but in this case it might be better to manually flip the polarity.When layering the sound with the original, it seems unreasonable to expect perfect phase accuracy, because the exact trigger point will depend on the threshold setting and what else happens to be playing at the same time. Even so, Trigger manages very tight timing, and often produces better‑sounding results than aligning the waveforms visually. In the screen above, for instance, you can see that it places the replacement sample starting in perfect sync; however, its initial transient is opposite in polarity to the original kick, which highlights one area where manual intervention may be required. Trigger doesn't adjust the polarity of its samples to match the original drum hit, so if you come across this problem when mixing the original hit with samples, you should invert the polarity of the source track before setting Trigger to work. Normally a kick drum will start with a positive‑going waveform, assuming that it is miked from the front and there are no inversions in the recording chain.
On the subject of precision, Steven Slate told me: "The goal of our plug‑in is not only precise triggering, but we were looking somewhere beyond sample‑accurate precision. The idea is to analyse the source‑signal transient envelope and use a special real‑time optimised correlation algorithm to detect the 'meat and juice' part of this transient. So triggering is performed not at the very beginning of the transient, and not in the envelope peak, but somewhere in between, according to the shape of the initial transient. We found that this approach worked best on the majority of our test drum recordings. The best thing is that this approach delivers much better results on bad tracking, compared to triggering at exact transient start.”
Conclusions
Trigger can be used at a very basic level to achieve great results with minimum effort, and its library of high‑quality drum samples can save you a lot of time spent searching for suitable alternatives. If you haven't heard any of Steven Slate's drum samples before, I have to say they're up there with the best, and by layering the various room sound samples with the dry hits, you can create just about any type of drum sound. Chances are you won't need to go hunting around for third‑party drum samples, though it's good to know you can use your own samples if you prefer.
Adjusting the filter can claw back a bit more separation where spill is causing problems, and although setting up Leakage Suppression mode can take a little time, it can improve the outcome significantly and achieve results where other programs simply give up. Compared with the rivals I have used, including SPL's Drumxchanger and Toontrack's Drumtracker, Trigger works as well or better than they do even in its basic mode.
Summing up, then, Trigger is a great problem‑solver. I have a feeling that this particular piece of software is going to win itself a lot of friends.
Alternatives
Wavemachine Labs' Drumagog is one of the best‑established names out there, but Drumtracker from Toontrack also does a great job and is a little cheaper. Other contenders include SPL's Drumxchanger and Digidesign's TL Drum Rehab.
Trigger Instrument Editor

With versions for both Windows PCs and Mac OS, the optional (and free) Trigger Instrument Editor provides a simple way to browse your existing sample libraries and to use them to create your own multisampled drum instruments.
Instruments are saved as Trigger Compressed Instruments (TCI), the multisample file format used by Trigger. A TCI can contain up to 127 different articulations and up to 127 velocity layers per instrument. Not only that but you can, should you deem it necessary, have up to 127 alternating hits per velocity layer, though creating an instrument with the maximum possible number of velocities, articulations and alternative versions would result in over two million samples per instrument!
The browser to the left of the screen lets you search your drives for suitable samples, and you can set up a default directory that always appears when you initiate the program. Audio Setup is where you select the audio output device, sample rate and audio buffer size. Toggling 'Play on Select' enables and disables sample auditioning in the browser.
Any WAV and AIFF files are fair game, and they can be dragged and then dropped into the empty cells that appear in the window. Each row represents a velocity layer, while each column determines a number of alternate hits. The default arrangement is one row of four cells, but this can be changed. Velocity range may be adjusted using the mouse or keyboard, but there's also a Velocity Automapper button that maps velocities automatically. Once saved, custom instruments can be accessed within Trigger in the same way as its own library samples — although, of course, phase accuracy when layering is down to the samples you choose to use.
Pros
- Can be used at a very basic level, or you can use Leakage Suppression and get much more forensic about eliminating the effects of spill.
- Realistically priced.
- Excellent drum sample library included, with phase‑accurate sample layering.
- Very tight timing.
Cons
- Some patience and expertise is required to get the best out of Suppression mode, though the clear GUI really helps.
Summary
Trigger is extremely capable for dealing with real‑life drum recordings and has some useful additions for tackling troublesome spill. The included drum sound library is also very impressive, while if you fancy making up your own drum sample sets, you can download the free Trigger Instrument Editor.
information
Studioxchange +44 (0)1462 677333.
Test Spec
- Trigger v1.5; Trigger Instrument Editor v1.2.
- Apple Mac Pro with 2 x 2.8GHz quad‑core Intel Xeon CPU and 10GB RAM, running Mac OS 10.6.
- Tested with Apple Logic Pro 9.1.