We return to the subject of Clip Envelopes, and discover how it's possible to work around a Live limitation and record MIDI controller data into Clips in real time.
In the last instalment of Live Technique we explored Clip Envelopes: automation that resides inside Clips, rather than the more typical type of automation that exists as a continuous graph in the Arrangement view. This month we're going to return to the subject and look at how Clip automation can (and can't) be recorded in real time from a hardware controller.
What are we talking about, exactly? Well, it's pretty common to assign hardware controls to mixer controls, audio effects or instrument plug-ins so that you can add interesting movement to your tracks in real time. Now, imagine being able to record these movements as short Clips that you can loop in the Session view, rather than as continuous graphs in the Arrangement view. This would add an extra dimension to the jamming and performance side of Live. It would also allow you to record MIDI continuous controller data at the same time as you play notes on Live's instruments.
This isn't something that you can presently do in Live (something of a sore point among veteran Live users — fingers crossed for v8), but with a bit of hackery the limitation can be overcome.
CC Me
Here's a typical MIDI recording scenario: you're recording an instrument that responds to expression or performance controls, such as altering its vibrato with the mod wheel, or changing filter cutoff in response to a particular knob on your controller keyboard. This works using standard MIDI Continuous Controller (CC) messages. If you're using a hardware MIDI sound source, you can record MIDI notes and CC data simultaneously in Live. Any control movement that generates CC data will be recorded as Clip automation within the Notes Clip in your MIDI track. You can also overdub controller data into an existing Clip if MIDI Overdub mode is active. Continuous Controller data is viewed in the same place as automation Clip Envelopes (see screen above)  MIDI continuous controller data recorded in a Clip can be viewed in the Clip Envelopes section.. In Clips that can have envelopes for more than one device (such as Effects devices), MIDI CC envelopes are grouped as 'MIDI Ctrl'.
If you're recording MIDI for an external device, such as a hardware synth, everything works as expected. Unfortunately, real-time recording of modulation for devices within Live, such as internal instruments, effects, mixer parameters and Clip parameters, is not, on the face of it, possible. Here's why.
To control a parameter in Live, you use the MIDI Map mode to assign it to a knob on your MIDI controller. Surely, you think, you can now record MIDI CCs from that knob into a Clip (as you would with a hardware instrument) and the control will be automated. But no: once a Live parameter has been mapped to a MIDI controller, the MIDI CC channel used for the assignment is disabled from recording. This is ostensibly to avoid conflicts between multiple layers of the same controller. As an aside, I don't really see the problem, as Live is already able to handle relative relationships between Clip Envelopes and on-screen controls, and can also suspend automation in the Arrangement when a control is moved manually, and subsequently pick up the automation when you press the Back To Arrangement button.
We're Here To IAC To It
The workaround isn't particularly pretty. Basically, you need to sneak around Live's block on recording MIDI CC data that is used for control mapping. To do this, you need to fool Live into thinking that the CC data is coming from a source other than the MIDI controller that has been mapped. On a Mac, this is done by routing the data via an IAC (Inter Application Communication) bus, which is found in the Audio MIDI Setup application. In Windows you'll need to use a third-party application such as MIDI Yoke (www.midiox.com). Both the Mac's built-in IAC system and MIDI Yoke are designed to allow the routing of MIDI data between different programs running on the same computer. However, we'll use them to pipe data between tracks in Live, without using Live's own internal MIDI routing structure.
The down side to this hack is that you need an extra track for any track you wish to record real-time control movements to. However, doing this offers some interesting possibilities, as we'll see. We'll start with an example using an audio track. Controlling instrument plug-ins on MIDI tracks then just requires variations on the basic setup.
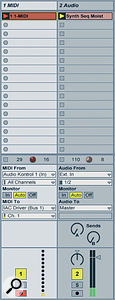
The screen to the left  The settings for routing controller data to an audio track for real‑time recording.shows a MIDI track and an audio track with a loaded loop. The MIDI track will be used to record your CC Clips. The MIDI track's output is set to IAC Driver Bus 1, Channel 1. The audio track doesn't have a MIDI input, but that's not important. The MIDI track's input is set to the specific MIDI source, rather than All Inputs and is in Record mode and Auto input mode. The screen at the top left of the next page
  This is how the Track and Remote preferences need to be set up in order to fool Live into thinking that it's controlling an external MIDI device.shows how Live's MIDI Preferences need to be configured. The IAC bus is enabled for both Track Input and Remote. The Audio Kontrol Input, which is the input from my controller keyboard, is only set to Track input. (You can disregard the Euphonix references).
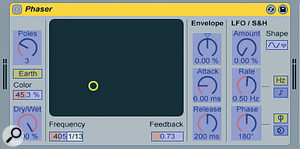
The screen above right  A Phaser effect on the audio track, with its Frequency control mapped to an external MIDI controller.is a Phaser effect which is on the audio track, and is the device I want to control and automate. Having set up the tracks, I can now enter MIDI Map mode and select the Frequency parameter on the Phaser. When I move the knob on my controller keyboard, the MIDI passes to the audio track via the MIDI track, and the parameter is tied to CC data coming from IAC Bus 1, Channel 1, rather than directly to my keyboard.
With everything set up in this manner, I can start a Clip recording in the MIDI track, and perform real-time control movements (see screen below![]() A recorded MIDI CC modulation envelope.. The interesting possibility I alluded to earlier is that I can record several Clips with different variations and loop lengths to apply to the controlled parameter on the audio track. These modulation Clips are triggered just like any other Clips in the Session view, and can be sequenced in the Arrangement view.
A recorded MIDI CC modulation envelope.. The interesting possibility I alluded to earlier is that I can record several Clips with different variations and loop lengths to apply to the controlled parameter on the audio track. These modulation Clips are triggered just like any other Clips in the Session view, and can be sequenced in the Arrangement view.
Live Instruments
Software instruments running in Live present a slightly greater challenge, as you have MIDI notes to fit into the equation. The basic setup is the same, with two tracks: a MIDI track hosting the software plug‑in, and another routing the control data to it. Then there are two approaches you can take, each with different advantages. Firstly, you can follow the above example and use separate Clips for notes (in the instrument track) and modulation envelopes (in the MIDI control track). This maintains the creative possibility of mixing and matching different note sequences with different modulation Clips.
However, in many cases it's simpler and easier to use a single Clip for notes and automation. This is the preferred route to take if you need to record traditional performance data such as mod wheel vibrato along with a note sequence. In the main screen on the first page of this article, I've added two more tracks to show how this works. The routing is the same as in the first example, except that Channel 2 of the IAC bus is now being used. The Instrument track ('Bassline') has also been switched into Input monitor mode, so that it always plays incoming MIDI. Again, it's important to choose a specific MIDI input in the control track, as leaving All Inputs selected will mean all your IAC bus data will get routed in and cause MIDI feedback. The important part of this scenario is that you record into the control track, not the track that is hosting the instrument. This allows you to record both notes and CC data into the same Clips, as shown in the picture.
Music In Motion
The concept of Clip Envelopes is one of Live's most inspiring innovations, allowing modulation to be added on a Clip-by-Clip basis, instead of being tied to an arrangement or timeline as in most DAWs. This keeps parameter sweeping, step‑sequencing and enveloping part of the free-form, jamming nature of song creation in Live. Although it's not easy to set up, the ability to record these modulations from a controller in real time creates a more fluid workflow bringing to mind the fun Motion Sequencers found on Korg's Electribe range of grooveboxes, which allow you to capture and replay looped sections of control tweaks with your drum/synth patterns. Let's hope Live 8 has some nice surprises for us fans of this feature.
