It's now possible to carry out most of your audio editing exclusively in one Logic window. We take a look at the improved Arrange window functionality and discover how it can transform your editing experience.
 Most music applications that started life as MIDI sequencers do not have an enviable reputation when it comes to audio editing functionality. The general assumption tends to be that, for a user to deal with audio effectively in such an application, a considerable number of windows and a plethora of tools are required. However, Logic's updated Arrange window's local menus, tools and editing functions, alongside the new choice of fade modes and dragging behaviours, can streamline the process into a powerful and efficient single-window operation. Add to these the numerous navigational and zooming alternatives and you'll be looking straight into the heart of those troublesome waveforms. Let's explore how these new features can enhance the editing workflow by examining some common editing scenarios.
Cut, Cut, Cut!
It might seem like a straightforward suggestion, but it's really worth eliminating any clearly inadmissible content before even embarking on a serious editing job. In Logic terms, this means listening to the arrangement and clearing any regions unlikely to make the final edit, then slicing the remainder to separate useful sections from poor ones. The resulting regions can also be cleared, or muted for future reference. Reducing the audio material to a meaningful and manageable amount at this stage will result in a more efficient approach to correcting, extending or creating composite parts later on. Of course, regions can be resized or divided in a number of ways, each proving beneficial in a different set of editing circumstances.

 The pointer tool turns into a region-resize pointer when dragging the bottom corners of an audio region. Resizing snaps to full bar durations or smaller sub-divisions, depending on the level of zooming. For an even finer resolution, hold down the Control key prior to dragging the region corners.If you're used to making cuts on the beat while referring to the Song Position Line (SPL), it makes perfect sense to identify or enable the Split Objects by Song Position and Split Objects by rounded Song Position key commands, both of which allow for region division at the current song position, with or without rounding, just as the names suggest. The first option (which is also available under Region / Split/Demix from the Arrange window's local menus) proves rather effective when used in combination with another set of navigational key commands: the Rewind, Forward, Fast Rewind and Fast Forward functions. These allow you to move the SPL backwards or forwards by one or eight bars respectively, ending up on an exact downbeat and thus providing invaluable tempo-locked navigation throughout the arrangement. It's therefore quite important to locate these in the Key Commands window and either learn the corresponding key assignments or enter new combinations of your choice. When a relevant section has been reached, you can perform a cut at the identified downbeat by employing the Split Objects by Song Position command. Alternatively, you can play or navigate through the song, without referring to the time grid, until you reach the part of a region that needs dividing. You can then stop the SPL and use the Split Objects by rounded Song Position command, which will round the split to the nearest bar.
The benefit of both these techniques is that edits conform to Logic's time grid, and you can trim an audio region by dragging the region's bottom left or right corners using the pointer tool, to the same affect. This saves you from having to slice a region, especially if the problematic areas are in its start or end sections.
If, however, you want to divide a number of regions so that they conform to a specific arrangement section (such as a verse or a chorus) you can create a cycle region over the identified section or select a marker reflecting that section, then choose Split/Demix / Split Region by Locators from the Arrange window's local Region menu. This will divide the regions according to the locators set by the cycle region or marker, although you have to make sure that the necessary audio regions are first selected in the Arrange window.
Tools Of The Trade: The Scissors And Marquee Tools
 Available from the local Arrange window toolbox, the Scissors and Marquee tools are both invaluable to audio editing. Apart from providing a straightforward solution to region division, the Scissors tool also enables waveform scrubbing when dragged horizontally across an audio region. Click-holding over the region attaches a help tag to it, which constantly updates to monitor the current divide position. Regions are split at that exact position upon release of the mouse.
Dragging over an audio region with the Marquee tool enables selection of a specific part within that region, which can then be option-dragged to create copies elsewhere in the arrangement. Again, the help tag displays the start and end positions of the selection for added accuracy.  If you Command-click any of the icons in the Arrange window toolbox you can recall its respective tool at any time by pressing the Command key again. This, coupled with the default assignment of the Zoom tool to the Control key, means that there can be three tools available to you while editing, at the touch of a button.
Scissor Twisters
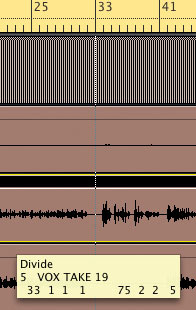
So what does the Scissors tool add to this cutting functionality? With a single click it allows for region division that doesn't necessarily conform to the time grid, which is particularly handy when dealing with waveforms in close detail; that is, in extreme levels of zooming. However, if you click and hold on an audio region without releasing the mouse, additional functions become available, which offer further editing accuracy and audio monitoring. Click-holding turns the Scissors tool into a cross-hair with an indicator line extending vertically in the Arrange window to show the current divide position, while dragging the cross-hair left or right across the region enables solo mode, allowing you to preview the sound at the current cross-hair position. While you're doing this, the help tag will update to show you the current indicator line position, which is where an accurate cut will be performed when you release the mouse.

 Option-clicking with the Scissors tool creates several equal-sized regions from the original one.Unlike the cross-hair, the indicator line will snap to exact beat sub-divisions, depending on the level of magnification, so if a finer resolution is required you'll have to either zoom in more or disable snapping by holding down the Control key. Holding down the Option key prior to a split will divide the original region into several equal-sized portions, reflecting the length from the start of the region to the exact location of the split. This technique is excellent for separating click-tracked drums or percussion, as slicing such regions into equal beat sub-divisions means they can later conform to song tempo changes!
Power Zooming
 Accurate editing largely depends on the level of viewable detail and this is why flexible zooming is such an integral part of an effective editing process. To assist with workflow, Logic provides a number of additional key-command-only zoom functions, alongside the Zoom tool and Zoom sliders. These commands let you save and recall zoom settings, zoom in on selected regions, and even vertically magnify a waveform without having to zoom in on the region itself. They can be located in the Key Commands window by entering 'zoom' in the search field. The Recall Zoom 1-3 and Save as Zoom 1-3 commands offer a similar function to screensets, in that they allow you to save and recall snapshots of the Arrange window workspace, containing different levels of magnification. This is also similar to going back in levels of magnification by Control-clicking in the Arrange area after consecutive magnifications with the Zoom tool. The 'Zoom to fit Selection vertically and horizontally, store Navigation Snapshot' command adapts the screen to fit the whole region that was selected, while 'Zoom to fit Locators, store Navigation Snapshot' can be used in a similar way, only in conjunction with markers or cycle regions that dictate locators. Finally, the Waveform vertical zoom in and out commands let you zoom in and out of low-level waveforms without having to put up with enormous levels of region magnification occupying valuable Arrange window space. Make sure you also locate and use the basic Zoom in and out commands, instead of depending on the Arrange window sliders.
Hide, Copy & Paste
Assuming that only the usable content remains after all the cutting and slicing, it's time to start working on the arrangement by moving, copying, pasting and repeating the selected regions. But there is one more level of space management available before tackling the edit itself. This is to do with tracks containing regions that might not be great in their entirety, yet they could provide useful sections for a composite track later on. As a result, it'd be wise to retain them in the same Logic song until such need arises, but without wasting valuable Arrange space in the meantime. This is where the Hide function comes to the rescue...
Clicking once on the grey Toggle Hide Edit button will turn it green, revealing individual Hide buttons next to each of the Track list names, while clicking any of these will turn them green too, indicating that the tracks are engaged but not yet hidden. Clicking the Toggle Hide Edit button a second time will collapse the engaged tracks, turning the button orange to alert you to the existence of hidden tracks in the arrangement. These are not automatically silenced, though, so make sure you mute the tracks or contained regions before hiding them. Once you've done so, you can resume editing with a pool of strong available performances in the form of regions, knowing that additional options are only a (Toggle Hide) button-press away.

The Toggle Hide Edit button is situated at the top left-hand corner of the Arrange window and is indicated by the letter 'H'. It features three colour modes: * Grey when no tracks are hidden. * Green when displaying the individual track Hide buttons. * Orange when at least one track is hidden.
A major part of building any arrangement consists of copying such regions, and there are different methods for doing so. The most common one is to Option-drag a region to a new location, which complies with Apple's convention; dragging alone simply moves an object to a new location, while Option-dragging copies it there. Alternatively, you can copy a region to the clipboard by pressing Apple-C or selecting Copy from the Arrange window's local Edit menu. But first, make sure you select the destination track in the Track list and position the SPL accurately, as pasting doesn't conform to any rounding or time-grid placement by default. It might be wise to use the Forward/Fast Forward key commands as explained above or the Transport's Bar Position text box to ensure that the SPL reflects the downbeat accurately.
An additional method for copying parts, which doesn't depend on pre-divided regions, employs the Marquee tool dragged over a region part to determine a selection that can then be option-dragged to create a copy. Again, the help tags provide invaluable assistance to accurate selection and positioning, while there is a further auditioning benefit to using this kind of selection, in that the song will always play from its beginning (when the normal Play command is used) regardless of current song position or specified cycle.
But what happens to an existing region in the new location if the copied region or selection is placed over it? That will be determined by our intentions and judicious use of the Arrange window Drag Modes. Available from the top right-hand corner Drag menu, these provide useful options affecting the behaviour of region placement. Choosing No Overlap will mean that the copied region automatically cuts and trims the underlying one, which is particularly handy in avoiding any confusion with playback priority of overlaps. The default drag mode is Overlap, which explains why such confusion may arise in the first place, but even in this case overlaps can be eliminated by choosing Remove Overlaps from the Arrange window's local Region menu.
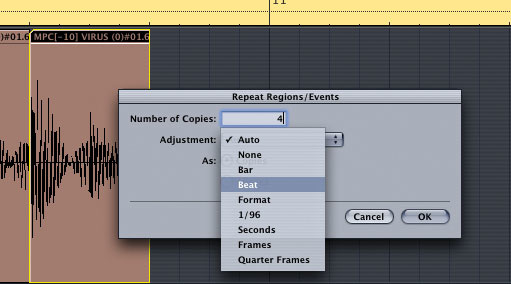
Finally, you can make multiple copies of a region by using the Repeat Regions function, also available from the local Region menu. This method allows for a specific number of copies to be created and provides further control over the timing of the copies' placement with regard to Logic's timeline. In the Repeat Regions/Events dialogue box that opens, the Adjustment drop-down menu specifies whether the copies will repeat right after one another or snap to the timeline in different ways, which has particular importance for audio regions that are not trimmed to exact bar durations.
Non-linear Navigation
 Being able to efficiently navigate through an arrangement is a necessary prerequisite for effective audio editing, so having specialised playback commands at hand speeds up the editing process. Two of the most useful ones are 'Play from Selection' and 'Play from left window corner', but they're both only available as key commands. They use the furthest point to the left of a region and the furthest visible point to the left of the Arrange window to initiate playback. Search for them by visiting the Key Commands window under Logic Pro / Preferences, and enter 'play' in the search field to locate them. Note how key-command-only functions are designated by a black dot in front of their description.
On the other hand, if you prefer using markers for navigation, you can repeat the search, this time entering 'marker' in the search field. The Go to Previous Marker and Go to Next Marker functions allow you to move the SPL from marker to marker sequentially, so it's worth assigning them to memorable key combinations. Alternatively, you can hold down the Command key and single-click at the bottom half of the bar ruler near a marker to move the SPL to its beginning, or hold down Command and double-click to move the SPL to its beginning and initiate playback. Bear in mind that this technique only applies to the bar ruler, and not to the Marker track itself.
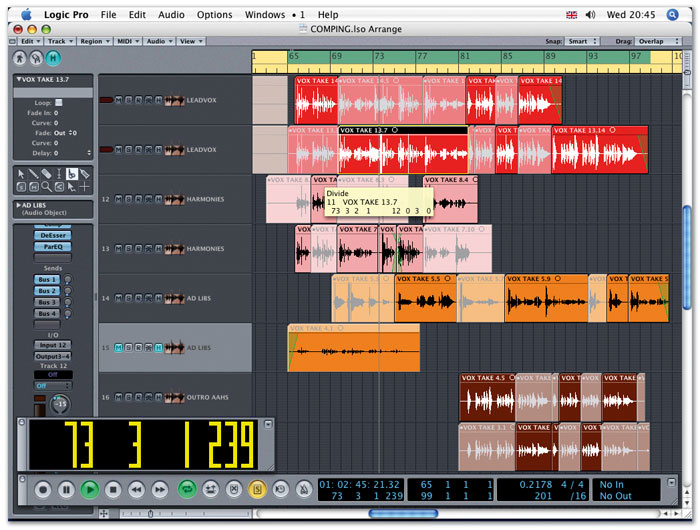
The Black Art Of Comping
After exhausting all the navigational, viewing, cutting, copying and pasting possibilities, it's easy to see how putting together a meaningful musical passage out of a number of takes — or regions, in our case — should be a rather intuitive affair in Logic's Arrange window. In fact, this very process of creating a composite part out of a number of performances is what is referred to as 'comping'. The local Arrange window functionality speeds up the process considerably.
 tool is assigned to the Control key by default in Logic, so there is no need to select it from the Arrange window toolbox prior to zooming. Control-clicking will therefore employ the Zoom tool for magnification, while Control-click-dragging will specify an area for magnification contained by the dragging action. Control-clicking on empty Arrange window space recalls the previous levels of zooming, in reverse order.") The Zoom (magnifying glass) tool is assigned to the Control key by default in Logic, so there is no need to select it from the Arrange window toolbox prior to zooming. Control-clicking will therefore employ the Zoom tool for magnification, while Control-click-dragging will specify an area for magnification contained by the dragging action. Control-clicking on empty Arrange window space recalls the previous levels of zooming, in reverse order.Let's take the common example of a vocal verse recorded several times using cycle record as our example. The resulting regions will take up consecutive Arrange window tracks corresponding to the same channel, with all but the latest region muted. It's worth keeping these regions on one channel, as they can all be auditioned through the same inserts and sends, providing an objective platform for comparison. This also means that you can leave Logic in cycle mode while you solo, mute and unmute consecutive regions or tracks, taking advantage of the respective key commands: typically 'S' for solo mode, 'M' for region muting and 'X' for track muting. Being able to have multiple tracks corresponding to one channel is also why track muting in the Arrange window doesn't reflect on track muting in the Track Mixer or Environment. In any case, you should avoid leaving more than one region or track playing back at any one time, as it will be hard to distinguish between them during monitoring.
The Zoom (magnifying glass) tool is assigned to the Control key by default in Logic, so there is no need to select it from the Arrange window toolbox prior to zooming. Control-clicking will therefore employ the Zoom tool for magnification, while Control-click-dragging will specify an area for magnification contained by the dragging action. Control-clicking on empty Arrange window space recalls the previous levels of zooming, in reverse order.Let's take the common example of a vocal verse recorded several times using cycle record as our example. The resulting regions will take up consecutive Arrange window tracks corresponding to the same channel, with all but the latest region muted. It's worth keeping these regions on one channel, as they can all be auditioned through the same inserts and sends, providing an objective platform for comparison. This also means that you can leave Logic in cycle mode while you solo, mute and unmute consecutive regions or tracks, taking advantage of the respective key commands: typically 'S' for solo mode, 'M' for region muting and 'X' for track muting. Being able to have multiple tracks corresponding to one channel is also why track muting in the Arrange window doesn't reflect on track muting in the Track Mixer or Environment. In any case, you should avoid leaving more than one region or track playing back at any one time, as it will be hard to distinguish between them during monitoring.
Now, chances are that the consecutive regions will feature some moments of brilliance, while other sections will be average or poor. Any time a good passage is identified, it's important to isolate it by slicing the region and naming it. Region division doesn't have to be overly accurate at this stage, as regions can be trimmed to perfection later on. Muting the average sections and clearing the poor ones is also a good idea, as long as there are no gaps left for any part of the arrangement section you're working on.
At the end of the monitoring, naming and muting exercise, you should have a jigsaw of regions that are not muted, at which point you can also make a decision on passages with more than one alternative. In turn, you can play through the whole section to ensure that the verse sounds consistent, but do switch between available options if necessary, without being alarmed by clicks at the edit points; these will be dealt with at the following crossfading phase. Prior to that, it's necessary to move all chosen regions to a single track, so create a new track corresponding to the same channel, leave it selected, then select all the relevant regions and choose Move Selected Regions to Current track from the local Region menu. This will make up the whole verse part out of the selected regions, leaving only the crossfades to do.
 To create crossfades automatically for all edit points, select all the regions comprising the verse section, then click-hold the entry next to Fade in the Region Parameter box and select 'X' for the crossfade option. Next, you have to determine the exact length of the crossfade by double-clicking the numerical entry to the right of the Fade parameter and entering a number in milliseconds. This procedure will create non-destructive crossfades at all edit points for the specified duration, and should result (hopefully) in nice slick edits.
However, if some of the edit points are noticeable, or you find that you can hear clicks at specific edit points, it's best to employ an alternative, and more precise crossfade technique. Select X-Fade from the Arrange window Drag menu and resize the regions at the problematic edit points. Bear in mind that the crossfade duration will still default to the previous numerical entry set in the Region Parameter box; it won't correspond to the length of the resizing overlap. Once you're happy with your comped track, you can clear all muted (unused) regions by choosing Select Muted Regions/Events from the Arrange window's local Edit menu and hitting Backspace.
Audio Regions Vs Audio Files
Logic displays audio files located on hard drives as Regions in the Arrange window and unless otherwise prompted, deleting regions here will not erase the source files from the drives. In fact, the corresponding regions will also remain available in the Audio window, so you can edit away selectively and non-destructively knowing that your original files and regions are safe and within reach. For added peace of mind, it's good practice to save consecutive versions of the Logic song you're working on, so that the initial arrangement is retained, preserving the locations of all audio regions as they were first recorded. This way, you can always come back to retrace missing content, exactly as it was on the timeline. If you're at an advanced stage of editing, you can open both the current and original songs to drag the missing regions from one Arrange window to the other.
For Everything Else, There's The Sample Editor
In conclusion, Logic 's Arrange window is clearly a very powerful editing environment packed with relevant features that enhance the editing workflow. Yet where it falls short is on sample-level accuracy. Of course, Logic does provide the Sample Editor for finer editing work, but it would be nice to see its strengths implemented here, as is the case with many other features that have gradually become incorporated into the Arrange window with consecutive upgrades. It would be a welcome addition to be able to, for example, re-draw a waveform to get rid of a click, or fade in at the very first transients of a cymbal, without having to open an additional window. Furthermore, the use of Anchor points in the Sample Editor and Audio window does confuse the issue for new users who don't yet grasp this relative timeline association between windows. Perhaps there could be an independent editing option when you're using the Sample Editor, just as when you're using a third-party sound editor, where the file can be imported into the timeline after processing without this relative pre-positioning. Then again, would there be any need for a dedicated Sample Editor if its strongest features were implemented into the ever-growing Logic Arrange window? Only time will tell.
Who Dares Wins: Using Logic Live
Although Logic is an extremely well-equipped program, in certain areas it lacks functionality. This has encouraged third-party developers to produce tools that fill the gaps that exist where the program is weakest. Redmatica's Keymap editor for EXS24 (reviewed in SOS August 2007 and on-line at www.soundonsound.com/sos/aug07/articles/redmaticakeymap.htm) is a good example, as it enables users to make the most of Logic 's sampler, which otherwise is somewhat clunky.
Another of Logic's weaker spots is encountered when the software is used live, although this hasn't stopped some major acts braving the use of Logic on stage. However, there have been some adequate third-party applications, such as the late lamented Rax stand-alone software synth player, which was discontinued after it was bought by Plasq (makers of Comic Life). But Fluqe (www.fluqe.com) came to the rescue with On Stage, a utility that runs alongside Logic and allows Projects to be loaded using MIDI program change messages. I've mentioned the software in these pages before, but the number of "how can I improve my live experience with Logic" questions I get asked shows that it's still not widely known. According to the Fluqe site, it's now being used by some high-profile acts such as Muse and Björk, so it should gain much wider recognition. The program costs $24.95 (which was about £13 at the time of writing) and is available as a download from the the company's web site. One useful tip if you're using On Stage and EXS24 is to check the 'keep common samples in memory when switching songs' preference in the Options menu, as this will speed the loading of Projects — as long as you organise your samples effectively.
To make things easier for the Logic user, it would help if future versions of the software were more consistent in their use of MIDI program-change numbers for changing patches on soft synths and effects. At the moment, not all plug-ins respond to external MIDI program changes, and those that do sometimes work in unpredictable ways. Apple confused a lot of people when they allowed the use of MIDI program changes to change channel strip performances; but only on MIDI channel 1. While this was a welcome move, and one that made it easier to use Logic in live situations, it would have been nice if they hadn't commandeered the channel most people use as the default on their MIDI controllers! As it is, the latest version of Logic only seems to allow you to change sounds on plug-ins if you send on MIDI channel 10. I used to be able to use channels 2-16 and have no idea when this feature was introduced! Of course, the fact that Logic's own virtual instruments don't respond to MIDI program changes doesn't help either. What's needed is a common response to program changes between all plug-in and host software manufacturers. Something like the original MIDI inter-company co-operation would be a nice touch, as that hitherto unprecedented agreement was a major contributing factor to the way we make music today. Stephen Bennett


