 Input Assignments: This basic setup can be altered, depending on how many mics are available and the types of instruments being used by the band (you'll need more stereo inputs for more electronics‑based music).
How would you configure your PT system to cope with the practicalities of traditional band recording?
With the power of modern computers enabling so many exciting new developments in music technology, it's understandable that numerous column inches are devoted to such wonders as soft synths, Internet collaboration and inter‑application MIDI communication. However, SOS has always balanced this sort of coverage with regular returns to perennial recording issues, one example being the recent series on basic instrument recording techniques. In the same spirit, this month I'm suggesting some tips for using Pro Tools at the heart of a good old‑fashioned multitrack recording session.
For the purposes of this column, I'm assuming a recording session for a typical small rock/pop band (let's call them The Hyper Theticals) consisting of a live drum kit, bass, guitar, and vocals. The basic techniques are assumed to be the same as a traditional studio session. My focus is on ideas for configuring Pro Tools to replace the familiar tape‑machine and mixing console setup.
The key, predictably, to a smooth Pro Tools‑based recording session is preparation. Unlike a hardware mixer and recorder combination, Pro Tools' virtual studio environment is configurable from scratch, and such configuration should be completed (as far as possible) before the session. You wouldn't expect to book into a traditional studio and wait for half an hour while the engineer cables up the mixer, so you should have a ready‑to‑go Session file.
I/O Setup
 Outputs: This mapping provides a main mix output and a secondary output for a DAT or other 2‑track recorder. The second bank of eight outputs is dedicated to four headphone mixes (connected to a headphone amp). There are also two stereo effect sends, in case any outboard is needed during the recording session.
Decide beforehand how you're going to set up your hardware input and output connections, and make a suitable I/O Setup matrix. The screens on the left show suggested configurations for our imaginary session, based on a system with 16 interface channels
Obviously, as Pro Tools has no input gain control (unless you have a Control 24 hardware control surface or a Digi 001 system), how you send signals into the system will depend on what preamplification you have at your disposal. This will probably mean using a hardware mixer to get all your mic, line and DI signals up to Pro Tools‑friendly levels. Alternatively, you might have access to dedicated preamps. I assume that most people who own TDM setups will have no problems accessing suitable mixers and/or preamps.
If you're short on either of these options (perhaps you have a primarily computer‑based studio centred around a Digi 001 system, with little outboard hardware) and you need to be able to lay down more tracks simultaneously, you may be able to work around the problem. Firstly, if you switch your 001 interface to run at ‑10dBV input level, many keyboards turned up to full whack can provide a reasonable level plugged directly in. Similarly, some guitar and bass amps have line outputs on the back. Also, many guitar and bass players will have some kind of effects box with a DI output. By using these options you can save your preamps for mic inputs.
Mixer Template
 Buss assignments: These four internal busses have been configured to provide submix busses. More busses would be needed if any internal effect send and return connections were required.
Once your I/O setup is complete, you can build a mixer to suit the session. My suggested template for handling this simple scenario is outlined in the 'Recording Session Template' box (page 228).
Now there are a few things you can do to help the actual recording process get going quickly. One is to obtain some information about the material you'll be recording. If you can get the band to give you some tempos for their songs, you can prepare a click‑track prior to the recording. You might even be able to extract a tempo map from an earlier demo recording.
Otherwise, you can capture song tempos just before the songs are to be recorded, by getting the drummer to play through some of the track and using the 'tap' feature accessed via the transport bar. Of course, the drummer or band may not wish to use a click track. In this case, it's still worth taking some time after the initial recording passes to extract a tempo map, as this can be invaluable when cueing up for overdubs (more on that later). A click track can be added by either preparing an audio track, or using the MIDI metronome. My money would be on the former, as this rules out any potential MIDI timing issues. Record or import a couple of percussion sounds, and use the tempo grid to paste one bar's worth into your click track, then Duplicate as required. Finally, use grid mode to place a marker at the start of the song and another two bars before this, to provide a count‑in.
Setting Up To Record
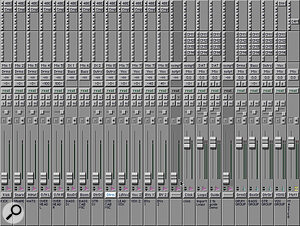
 Mixer starting point for recording a small rock band.
Before you finally cue up and drop into record, there are a couple of final issues worth mentioning. As with all digital recording systems, you need to give special thought to Pro Tools' recording levels. The usual advice is to record with the Pro Tools meters as close to the red as possible, without ever actually getting a red light. However, it's not quite as simple as that, as you need to bear in mind the operating level of the mic preamps involved. For example, you may find that to get a decent level in Pro Tools you're pushing your preamps well over their 0dB mark, to a point where audible distortion occurs. Those who have 888 interfaces can adjust the input trims on the front panel to compensate. (These input trims are not full‑blown input‑gain controls, but rather fine‑tune controls for matching your Pro Tools setup to the output of, say, a mixer.) With other Pro Tools interfaces, try switching the operating level to ‑10. In the end, you may have to compromise to achieve the best‑sounding recording.
The next decision is whether to record through any of Pro Tools' plug‑in effects. Normally, when you record directly into audio tracks, the signal is digitised and sent to disk before passing through any plug‑ins inserted on the track. If you want to, for example, compress the signal before it's written to disk, you need to come into Pro Tools via Aux Input tracks, and then route the outputs of these aux channels to audio tracks.
Finally, if the musicians require it, you can set up individual headphone cue mixes via the aux sends. I've put these sends on the groups, which makes setting levels quicker and easier, but if you need more flexibility you can put the sends on the record tracks instead.
Recording
Pro Tools makes it easy to follow the old advice of recording all takes, including rehearsals, but if you have started a take and it's obvious that you aren't going to want to keep it, hit Command‑period instead of stop. This will terminate recording, and discard the audio, thereby avoiding the wasting of drive space on unusable takes. If you want to keep the take, just start the next one on a fresh playlist. (If you're not familiar with playlists, I will be covering them next month. In the meantime, look them up in your PT manual, because they really are invaluable.)
For those who already use playlists, it's worth knowing that Pro Tools now follows edit groups when creating new playlists, so the process can be very quick — just select New in any of the tracks' playlist pop‑ups, and go for take two. Using this method also means that you're set up to take advantage of Pro Tools' multiple take‑lists functionality, should you need to comp from several recordings.
Next month, we take The Hyper Theticals closer to pop stardom, when we cover overdubbing and punching in, sort out phase between tracks, and comp up our recordings.
Recording Session Template
The channels to the left of this mixer are the basic record tracks: five channels for drum mics, two each for bass and guitar (for mic and DI inputs), and a couple of tracks each for vocals and BVs. The three central tracks comprise the click track, a stereo track containing some imported loops for the foundation of the track, and a stereo reference track for pulling in the band's original demo recording. To the right are four aux inputs, being used as submix groups.
Bussing to aux inputs in this way has a couple of advantages. Firstly, it means that you can set up a balance quickly and easily, and find the basic elements of the song quickly if the mixer starts getting bigger than a single screen. Secondly, you can quickly apply effects to parts of the mix, if required, in the heat of the session. The click and backing tracks and the group channels have sends to the various headphone mix outputs. As a purely visual aid, I've broken up the mixer with a couple of greyed‑out (inactive) tracks — anything that lets you find your way around quickly is helpful when your're trying to do several things at once.
Quick Tips
- Command‑Control‑clicking on a mixer channel's icon (bottom right) is a shortcut for toggling the channel's active/inactive status.
- Because only one type of automation can be shown in a track at one time, normal copying and pasting will only capture the automation for that particular parameter. However, if you hold Control while copying and pasting, every automation parameter in the selection will be copied.
- Using the pencil tool to draw on an audio waveform (which you might typically do to remove clicks and so on), is a destructive process — ie. it changes the actual audio file. To ensure that you always have the chance to go back, you should make a copy of the relevant data. The quickest way to do this is to select an area of audio around the click (in the example given above) and use the Consolidate Selection command in the Edit menu (Alt‑Shift‑3). This creates a new audio file based on your selection.


