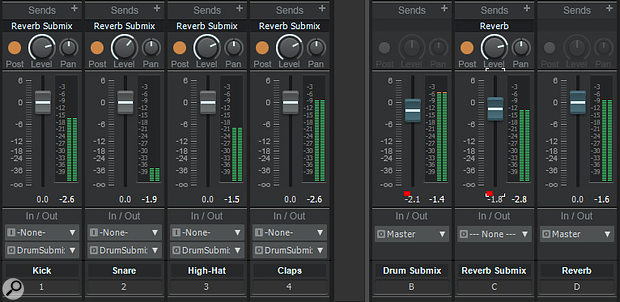
 Screen 1: This setup pulls back on the drum track effects send levels when you reduce the drum submix level.
VCA (voltage-controlled amplifier) faders don't pass audio. Rather, they act as 'remote controls' for other faders: assign a track fader to a VCA fader, and now the VCA can control the track's gain, without moving the associated track fader. Assign multiple track faders to the VCA, and you can bring all their levels up and down simultaneously. You can also adjust track faders independently of a group controlled by a VCA fader, without causing the other faders to follow along.
Cakewalk doesn't have VCA faders, and it's understandable if your response is, "What's the big deal? Can't you just send the channels to a bus, and use the bus fader to control the level?" The answer is yes, and if that's all you need to do, groups are fine. Even with a channel in a group, you can still adjust a fader independently of the other tracks in it by holding down the Ctrl key while moving the fader. When you release the fader, the control returns to being part of its original group.
However, there are other VCA fader functions that Cakewalk can't do, like having the same fader belong to different groups. This can be helpful for projects with a high track count. For example, you could have fader groups for violins, violas, and cellos — nothing unusual there — but you could also have a violins + violas fader group, and yet another fader group with all the strings.
One of the classic scenarios where VCA faders win out is when several tracks (say, individual drums) go to a submix fader, and the tracks also have post-fader send controls going to an effect such as reverb. With a conventional submix bus, as you pull down the bus fader, the faders for the individual tracks haven't changed — so the post-fader sends from those tracks will still be sending signal to the reverb bus. As a result, it's not doing what a post-fader send is supposed to do, which is reduce the send amount as you pull down the channel fader. Even with the bus fader pulled all the way down, you'll still hear the reverb.
A VCA channel solves this because it controls the gain of the individual channels. Less gain means less signal going into the channel's send control, so with the VCA fader all the way down, there's also no signal going to the reverb. However, even though Cakewalk doesn't have VCA faders, you can use traditional bus-based routing, or grouping, to accomplish the same result.
Taking The Bus
Let's reprise our drum submix scenario, where you want to route drums to a reverb bus, which also provides reverb for some of the project's other tracks as well, and that you want the reverb level on the drums to drop when you reduce the drum submix level. To do this:
1. In addition to your drum bus and reverb bus, create a reverb submix bus.
2. Assign the reverb sends from the drum channels to the reverb submix bus.
3. Add a send to the reverb submix bus that goes to the reverb bus.
4. Group the drum reverb submix controls together.
Now when you bring down the drum submix level, you'll also bring down the level going to the reverb, which accomplishes the same as using a VCA channel to do this. As expected, this won't affect any other non-drum channels going to the reverb.
On the other hand, you may not always want the input level to a processor to decrease when you pull down a bus. For example, with saturation or compression, altering the input will change how the processor responds. To preserve the input level to the effect, you don't need an additional submix bus. Just use pre-fader sends to the bus containing the effect, then simply group that bus' fader with the submix bus' fader. Bringing down the level of one brings down the other, but the amount of audio going to the effect remains constant.
Group Activity
This is an even simpler approach, which uses grouping rather than dedicated busses. Assuming you have a drum bus, reverb bus, and reverb sends on all the drum tracks where you want reverb, all you need to do is the following.
1. Select all the drum tracks.
2. Right-click on one of the tracks' send controls, and assign it to a group.
3. Right-click on the drum submix output fader, and assign it to the same group.
Now when you pull down the drum submix, you'll be pulling down the reverb sends as well. Remember that you don't have to remove a send from its group to change its setting — just hold down the Ctrl key while you adjust it. (With the bus-based method described earlier, you needn't remove a send temporarily from a group, because it's not part of a group. Just adjust the send control.)
Another use for VCA channels is to control the gain of a channel without affecting existing automation.
The Offset Rule
Another use for VCA channels is to control the gain of a channel without affecting existing automation. If the automation changes are exactly as desired, but the overall level needs to increase or decrease, simply offset the gain so that the automation curve remains intact, and then adjust the overall level with the VCA fader. This is often simpler than trying to raise or lower an entire automation curve.
 Screen 2: Offset mode makes it easy to change an automation envelope's overall level.
Cakewalk has always been able to do this, thanks to the Envelope/Offset Mode option. To enable this, click on the Envelope/Offset mode icon in the Control Bar's Mix module, as in Screen 2. (In addition to level faders, this mode also works with audio track automation for pan, bus send level, bus send pan, bus return level, bus return balance, main out volume, and main out balance, as well as MIDI track automation for volume, pan, chorus and reverb.)
In Offset mode, any parameter that can be offset has a '+' sign appended to the parameter value, eg. 'Pan 11% L+' instead of 'Pan 11% L', or, for a level fader, '-2.3+' instead of '-2.3'.
Say a fader reads -4dB, you switch to offset mode, and then move the fader to +2.1+ meaning you've offset the net value by +2.1dB. The fader's effective value is now -1.9dB. This is ideal when all your automation moves are just right, but the overall level needs to be trimmed up or down.
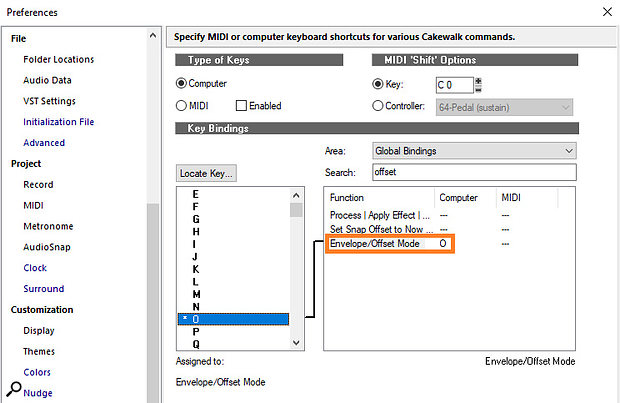
 Screen 3: Offset mode toggling can be assigned its own keyboard shortcut.
Sonar used to default to using O as a keyboard shortcut to select Offset mode. However, it was removed as a default because people often hit O accidentally, didn't know why all their faders had reset to 0dB, and thought there was a bug. However, this is an extremely convenient shortcut, so go to Edit / Preferences / Keyboard Shortcuts, type Offset in the search box, bind it to O, then click on Apply and OK (see Screen 3). You'll thank me for this.
The Write Stuff
Another advantage of VCA channels is that when you're controlling the gain of multiple channels, you can write automation to multiple channels simultaneously just by varying one fader. Although using a VCA channel to do so is convenient, it takes only a few more clicks to do this in Cakewalk.
 Screen 4: Right-clicking on a fader lets you assign it to a group. Note that multiple tracks are selected, so assigning one control to a group will assign the same control in all selected tracks to the same group.Suppose you want to automate volume for several channels. Group the channel faders together for which you want to write automation. Write-enable all those channels, and then moving any one fader will move all of them, and write the automation to all the tracks. To 'solo' automation for one channel, hold Ctrl while moving that channel's fader. However, note that you can't do this for more than one fader at a time. For example, suppose you have two violin and two cello tracks and are writing the same automation for all of them. If you then want to continue writing automation for one of the violin tracks while the other tracks remain static, you can do that, but you can't continue writing automation for two of the tracks while the others remain static.
An alternative method involves quick grouping. Select the channels for which you want to write automation by Ctrl–clicking on the channel numbers at the bottom of the Console. Again, select write for all the channels. Hold the Ctrl key so that moving one fader moves the faders in all selected channels, and write your automation. Even while the transport is moving, you can Ctrl–click on one of the selected channel numbers to deselect it, then hold Ctrl and continue writing automation for the channels that remain selected by clicking on a selected channel's fader.
The bottom line is that while VCA faders become more relevant as a project's complexity increases, for many applications, Cakewalk already has the tools you need to perform many VCA fader-like functions.
