Although Pro Tools has been able to work with interleaved stereo files since v10, lots of people still work with split stereo files, in which the stereo track plays and/or writes back two separate mono files. Many DAWs, audio editors, soft samplers and video NLEs are either unable to work with that format or are, at best, fiddly to operate when working with them. Reaper falls into the category that can only open them as separate mono files, though, as I’ll explain, it has a useful trick or two up its sleeve once those files have been opened.
Most tools that are able to join split stereo files together into the interleaved format have some frustrating quirks. In Pro Tools 11, for example, it’s great that moving two mono files on to a stereo track automatically creates a stereo Region, but to turn that Region into a stereo file for use elsewhere requires that you first select and Consolidate the clips — and that names the file according to the track name, not the Region name, which is not always desirable. It also requires you to perform the action separately for each pair of clips, so if you have, say, 10 pairs of left and right files on two tracks, you’ll have to consolidate and export the region for each pair.
Interleaving
It was this specific frustration that brought me to investigate Reaper’s capabilities in this area: I’d been given several Pro Tools 9 sessions, each with dozens of pairs of mono files that I needed to join, so that they could be imported efficiently as stereo files by Native Instruments’ Kontakt Sampler. While Kontakt can import the mono files, and you’re able to pan them left or right as desired, when working with (often literally) thousands of samples this is fiddly and time-consuming, and it obviously risks introducing hard–to–track–down user errors.
Much to my delight, Reaper proved almost the perfect tool for the job. Not only is it able to combine split–stereo files, but you can combine any two separate mono files to create a single stereo interleaved file, irrespective of length. What’s more, you can do this without having to change the filename (as you seem to have to do in Pro Tools) and do also to multiple pairs of clips at once. Here’s how to do it...
1. If you don’t have the SWS extensions for Reaper already, you really should — this is far from the only useful application for them. You can download them from www.standingwaterstudios.com/installation.php. You’ll need to be working on Reaper 4 or higher.
 Standing Water Studios’ Extensions pack costs nothing and provides a wealth of useful facilities for Reaper users.
  Two tracks filled with mono events that require ‘gluing together’ as stereo interleaved files.2. Next, open a Finder/Windows Explorer window and navigate to the folder that contains your audio files. Select all of the left–channel files and drag and drop them into Reaper.
3. Reaper will ask whether you want the files to be placed on the same track or separate tracks — you want them on the same track. Reaper will place the files one after another on a single track.
4. Do the same for the corresponding right–channel files, to place them on a new (and adjacent) track. The corresponding files need to be placed at exactly the same point on the timeline as their left–channel counterparts — so, assuming we’re dealing with same–length left and right files, select all events on one track at a time and drag them back to bar 1 beat 1.
You should now have all the audio you wish to join together in place in your Reaper project. Next, as a precaution, insert a little ‘daylight’ between the clips, making sure that the corresponding left– and right–channel clips remain aligned. This protects you from a quirk in the Action you’re going to use, which can inadvertently merge the wrong clips together if there’s no gap. The easiest way I’ve found to do this is to tweak the project tempo until gaps appear.
 If you try to join the events without putting ‘daylight’ between them, the implode–and–pan Action can give you some strange results — so first visit Item Properties to ensure that your audio will not stretch with tempo changes, but that event start times will move. Then decrease the project tempo to separate the events.
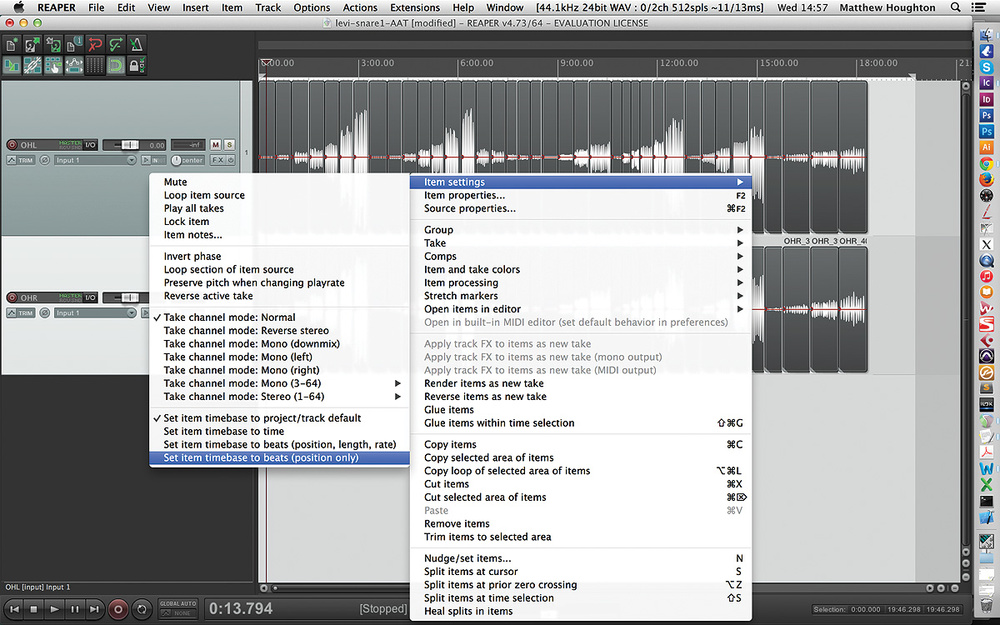 First, though, you need to stop Reaper attempting to time–stretch the audio when the tempo changes, which (on my system at least) is the default behaviour. To do this hold the Cmd (Mac) or Ctrl (Win) key and press ‘A’ to select all clips. Right–click, select Item Settings, and make sure the ‘Preserve Pitch When Changing Playrate’ option is unticked. Then, to make sure the clips move apart as we reduce the tempo, go to Item Settings again and this time choose ‘Set Item Timebase to Beats (position only)’. Now, if you reduce the tempo by, say, 10, the audio clips will separate without any audio time–stretching being applied.
With all files selected, it’s time to join your pairs together. Go to ‘Actions/Show action list’, type ‘implode’ into the search bar and then select ‘Xenakios/SWS: Implode items to takes and pan symmetrically’. Each and every pair should now be visible as two takes on a single track.
Making Stereo Files
With this done, your mono recordings are now functioning as stereo channels within Reaper, with all the panning having been taken care of manually. However, they remain separate files on the hard drive, so another step is required to turn these stereo clips into actual stereo interleaved files. To do this, you must render the clips, but before you do, it’s a good idea to go to Options/Preferences/Rendering and set the render tail length to 0ms. That way, I’ve found it much easier to import the resulting stereo files back into Pro Tools, should that be required, simply because they’re the same name and length as the original and can therefore be selected as an alternate take. Another sensible precaution is to set your project tempo back to what it was, so that when rendering the timestamps will match the originals. To render your clips:
1. Make sure all your stereo events are selected. If you wish to use the existing filenames in your rendered files (as I did, and will be doing here, though renaming options are available), you can choose either the left or the right clip as the name source, the left being selected by default. To change that, click on the right–channel take(s).
2. Go to File/Render... (Alt+Cmd/Ctrl+R) and choose ‘Selected Media items’ from the drop-down menu at the top. This ensures that each pair of clips will have its own stereo file created, rather than joining everything together as a single file.
 Reaper’s Render dialogue box offers a huge degree of flexibility over what type of files are to be created and how they are named.
 Job done: rendering the result takes a little time, but not long enough to boil the kettle — and the process is fully automatic. 3. Browse to choose your target directory and then click the Wildcards button. There are all sorts of useful expressions that can be included in the filename — dates, timestamp, tempo and so on — but we’ll just choose ‘$item’. This ensures your stereo file will share the same name as the take you selected. (For my purposes this was important, since re–sequencing the numbers would have caused me problems when lining up with clips from other mics’ mono channels in the same projects).
4. Resist the temptation to engage the ‘Multichannel tracks to multichannel files’ option, which is for tracks/files with more than two channels.
5. Ensure the audio file settings are the same as the originals, so that if you’re using them with other mono files from the same project, the format of all files will be consistent.
6. Now just hit Render and watch Reaper do its thing: even for large batches, while you’d have time to put the kettle on, Reaper should be done before you’ve had time to make a brew!
Reaping Rewards
And that’s the job done; you should now have stereo interleaved files on your hard drive that are the same length as the originals and which share the same filename as the originals.
I said earlier that Reaper was ‘almost’ the perfect tool for the job. My one (rather major) disappointment is that it lacks the ability to import or export sessions in OMF or AAF format, which would have made the process of importing the Pro Tools data easier, particularly if any clip gains or level automation had been applied. If you need to work in that way, then I recommend investing in AA Translator (www.aatranslator.com.au), which allows you to convert Pro Tools (up to v11) sessions to Reaper projects, retaining useful information such as clip gain, pan settings, level automation and so on. While it can’t export to Pro Tools files higher than version 9, it can export to OMF, or older versions of Pro Tools, the files of which can be opened by Pro Tools 11.
The only other tool I’ve found (and believe me, I’ve searched long and hard) that is able to stitch separate mono files together as stereo interleaved ones as a batch process, without sacrificing important information, is the Windows–only donationware application Cleaver, from the makers of AA Translator, a short review of which you can find in this issue. I found that, for some applications, I preferred using this tool, while for others it was useful to have the ability to join things in place, inside a Reaper project.


