We get hands-on with the new and improved features of Live 9.
 The left panel shows the search results for 'Ambient' in the Sounds category. The middle panel displays the location of the 'Ambient Monastery' Instrument Rack in the Sound Objects Lite Live Pack. Saving an edited version of the Instrument Rack places it in the User Library, in a new folder named to reflect its type in the Sounds category.
By now, you may well already have read the extensive review of Live 9 in the March issue of SOS and be fully up to speed with what's new in the latest version — so this month I'll discuss how you can make the most of some of the new features.
The new version introduces major improvements to make working with Live easier, faster and more intuitive. The new two-column browser shows you more and lets you find things faster. Automation is now shared between the Arrangement and Session views, and new tools make it easier to enter and edit data. Likewise, new editing operations, along with audio-to-MIDI conversion, enhance Live's MIDI capabilities, and many Live effects devices, especially the compressors, are greatly improved. Let's start by looking at the enhanced browser.
Browsing
Live 9's Browser bears little resemblance to previous versions. Instead of the five Browser buttons — Live Devices, Plug-ins and three user locations — you'll find two columns: one for selecting a type of object (Categories) or a location in your file system (Places) and another for displaying the results. The Categories section is a fixed list, but the content is updated as you add and remove items in your Live library. The Places section has three or four pre-assigned locations, to which you can add your own locations from anywhere in your file system. The pre-assigned locations are Packs (any Live packs you've installed), User Library (which you can locate anywhere you like), Current Project and, if you've updated from Live 8, your Live 8 Library. Here are five things to keep in mind:
1. Use the Library tab in Live's preferences to specify the locations of your Live Packs, User Library and Live 8 Library.
2. Live Packs, which include Live's Core library, are read-only. When you edit and then try to save an instrument preset, for example, Live will point you to what it considers an appropriate new location in your User library. The Live 8 Library, if you have one, is also read-only, which means that you will be able to continue using it with Live 8.
3. Search results match all words in the query: the word order doesn't matter.
4. Searches are localised to the selected category or place, but when you change that selection, the search results will update automatically. The All Results category, which appears at the bottom of the Categories list during a search, will reveal everything in Live's search database that matches the search query.
5. In addition to samples and clips, Live will preview Instrument and Instrument Rack presets from Live Packs (but not from other locations). This makes auditioning them far more convenient.
Automation
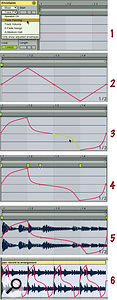
 Here's how to create a reusable pan-automation envelope on a Session view audio clip and loop it in Arrangement view: 1. Create a one-bar audio clip of silence. 2. Select 'Mixer Track Panning' automation and add five breakpoints to create a triangle-wave pattern. 3. Curve the segments as desired by option-click-dragging. 4. Add Warp markers and drag them to change the segment lengths. 5. Drag audio clips into the sample editor window to replace the original (silent) audio clip. 6. To loop the automation in your arrangement either record multiple passes into the Arrangement view or drag the clip to the Arrangement view and then duplicate it (simply looping the clip doesn't loop the automation).
Automation is now fully supported in Session view clips. When you create mixer and device envelopes in Session view clips and move or record those clips to the Arrangement view, the clip envelopes are converted to track automation. Likewise, track automation is converted to clip envelopes when you move clips from Arrangement to Session view. (MIDI controller modulation in MIDI clips and sample parameter modulation in audio clips are not converted to track automation.) Because automation is preserved, when you convert sections of your arrangement to Session view Scenes, they will now sound exactly like the arrangement. Live 9 makes that conversion easier: just select a time range in the Arrangement view and choose 'Consolidate Time to New Scene' from the Create menu.
Drawing and editing automation and clip envelopes is also much easier. You add and delete breakpoints with a single click; type 'B' to change Draw modes; then hover the mouse just above or below the segment between two breakpoints, until the segment changes colour, and then click-drag to move that segment, or click-drag while pressing Opt (Alt on the PC) to create a smooth automation curve.
Working With MIDI
 After removing the false transients circled in red, the audio bass loop at the top was converted into a MIDI loop. The MIDI loop was duplicated twice and the second and fourth passes (brown notes) were altered using the Notes Box's Invert, Reverse and Legato buttons.
Live 9 includes major enhancements to MIDI editing, along with three algorithms for extracting MIDI data from audio clips. (I'll cover those in detail in a future column.) As one example, here's how you might use these new tools to expand a four-bar audio bass loop into a 12-bar MIDI bass track.
Because all the new audio-to-MIDI conversion routines are based on transients in the source audio file, the first step is to check that the transients accurately delineate audio events and to delete any that don't. Next create a MIDI track with the bass instrument you want to use for the MIDI clip and drag the audio clip to a clip slot on that track. Live will let you choose between its three conversion routines; for a monophonic track like bass, choose 'Melody' and Live will deliver a MIDI bass track. Correct any wrong pitches and then click the MIDI Note editor's Fold button so that pitch changes will stay within the original set of notes. Of course, straying a little outside these boundaries can be even more interesting.
Click the Duplicate Loop button in the Notes Box twice to repeat the loop four times. Select the notes in the first repeat (bars five to eight) and click the Invert button. Select the notes in the last repeat (bars 13 through 16) and click the Reverse button, followed by the Legato button. Odds are that the two processes — invert and reverse with legato — will yield usable variations requiring minimal editing. If your bass loop follows a chord progression, more pitch editing may be necessary (especially for the reverse operation).
The Transpose field at the top of the Notes Box provides a quick way to move all selected notes. With Fold off, typing in a note name moves all notes up so that the lowest note is the one named. Typing '–' before the name makes the highest note the one named. Typing a number preceded by '+' or '–' shifts the selected notes up or down by that number of semitones. With Fold on, operations are ignored unless they fit within the allowed notes.
Device Improvements
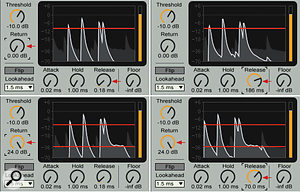
 Used together, Gate's Return and Release controls allow much more precision in sculpting what passes and what is blocked. With no Return and minimal Release, only the peaks get through (top left). Increasing Release by itself lets tails of all events through (top right). Increasing Return by itself blocks all but the last tail (bottom left) and then increasing Release lets more of that last tail through (bottom right).
Compression gets a huge face-lift in Live 9. The new kid on the block, The Glue Compressor from Cytomic, is modelled on the SSL E-series bus compressor and is particularly well suited to Group- and Master-track compression. It offers attack times as low as 0.01ms to capture any conceivable transient and there's a filtered side-chain input, which you can use by itself or mixed with the main input to trigger compression. Multi-band Dynamics (covered in the December 2012 Live column) has also sprouted a side-chain input. Both The Glue Compressor and the revamped original Compressor have Dry/Wet controls for parallel compression (check out the feature on parallel compression in the February 2013 issue of SOS). Compressor also provides upward expansion by offering ratios less than 1:1, and a new display option lets you monitor output level or gain reduction in real time. The Gate effect has a similar display, and using this together with Gate's Return and Release controls makes it easy to prevent gating from being too choppy while still limiting the gate tails. Return sets the difference in the levels that open and close the gate, whereas Release determines how fast the gate closes.
EQ Eight has also received some love, with improved filters, a large, detachable, interactive display (like Spectrum's) that lets you simultaneously adjust multiple bands with the mouse, and an audition mode for monitoring just the bands you're adjusting. Last but not least, Operator offers 'OSC Fixed Frequency' as a new modulation target affecting all oscillators set to Fixed mode.
Further Reading
For a hands-on introduction to Live's new features, check out the tutorials in Live's built-in lessons (select Help View from the View menu and click the What's New in Live 9 tab). Be sure to load the Live set that accompanies the tutorials by clicking the link at the top of the index page.


