Flex your Logic Pro X muscles with half a dozen more tips and tricks.
Let’s pick up where we left off last month. To remind you, instead of going in-depth on techniques related to a specific theme, I’m going to present a selection of some of my favourite tips covering a range of topics.
Play It Again
The more you work in Logic (or any DAW), the more you’ll find yourself repeating the same physical sequences over and over. These are great moments to search the Key Command list for new ways to accomplish navigating the program.
Even simple tasks like placing the playback head in the right spot can cost you time over the course of a project. Two easy methods that I use can speed up your sessions.
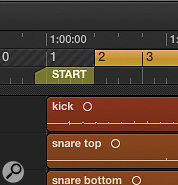
 Regardless of locator positions, a well-placed marker ensures playback from the beginning of your track.Markers are one way, but I never found a way to incorporate them into my workflow — with one exception: in all my templates, I have one marker set at one beat before bar 1. Using the Key Command ‘Go To Marker 1’, I can jump to the beginning of my track easily. This command is normally followed by hitting the spacebar to begin playback. I place the marker a beat ahead of bar 1 to give the graphics a moment to get in place and to allow for any buffering that’s needed.
Another similar playback-related Key Command I use is ‘Play From Previous Bar’. I have it set up to be engaged with Command+Space. This function is useful because it provides a moment before the section is played back to give you a little context. It will also go back a full measure even if the playhead is at the end of the bar you’re in.
One benefit of these commands is that they operate independently of the locators. Normally, if your locators are set to cycle, hitting the spacebar brings you to the beginning of the loop. ‘Go To Marker’ will work in this case and even slide the locators to the marker (which may not be a good thing in some cases), but ‘Play From Previous Bar’ ignores the locator/cycle entirely.
Close-up
An area where Logic shines is in its ability to keep relevant, contextual information front and centre, at any given moment. Early in its development, Logic employed a feature that continues to be part of its workflow: Screensets. Using Key Commands, the user can arrange any combination of various windows and recall them instantly. Whether you are working on a small laptop screen or spread out over several monitors, this feature is invaluable.
Screensets cover a macro overview method of navigating Logic, but zooming in/out on individual windows is a different story. I use the Command key and the four-way arrow buttons for my zooming needs. Conveniently, by holding down the key combination you continue zooming in the selected direction with increasing speed.
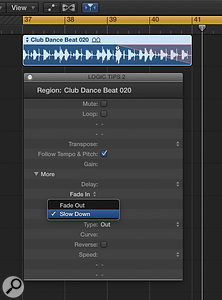
I recently incorporated saving/recalling zoom settings into my workflow. Choose a zoom setting that you find yourself coming back to again and again. Save the zoom setting with the Key Command ‘Save as Zoom 1’. You can do this for up to three zoom levels. Now you can recall each one with a click combination. Open the Key Commands dialogue to see what the key combination is for ‘Recall Zoom 1’. If you like to customise your Key Commands, use a complex command to set the zoom, and a simple one to recall it. With the Fade Out option changed to Slow Down, the ‘power failure’ effect using the fade tool is a snap.
Screensets are project-based so you need to save them in your templates. Zoom settings are global, so they work across all of your sessions.
Power Failure Part 2
Last month I demonstrated a method to make your track slow down and detune as if the power plug was pulled. The process took advantage of several of Logic’s tools: bouncing, converting audio to sampler tracks and editing the EXS24 instrument. This month I want to show you an even easier method. I’ll use a drum loop in this case but it’s the same process for a whole mix (once it’s bounced and imported back in).
Select the region you want to affect. Direct your attention to the Region Parameter Box. Click on ‘More’ to open up additional options. Click the words ‘Fade In’ and select ‘Slow Down’ instead. Now, with the fade tool, draw in a fade as you would for volume at the point where you want the region to begin slowing down. You can also change ‘Fade In’ to ‘Speed Up’ for more experimentation.
Pick Me Up
Nothing starts off a track better than a little pick-up into the first bar. Whether it’s a drum fill or a crazy bass slide, a pick-up is a freebie when it comes to gaining the listener’s attention. Two potential problems come up when dealing with pick-ups, however.
 Got a two-beat drum intro? Making the first measure 2/4 keeps the rest of the song on the grid.
Let’s say you have a two-beat drum fill to kick things off. If you place it on beat 1, the rest of the song is offset by a half measure. If you place it two beats before beat one, the SMPTE time will be off. That can be problematic if you’re working on a commercial or anything where your track length needs to be accurate.
These two problems are easily fixed. If you prefer the pick-up to begin at the very start of your tune (bar 1), simply change the bar’s time signature to the length of the fill. First move the playhead to anywhere in the first measure. Next, double-click on the top ‘4’ of the 4/4 in the display at the top of the arrange window. In this case, change it to a 2. You then need to change the following bar back to 4/4 using the same procedure, since Logic will continue any meter changes until there is a further change.
If you don’t want to deal with meter changes, and would rather have your two-beat fill land where the song begins (beat 1, bar 1), then try this. Open File/Project Settings / Synchronization. Change the Bar Position to the point where your pick up starts (two beats before bar 1) and keep the SMPTE field at 01:00:00:00.00. Now your track will begin before beat 1 and that extra time is represented in the SMPTE readout.
 By adjusting the bar position in the Synchronization settings, you can start the clock at any point in your track.
Marquee Mark
The Marquee tool is fast becoming my best friend. I keep it as my secondary tool so I can easily access it by holding down the Command key. By getting familiar with it, your workflow may improve significantly.
- Click anywhere with it and press the spacebar to begin playback, regardless of the cycle settings. Or select a range, hit space and it will only play once — no looping.
- Quickly split a region by clicking and dragging. You can then mute, delete, change gain or perform any edits to the new section of the region.
- When viewing automation lanes, use the Marquee tool to select an area to edit. The tool will create nodes on either side of the selection for easy changes.
Still unsure about how to add Marquee tool efficiency to your workflow? Get your feet wet by selecting Marquee tool ‘click zones’ in Preferences / General / Editing. With this option selected, the pointer will change to the Marquee tool when it’s placed in the lower part of a region.
Terminal Velocity
By selecting multiple notes in the Piano Roll editor, you can adjust their relative velocity with the Velocity slider or Velocity tool. But did you know that with Shift+Option held down while performing this, the values of all the notes will become equal?
With multiple tracks selected in the mixer, changes like input, output, and bus assignments will apply to all selected tracks. But did you know that with the Option key held down, the values will be assigned in consecutive order? This makes setting up the inputs for, say, a live drum kit a breeze. It’s also great for selecting the bus inputs to a group of aux tracks.
Logic can sometimes seem like its moniker is a passive-aggressive joke from the software programmers — but the more you dig into it, the more it starts to seem... logical.


