Tightening timing, sustaining snares and silencing sibilance are among the tasks tackled in this month's remix...
, Alex Clay Simms‑Rosser (vocals), Phil Watson (bass), and Krystian Winn (drums). They pride themselves on their live performances — and they must be doing something right, because they've been invited to play the Newquay Boardmasters Festival for two years running, alongside signed bands such as Madina Lake, Young Guns, and We Are The Ocean.") This month's Mix Rescuees are the band We Fell From The Sky, comprising SOS reader Henry Schofield (guitar), Alex Clay Simms‑Rosser (vocals), Phil Watson (bass), and Krystian Winn (drums). They pride themselves on their live performances — and they must be doing something right, because they've been invited to play the Newquay Boardmasters Festival for two years running, alongside signed bands such as Madina Lake, Young Guns, and We Are The Ocean.
This month's Mix Rescuees are the band We Fell From The Sky, comprising SOS reader Henry Schofield (guitar), Alex Clay Simms‑Rosser (vocals), Phil Watson (bass), and Krystian Winn (drums). They pride themselves on their live performances — and they must be doing something right, because they've been invited to play the Newquay Boardmasters Festival for two years running, alongside signed bands such as Madina Lake, Young Guns, and We Are The Ocean.
Despite Henry Schofield's dissatisfaction with the mix he'd done of his band's song 'Not You', there was nonetheless much to recommend it — a clearly focused style and structure, sensible arrangement, and some truly committed performances, vocally in particular. So what was preventing him from attaining the kind of American rock sound he was looking for? It didn't seem to me that processing quality was holding him back, as he mentioned using high‑quality plug‑ins, including SSL's Duende collection and IK Multimedia's reverbs, and his drums were coming from Toontrack's Superior Drummer 2, which I know to be capable of decent results.
Mix Rescue | May 2011 by Sound On Sound
Henry had encountered two big difficulties. Firstly, the drummer hadn't got on tremendously well with the Yamaha DTXpress II electronic drum kit via which the samples were triggered (they've since switched to a Alesis Trigger IO‑based system, which he much prefers), and their attempts to smooth out the MIDI timing and velocity data after the fact yielded limited improvements. Secondly, Henry had found it tricky to retain definition for each drum, while at the same time binding it into the kit as a whole. I agreed that the drum timing was still a bit dodgy, but I also thought that the guitars were sounding quite thin and weak — a result, it later transpired, of attempts to EQ more space into the mix for bass and vocals. All in all, there seemed plenty of scope for tweakage, so I asked Henry to send me his unprocessed multitrack files so that I could have a go at a remix.
First Impressions
Importing the files into my Cockos Reaper‑based system, I immediately started work on the drums — because a rock track like this stands or falls by its drum sound. As I've come to expect from sample‑based drum instruments, there was no shortage of 'virtual' mics to choose from: three each for kick and snare; one each for the hi‑hat and three toms; stereo overheads; and five different room recordings (two mono, three stereo). However, as usual, I began by listening to just the overheads.
Voxengo's MSED narrowed their image down significantly, because it felt disconcertingly wide as it was. Otherwise, the sound didn't seem too bad, so I moved on to investigate the kick‑drum close‑mics. One of these was a sub‑bass track which seemed out of character for this mix, given the fast drum pattern and continuous bass‑line, so I used a balance of the other two, grouping them to a common channel where I could harden them up with equalisation from Stillwell Audio's Vibe EQ (I used peaking filters for a 5.8dB cut at 150Hz and a 2.8dB boost at 2.5kHz) and emphasise the attack using SPL's Transient Designer.
Snare Drum: The Importance Of Sustain
 Fast compression from Cockos ReaComp was used to rebalance the snare‑drum sound in favour of its decay portion.
The three snare-drum mics all had something useful to bring to the party. One needed some soft clipping to smooth out an over‑emphasised attack spike, but otherwise I left further processing to their communal group channel. A deep notch at 425Hz killed a nasty pitched resonance, and while I normally use the narrowest possible bandwidth in these instances, to leave neighbouring frequencies untouched, in this case the resonance had a slight pitch dive to it (which I'm more used to hearing with toms), so I had to widen the bandwidth a little to make it effective.
If a rock snare‑drum has too much attack, it tends to be reduced to little more than a tiny 'blip' when masked by a phalanx of guitars in the mix. For this reason, I often add sustain to this instrument, to retain more body in drum sound. The first method I used was roughly 6dB of 4:1 ratio compression, reining in the drum peaks with a medium 9ms attack time in Reaper's ReaComp, and then using a fast 35ms release to reset the gain‑reduction well before the instrument had fully decayed. It's worth mentioning that I initially set an even faster attack time, but that dulled the character of the transient too much. Once I'd rebalanced to make up for the loss of gain, the result was an increase in the sustain levels.
The second decay‑enhancement tactic I used was to create a duplicate of one of the snare tracks, shave all the attack off using an instance of SPL Transient Designer, and hammer it with Stillwell Audio's Bad Buss Mojo distortion processor. As I'd hoped, this not only increased the sustain, but also thickened the combined sound's frequency spectrum, although both these enhancements needed some further tailoring to tuck them into the mix properly. I refined the distortion component's envelope with an instance of ReaGate first, softening the onset even more with 18ms of attack time, and then tightening up the sustain element with hold and release times of 18ms and 123ms respectively. The frequency balance was also then adjusted with a 4dB high-shelving cut at 1.1kHz, and for this I used DDMF's LP10 equaliser, operating in linear‑phase mode so that I wouldn't have to worry about phase‑shifts causing frequency cancellation between the distortion channel and the other mic signals.
Decisions, Decisions
 Sustain was added to the snare drum using a parallel distortion effect, courtesy of Stillwell Audio Bad Buss Mojo. Fitting this effect into the mix required EQ from DDMF LP10 and envelope shaping from SPL Transient Designer and Cockos ReaGate.


The hi‑hat mic seemed fairly redundant to me, so I ignored that for the moment and went on to the various room mics. I also weeded out three of the five sets of five rooms, on the basis that I wanted them to provide as much support for the snare as for the cymbals. Placing the two more useful rooms (one mono and one stereo) then only required a little high‑pass filtering (to keep the kick‑drum clear) and some slight stereo widening (again with Voxengo MSED), because I usually like the room to be wider than the overheads — although opinions on things like this do differ between engineers.
Before I go on, I'd like to emphasise that there's no obligation at mixdown to actually use all the tracks you're presented with, especially when you're dealing with extravagant multi‑miked recordings. Part of what mixing is about is deciding whether each track supports the overall sound, so don't be afraid to bin things that aren't helping you. Even the main snare mic can be ditched if it's doing more harm than good — as in my SOS April 2008 and March 2011 remixes, for instance. I suspect that one reason why a sense of 'definition' of the individual drum sounds within the kit had eluded Henry may have been that he was trying to use too many of Superior's room‑mic options at once.
Finally, I brought in the toms. What was interesting here was that Henry had singled out the toms as causing him the greatest problems, but they actually proved the easiest thing to deal with. The biggest problem was that all three mics had some harsh‑sounding spill from the cymbals, which upset the balance. Many engineers use a lot of gating to deal with this kind of thing, but for rock I personally prefer to keep as much spill as possible, for a fuller sound, so I simply low‑pass filtered the toms at 9kHz to take the edge off the cymbals spill. Given that I mainly wanted to add power and body to the tom sound with these mics, that didn't really undermine their primary purpose at all. All that remained was to high‑pass filter each of the individual mics to keep the low‑end clutter at bay, and balance them together.
 The final thing standing between me and a respectable opening drum balance was that, despite my best efforts so far, the snare ambience still wasn't competing well enough with the cymbals — the snare felt narrow and wasn't blending well with the kit. To remedy this, I first applied some limited‑range gating to the overheads, triggering it from one of the snare close mics, so as to reduce the relative cymbal level. However, I couldn't push that far enough without it sounding unnatural, so I also drafted in SSL's Duende X‑Verb reverb plug‑in, starting from a preset that seemed a reasonable match for the drum kit's own recorded space. To increase the blending/thickening action, but without adding an obvious tail, I shortened the reverb time to 350ms and increased the early reflections level. Narrowing the stereo picture brought the added ambience more into line with the narrowed overheads image, and further reduced the reverb's audibility as an artificial effect.
For rock mixes, I often like to compress the whole drum bus, but never really felt the need here, instead using SSL's Duende Bus Compressor plug‑in over the whole mix for some pumping and 'mix glue' once the majority of the full dry mix balance was complete.
Bass Troubles
I brought the bass up next, and discovered that the performance was disappointingly uneven, in terms of both timing and frequency balance. I've processed and edited enough dodgy bass parts in my time, and experience suggested that I'd find myself on a hiding to nothing if I took that route here, so I decided to replace the part instead. I don't play bass myself, and with no session player on hand I opted to use a MIDI instrument instead: the 'Classic Bass' patch from NI Kontakt's bundled sample library. This only took about 20 minutes to set up (fortunately for me, the band had used a click track), and in the process I ensured that the sound remained as consistent as possible, both by ironing out variations in the MIDI note velocities and by compressing the sound at a 4:1 ratio using Stillwell Audio's The Rocket.
Introducing a new MIDI‑generated part to a rock mix like this might raise eyebrows amongst more dogmatic musicians, but you always have to ask yourself whether your listeners will actually be any the wiser. In this mix I felt that very few people would smell a rat, but I still hedged my bets a little, reintroducing some of the live character of the original part by band‑pass filtering it at 1kHz and mixing it in, plus I simultaneously low‑pass filtered the MIDI instrument at 2.6kHz to make more space for it. A final step was to make a little more of a distinction between the kick and bass sounds, by cutting 4dB from the former at around 100Hz and boosting the latter by 4dB at the same frequency.
Combating Vocal Sibilance
 The submitted bass part was so problematic that Mike chose to replace it with a MIDI performance using a bass patch from Native Instruments' Kontakt software sampler.
In most respects, adding in the vocals was quite straightforward, involving some level control from Jeroen Breebaart's general‑purpose PC2 compressor and Universal Audio's LA3A emulation, as well as a bit of EQ cut in the 3‑5 kHz area to round the corners off the general tone slightly. Given the differences between the song sections in terms of guitar textures and vocal delivery, though, I needed to do quite a lot of multing to adapt my processing to the needs of the arrangement. The main problem with all the vocals was that they were very sibilant, and I ended up combating this in a variety of different ways on different tracks, depending on which seemed to tackle each one best.
One approach I used was the DIY trick of boosting with a high‑frequency peaking filter in a compressor's side‑chain, using Reaper's ReaEQ and Stillwell Audio's The Rocket in tandem, but I also use multi‑band compression (from ReaXcomp) and a couple of different dedicated de‑essers: Universal Audio's Precision De‑esser (running on a UAD2 card) and Digital Fishphones' freeware Spitfish plug‑in. (For more details on setting up de‑essing, check out my article on the subject back in SOS May 2009 at /sos/may09/articles/deessing.htm.) In some cases, I even chained a couple of these setups together to achieve firmer sibilance reduction. However, regardless of the specific setting, the underlying aim of the processing remained the same, namely to reduce the harshness of the sibilance in the balance, without effectively knocking out the singer's incisors.
In practice, it can be quite difficult to achieve this balance in noisy mixes like this one, because of the need to make the vocal clear against all the high frequencies from other instruments. Indeed, it's possible to find yourself in a position where you are unable to reduce the harshness of your sibilance adequately before it sounds like it's lisping in context, on account of strong HF masking effects from the general din. There was a whiff of that problem in this project, in fact, and it took quite a lot of careful listening and mix tweaking before I was finally able to square that particular circle. Additional HF cut to the overheads and guitars proved to be part of the solution, but mostly it was just a case of tinkering with the de‑essing for a little longer than usual, in search of an adequate compromise for each part.
Once In A Blue Moon
, Cockos's ReaXcomp multi‑band compressor, and Digital Fishphones's freeware Spitfish de‑esser were all used.") A variety of de‑essing methods was used for the remix, depending on how each one performed for each vocal part: Universal Audio's Precision De‑esser, Stillwell Audio's The Rocket compressor (with a heavy 7kHz EQ boost in its side‑chain), Cockos's ReaXcomp multi‑band compressor, and Digital Fishphones's freeware Spitfish de‑esser were all used.
A variety of de‑essing methods was used for the remix, depending on how each one performed for each vocal part: Universal Audio's Precision De‑esser, Stillwell Audio's The Rocket compressor (with a heavy 7kHz EQ boost in its side‑chain), Cockos's ReaXcomp multi‑band compressor, and Digital Fishphones's freeware Spitfish de‑esser were all used.


On the whole, the guitars slotted into the mix without a tremendous amount of processing. Some EQ cuts were required to avoid muddying the bass or masking the vocal too heavily in the presence/sibilance regions, but that's pretty much par for the course in rock styles. The only real sticking point for me was that the main chorus rhythm parts suffered from being too heavily overdriven — and although this was fine for the more riff‑based verse and pre‑chorus parts, it was generating too much hash once the chords dug in. This is a common problem in Mix Rescue submissions, and it means that you can't turn up the guitars in search of extra power and definition, because it just adds harshness or mush.
There are many possible solutions. One option is to re-amp a DI signal to get a more usable part, but no DI tracks were available. Another tactic is to overdub cleaner parts alongside — or, for a non‑guitarist like me, to use the chord loops from Nine Volt Audio's Metal Guitars REX library. However, I couldn't fade the samples up very much before 'blanding out' the overall guitar texture. Layering in some kind of pad is another stalwart trick, but I couldn't go very far with it here before it sweetened the mood incongruously.
The desired assistance came, in the end, from a couple of dodges I only use once in a blue moon, but which are well worth knowing about for those few occasions where they come up trumps. First I used narrow‑bandwidth peaking EQ boosts to specifically pick out the pitched harmonics that accounted for the note definition in the recording. It's only really feasible to do this with very simple parts, and fortunately there were only two notes that I wanted to emphasise here (F-sharp and G). I placed narrow boosts at 378Hz and 400Hz to catch their fundamental frequencies, and then also boosted at three different multiples of those frequencies to enhance a handful of harmonics. With eight bands overall, each boosting 3‑4dB over a tenth‑octave bandwidth, the improvement was considerable. So, although narrow peaking‑filter boosts are normally considered a distinct no‑no as far as general mix‑balancing is concerned (because of unnatural tonal artifacts), once in a while they can be just what the doctor ordered.
The distortion had also softened the rhythmic definition, in response to which I applied another unusual dynamics processing fix via an instance of U‑he's Uhbik T tremolo plug‑in. Because this plug‑in happily syncs to tempo and also provides a highly programmable LFO modulation curve, you can use it to emphasise a track's rhythmic envelope. The way I set it up was first to increase the tremolo depth so that I could easily hear the effects of my tweaks to the LFO's timing, shape, and phase. Once the LFO was reliably creating a sharp pulse of audio at the start of every eighth note, I then reduced the modulation depth until the effect began to sound less artificial. Again, it's not exactly the textbook application of tremolo, but it was nevertheless very effective at livening up the guitar dynamics.
Effects & Referencing
With the main parts all sorted out, the rest of the mix was fairly plain sailing. The few remaining parts were squeezed into the balance where space allowed, and then a selection of send effects added some fairy dust: ambience reverb to blend the lead vocals and guitar solo with the backing; a global room reverb to increase the dimensions of the apparent space; a simple stereo tempo‑sync'ed delay to sustain lead vocals and the guitar solo; and a selection of different stereo widening treatments (chorusing, Haas delays, pitch‑shifted delay). I've talked about these kinds of effects in previous Mix Rescues, but rather than go over that ground again, I wanted instead to talk a little about the final mix‑referencing process, which was more than usually involved for this project.
 These two rather unorthodox EQ settings were useful in bringing out the pitched components of an excessively overdriven rhythm‑guitar part.
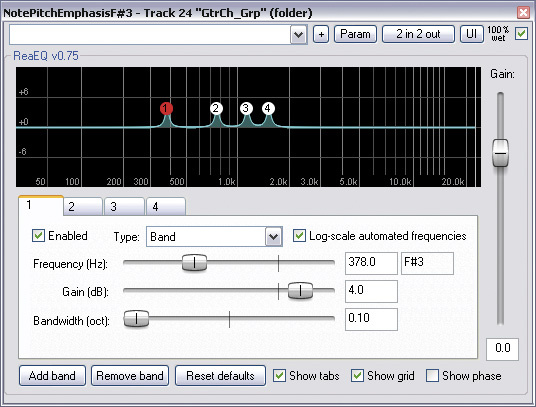 The two main reference tracks that Henry had mentioned were YouMeAtSix's 'In Your Shoes', and 'On The Cross' by The Used. Both tracks were commercial masters, however, so the first thing I did was apply some mastering‑style loudness enhancement from IK Multimedia's T‑Racks Brickwall Limiter in order to compare my unmastered mix on a roughly equal footing. Sure enough, the drums in my mix needed a bit of sharpening to compensate for the transient‑dulling effects of that kind of limiting, but that was only the start of it.
The big difficulty was that the reference two tracks had quite different sounds, so it was a bit of juggling match working out which elements of each might be the best models for 'Not You'. Mix referencing isn't a question of trying to carbon‑copy the sonics of other productions (a hopeless task anyway), but it's nonetheless important for a commercial mix to be able to sit comfortably in a playlist alongside the competition. So I allowed my chorus drums to be louder and subbier than YouMeAtSix, but not more than The Used, for example, while YouMeAtSix gave me more pointers for the verse vocal sound than The Used — in fact, I was so dissatisfied with my own mix's first‑draft vocal sound that I scrapped it completely and rebuilt it from scratch! The guitars, on the other hand, were more inspired by the harder‑edged sound of The Used, which seemed to fit in with the emotion of 'Not You' best.
There's more to referencing than just trying to line up your mix with the best balance/sound attributes of its market peers, though, because the mix has to function in its own right. Yes, maybe your verse vocal now sounds even better than your favourite record, but if that makes other aspects of the overall production sound lame by comparison, you've scored an own goal! Getting to a good compromise between these short‑term and long‑term considerations can be a challenge, so don't expect to get everything working in one shot. It's also important to bear in mind the wishes of the artist, so if there's any rough mix available, that can give valuable clues as to their priorities. And that's all before you take into account any of your own views, based on your own knowledge of the commercial music landscape.
Hopefully, it should by now be clear why the mix version I ended up sending to Henry as a first draft was actually my ninth bounce‑down! Going around the houses that many times might seem like purgatory, but it's also the most reliable and budget‑friendly way to improve both the quality and the consistency of mixes — and indeed your mixing instincts.
Take It Or Leave It
 It's not a bad idea to export your mixdown to a separate project for mix‑referencing purposes.
A lot of what this mix was about was deciding what not to include in the mix, and hopefully I've been able to demonstrate how beneficial it can be to question whether you really need every last overdub at mixdown. In addition, the sustain‑enhancement and de‑essing methods I used in this remix are applicable in a wide range of different styles of music, so do experiment with some of those on your own projects, if you've not tried them before. And whatever you do during the mix, do resist the temptation to skimp on the mix referencing process, because it's one of the best tools available for increasing the quality of your output when working on a budget.
Audio Files Online
We've placed a number of audio examples, including the full original and remixed versions of the track, at /sos/may11/articles/mixrescuemedia.htm, so you can hear the differences for yourself.
Remix Reactions

Henry Schofield: "I am really stunned with the remix Mike has done! Overall, the track just seems a lot fuller in sound, especially in the mid-range. The bass guitar has more attack and is significantly louder than in my mix, which gives the track a lot more energy. The drums are exactly what I wanted to achieve, with the tom sound really being tightened so that the drum fills sit in the mix. I have also really enjoyed some of the more subtle effects Mike has included, especially with the guitar solo, which has some automated reverb/delay that helps move the guitar solo around just enough to have your ears prick up.
"The other major point I feel Mike has helped with is the tightening up of sections. For example, before the guitar solo there is a section of instrumental stabs that I was never happy with, and finally it sounds how it should, with everything tying together nicely. There is so much to mention and such a tiny box for this to go in, but rest assured that Mike Senior has done a stellar job! I hope I can replicate some of these great ideas in my future mixes.”
Drum Timing
 Because the band's drummer had difficulties getting comfortable with Yamaha's DTXpress II electronic drum kit, the Toontrack Superior Drummer drum tracks he triggered from it needed extensive editing to smooth out the timing.
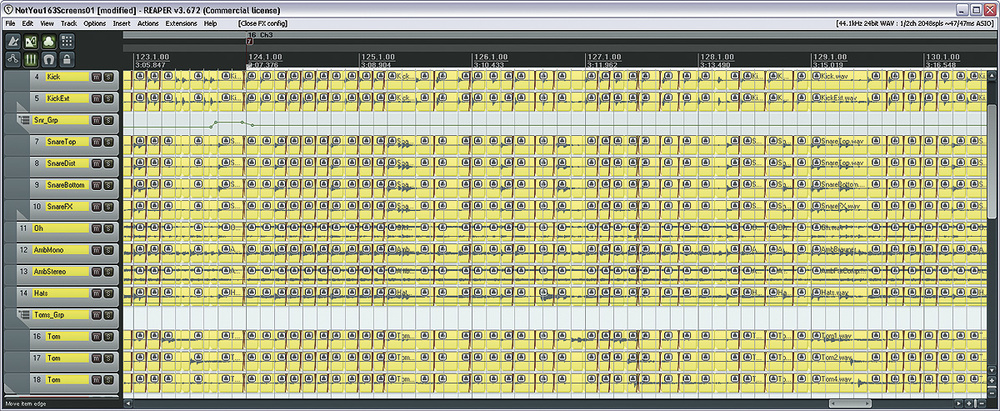 Although Henry had a good stab at editing the drum timing, he wasn't able to achieve a result he was happy with, and I reckon there are probably two main reasons why. The first is that he may have given up too early — it took me more than 500 drum edits to achieve the result you can hear in the remix, as well as some slightly less involved timing tweaks to the bass, guitars and vocals. The second reason he may have struggled is that the drummer had not only misplaced many isolated hits, but his overall groove also wandered relative to the click. So he'd perhaps drift imperceptibly behind the click over the space of a few bars, and then suddenly correct this misalignment, giving the subjective impression that he was rushing, even though he was now tracking the grid more closely. The lesson here is that the apparent musical timing of a note depends a great deal on what has gone before it, not just on the placement of those hits that actually seem to sound out of time.