With multiple undo functions and real-time processing, Studio One gives you the freedom to turn back the clock...
Computers  Studio One has a lot of pretty advanced 'undo' functions. For example, Restore Timing, which we can see here. The top screen shows the audio before processing; the next shows the audio once Quantise has been applied, with transients detected, Audio Bend markers placed and time-stretched audio in red; and the bottom screen shows the audio once Restore Timing has been applied: the Bend Markers remain, but the file has been returned to its original timing.
 are now powerful enough to do all kinds of processing in real time that used to require rendering, fades being the most obvious example. (Note that I am not addressing regular effects processing in this column.) Studio One, with the newest code base of any of the major DAWs, was written to maximise real-time processing capability, and this means that the program gives you real freedom to turn back the clock if you should change your mind. So, this month, along with real-time processing, we'll be looking at Studio One's various 'undo' features.
The Real Deal
Most of the features we're going to look at now are located in the inspectors.
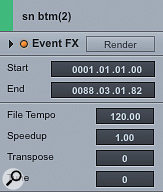
Each audio event is equipped with real-time pitch-shifting provided by the Transpose and Tune fields, and time compression/expansion in the Speedup field, all of which are in the Event inspector. Things get interesting with tempo-locked processing, however.  The Audio Event inspector gives every event its own real-time processing parameters. Speedup is tempo-independent time change without pitch change.
Studio One allows a tempo to be set for each audio file in the File Tempo field in the Event inspector. Loops may have a tempo already encoded in the file, or in the filename (in which case it can be manually entered).
Once a tempo is defined, depending on the time-stretch mode set in the Tempo field of the Track inspector, audio will be adjusted by time-stretching to match the tempo of a song. Change the tempo and the audio is stretched to match. Another useful feature in the Event inspector is real-time peak normalisation, although the normalisation level is fixed at 100 percent.
Instrument parts and tracks both have real-time transposition in their respective inspectors, and the Timebase field in the Instrument Track inspector provides time-stretching in the sense that it conforms MIDI note timing to the tempo. The Instrument equivalent of normalisation is real-time velocity scaling, which acts like a master fader on note velocities in the part. It's available in both the Track and Part (Event) inspectors.
More To Restore
Let's now explore some of Studio One's undo functions. Besides the regular, single-step Undo, there is the Undo History window. This is a straight-forward one-dimensional list that you can jump around in, but if you revert to an earlier step and then make any changes, all the steps in the Undo History following that point are disposed of.  Here, I've reverted back to step 10 using Undo History. Note that the following steps (all Move Events) are now greyed out to show they are no longer active.
There are two more undo functions worth mentioning. The Restore Timing command (press Shift-Q,or look in the Event menu) will undo the result of quantisation operations performed on MIDI notes or Audio Events and return the notes to their timing as originally recorded. But there are a few situations in which Restore Timing will not work; for example, if you have moved any notes manually since applying quantisation, or any notes were recorded with input quantisation engaged.
With audio, Restore Timing won't work if Events have been quantised using the 'Quantise On Track' command, which quantises the start time of an Event, but it will work if the Quantise command is used. The Quantise command performs a transient detection pass on the Event, places Audio Bend markers where it thinks beats are, and then uses time-stretching to quantise the Bend markers to the grid.
Restore Velocity (in the Event / Musical Functions submenu) is similar, in that it returns note velocity values to those originally recorded, but it is somewhat more robust than Restore Timing, in that it will work even if velocity values have been modified manually.
Turn Back Time
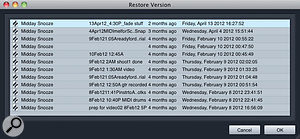
When it comes to undoing something, nothing beats Studio One's Versions feature, which takes a snapshot of the entire state of a Song file. Choose the Save New Version command (Option-Shift-Cmd-S on a Mac, Alt-Shift-Ctrl-S in Windows, or File / Save New Version), enter a name in the dialogue window that comes up, and your session is preserved. To return to that snapshot, choose File / Restore Version. (There is no default key shortcut for Restore Version, but one can easily be assigned to it. I chose Option-Shift-Cmd-R.)  The Restore Version dialogue allows you to access snapshots of an entire Song stored at an earlier time.
I find this feature extremely powerful and useful for numerous purposes. Unlike Undo History, restoring a version has no effect on versions stored after it, so you can jump around in time freely, perhaps copying something you like from an earlier version, and pasting it into the most recent version. If you had it before, you can have it again.
Probably the most important aspect of the Versions feature for me is that it eliminates the need to store multiple copies of a session document to preserve its history. Some DAWs force me to save a session copy every hour or two to protect against accidental deletions, file corruption and other errors. My typical strategy is to store a version as soon as I get a session completely configured, then save a version every time I complete some work I would be annoyed to lose. Instead of a folder full of old session documents, I have a single document, within which I can access any of my previous versions.
But this tactic is not limited to preserving session evolution; it can also be used to store alternative versions. Sometimes I bounce a rough stereo mix of everything in a session before I start overdubbing vocals so that I can overdub in a simplified session with only a single stereo track of instrumental material to deal with. Once I get the vocals recorded, I can copy the tracks, restore my original version, and paste the vocals in. There is a lot you can do with Versions!
Version Tips
Now I'll pass on a few tips to make your use of Versions as fruitful as possible.
The most powerful single tactic for maximising the usefulness of versions is to be assiduous about naming them and have a logical naming scheme. The Restore Version dialogue displays the creation date, but I've seen file dates get messed up before (although not yet in Studio One), so I typically start the name with the date and time, then add a short description of the most important differentiating aspect of that version (for example, "3Jun12 9PM-new vocal odubs”.
If you don't name your versions well, you absolutely will not remember why you saved them when you come back a week later, let alone a month or year later. At that point, your only choice will be to open each version in question and play Sherlock Holmes. That's not how I like to spend my session time. Furthermore, you can neither rename nor delete a version once you have created it, so get it right the first time. The Save New Version dialogue will allow you to enter quite a long name, but the Restore Version dialogue only displays about 24 characters, so make sure the most important information is in those first two dozen characters.
I recommend saving a version before you do anything that could alter it. I save a new version every time I open a Song before working on it, although one could just as easily save a version as the last thing before quitting Studio One each time. I also save a version before I restore an older version, just to make sure it's easy to get back to where I was.
Tools For Success
Studio One provides quite a few features that facilitate the creative process by making it easy to experiment without fear that you might irrevocably lose something good. I view Studio One's real-time processing as a set of low-level tools that increase the malleability of my Song, while the Versions command is an extremely powerful high-level function that effectively lets me jump around in time.


