We go back to basics this month, with an in-depth look at how you can get the best out of Reason 's Remix mixer.
Although undoubtedly familiar to any Reason user, the Remix mixer is surprisingly versatile, offering no end of creative routing possibilities.
Most Reason users will be fairly familiar with the Remix mixer — so what hidden depths and tricks can we find associated with this most fundamental of devices? We'll start with some basics, which might be handy if you could do with a refresher on the functionality of mixers in general, then look at some more advanced concepts and routing techniques.
Going back to first principles then, the main function of the Remix mixer is to take the audio outputs from up to 14 devices or instruments, and mix them together to a single stereo output. Most commonly, this stereo mix will be fed to a pair of outputs on Reason 's Hardware Interface at the top of the rack. However, unlike most music programs, which have one mixer at the heart of their whole environment, the Reason mixer is just another device that can be used at various places in the rack. In fact, a Reason project does not have to contain a main mixer at all; you can just plug instruments and effects directly into separate outputs on the Hardware Interface. This is often the best approach when using Reason as a Rewired synth rack in another application that has its own mixer.

Most of the time, Reason 's auto-cabling system takes care of making connections to the mixer, although, as we'll see, you shouldn't rely on it to always make the best decision for your needs. If you select the mixer, then create an instrument, the new device will be connected to the first available mixer channel. The name of the connected device will appear in the channel, and you can then set the instrument's level and position in the mix using the fader and pan knob.
Let's have a look at the rear of the device to gain a bit of insight into what's happening. In the screen above I've created a mixer, then a Subtractor synth, and finally an NNXT sampler. You'll see that Reason has connected the Subtractor 's single audio output to the channel 1 input connection labelled Left (mono) Audio Input. NNXT is a stereo instrument, and its two main outputs have been connected to the left and right audio inputs on channel 2. Each mixer channel can handle either a mono input or a stereo pair. When a single input is connected to a channel, it is routed to both the left and right master mix outputs, with the pan control setting how much of the signal goes to each, effectively positioning the instrument in the mix. When a stereo input is connected, the left signal is routed to the left mix output and the right signal to the right output. The pan knob then becomes a balance control, setting the relative levels of the left and right inputs. See the 'Dual-channel Stereo' box for an alternative way of working with stereo sources.
Dual-channel Stereo
 The width of stereo sources can be controlled by using two separate mixer channels. The Remix 's channels switch automatically between mono and stereo modes, depending on what's connected. For the most part it's convenient to have a single fader strip controlling your stereo sound sources. However, there are times when you need to treat the two sides of a stereo pair separately. In these cases you can connect the left and right signals to two separate mixer channels. Both signals should be connected to the Left (mono) inputs. The most common reason for doing this is to gain more control over the panning of stereo sources. As we've seen, when using a single stereo channel the left signal always gets routed to the left of the mix, and the right channel to the right of the mix, with the panner setting a balance between the two. What this doesn't give you is a way of controlling the width of the sound source. Some instrument patches and samples can sound very wide, and you may want to narrow them in the stereo field. With the panners set full left and right, as in the accompanying screen, you will get the same result as with a single stereo track, except that the sound will be 6dB louder (because there is 6dB of attenuation on stereo tracks when the panner is centred). However, you can now alter the left and right pan positions independently, to set how wide the stereo sound appears. The mid point between the two panners determines the apparent position of the sound. In the screenshot below the width and position of a stereo string-sample patch has been set using the two panners.
Return To Sender
Between the inputs and the master outputs on the back of the mixer you'll find the Aux section. Experienced mixers will be in familiar territory here. Aux busses, Sends and Returns are standard-issue mixer features. In Reason they are mainly used for adding various levels of an effect to channels in the mixer. If you select the mixer and create an effect device, it will be auto-cabled to the mixer in a classic send/return configuration (as shown in the right-hand screen above ). The Aux 1 stereo outputs are connected to the reverb's inputs, and the reverb's outputs go to the Return 1 inputs. The Aux 1 knob on each channel sends a portion of the signal to the effect, which is a quick way of working and allows you to share one effect among various channels.
 Some simple connections from instrument to mixer. Each mixer channel auto-switches between mono and stereo operation, depending on what's connected. While we're taking time to go back to basics, let's look at exactly why this works. Once you understand exactly how all the connections work, you can start overriding the auto-cabling system and patching the mixer exactly how you want. The Remix mixer has a main stereo mix bus which appears at the master outputs, with faders controlling how much of each input goes into the mix. However, there are four additional mix buses — the Auxiliaries — which appear at the Aux Send outputs. Instead of faders, the Aux knobs set how much of each input goes to each Aux bus. In traditional recording scenarios, these Aux buses are used to create multiple headphone mixes, but the Auxes can be deployed any time to send a signal, or a mix of signals, anywhere in the rack.
The Returns are simple inputs that feed into the main mix, with level controls appearing at the top right-hand corner of the mixer's front panel. When they're used as returns from an effect unit, the effect's dry/wet control should be set to 100 percent wet, meaning that only the effected sound is fed back into the mixer. This prevents the original sound from being doubled up and causing phase problems. For the same reason, send/return effect routing is only normally suitable for effects where the wet output is significantly different or shifted from the source sound, as with reverbs and delays. Effects such as compression, EQ and distortion are generally best used directly on source signals (see 'Inserts & Plug-ins?' box).
A classic send and return patch to a RV7000 reverb unit.
Like the Aux outputs, the Returns are not limited to being used for effects. They can be used as extra input channels for sources that don't need the pan, EQ or send features of the main channel strips. In some circumstances this can save you having to create a second mixer. Conversely, you don't have to connect return signals from effects to the Return inputs: you can use standard input channels. This allows you to EQ the effected portion of the sound, or to process it further via another send effect. Common examples of this are filtering a reverb return, or sending a delay to a reverb so that both the original sound and its echoes have reverb. Just be careful not to create a feedback loop by sending the returned signal back to its own effect (although, done carefully, this can be used creatively).
By default, all four Aux mixes are post-fader, meaning that the levels are affected by the main channel faders as well as the Aux knobs. This is useful when using Auxes for effects sends, because it means that when you adjust a fader the amount of signal going to the effect changes as well, preserving the dry-to-wet ratio. Aux 4 has a button marked 'P', which lets you switch the Aux Sends to pre-fader operation on a channel-by-channel basis. This means that the level going to the Aux mix is independent of the main fader, and is useful when you need a very high proportion of a send effect on a sound. It even lets you keep the main fader down for a '100 percent effected' sound.
Inserts & Plug-ins?
 Reason's mixers don't need insert points, as you can simply connect effects in-line as required. If you come to Reason from another music package, you might find yourself saying, 'where are the plug-ins?' Pretty much all other music programs use the traditional mixer concept of inserts. These are connections on the mixer channels where you can divert the signal to and from another device. On traditional hardware mixers, these are used to add an external processor, such as a compressor, into the signal flow of a mixer channel. Software mixers also often have insert points where you can divert audio out through external devices, and these make convenient places to add virtual audio devices (plug-ins) too.
As Reason cannot take audio from the outside world, the mixer dispenses with the inserts analogy. Instead of plug-ins, Reason uses effects devices that can be added to your signals wherever they are needed. For example, in the screen to the right, a Malström synth has a Scream 4 EQ and distortion unit connected between it and the mixer. Selecting any instrument and creating an effect will automatically cable the effect into the signal path. If you want to add an effect to the whole mix, such as compression, EQ or maximisation, you can add devices between the mixer itself and the Hardware Interface. The MClass effects, and the MClass Mastering Suite Combi are commonly used in this way.
Chain Gang
 Two mixers chained together. This configuration allows both mixers to share send effects.The final sets of audio connections on the mixer are labelled Chaining Aux/Send In and Chaining Master. These are inputs that have been added with some specific uses in mind, but once again, if you know what they are doing you can use them however you want. The Chaining Master is simply a stereo input directly into the main mix, with no controls. You can use this to input anything you like, but it is mainly provided for connecting a second mixer. Try creating a second mixer in a Reason song and see what the auto-cabling system does (see the screen to the left). The main output of the second mixer is connected to the Chaining Master of the first. This effectively combines the outputs of both mixers, with the master fader on the first mixer controlling the overall level.
The screenshot also shows that all the Aux Sends from the second mixer have been connected to the Chaining Aux inputs on the first mixer. The effect of this is to give the second mixer access to any send/return effects connected to the first mixer. In other words, if there is a reverb connected to the first Aux on the first mixer, you can add the reverb to channels on the second mixer using the Aux 1 controls on the second mixer. This feature attempts to integrate multiple mixers and make large songs easier to manage. However, there are a couple of differences in this scheme compared to using a single, larger mixer. Firstly, the solo buttons are not linked across the two (or more) mixers, resulting in some occasionally unexpected behaviour. Solos only affect the local mixer, so soloing something on the second mixer will only mute other tracks on that mixer. Similarly, if you solo something on the first mixer, you will still hear everything on other mixers. In addition, soloing a channel on the first mixer mutes the Chaining Aux inputs, meaning that although you hear the other mixers, they no longer have any effects on them. 

A patch for adding dedicated send effects to Redrum, avoiding the limitations of connecting Redrum to the mixer's chaining aux inputs.
The other common use for the chaining Aux inputs is to share Send effects with a Redrum drum machine, which has its own internal mixer with Send outputs (but no Returns). If another mixer is not already using the chaining auxes, Reason automatically connects them to Redrum 's sends. This configuration lets you apply the first two Send effects on the mixer to individual drum channels on the Redrum, instead of to the mixed output of the drum machine. The knobs labelled 'S1' and 'S2' on Redrum control the Send levels for each drum channel. This is a nice idea, but falls down in similar ways to the multiple mixer configuration. Firstly, if you mute the Redrum channel on the mixer, you will still hear the drums going through the effects. Secondly, if you solo any track on the mixer, including the Redrum channel itself, the effects are muted because the solo cuts the aux inputs. The screen at top left shows a better way to make use of Redrum 's Sends, by connecting dedicated effects units via a Line Mixer device. This is not as efficient as sharing the effects connected to the mixer, but it works much better, and doesn't use much more CPU power. This configuration can also be saved as a Combinator patch.
Groups & Submixes
 Submixing, via either extra Remixes or the smaller Line Mixer, makes a mix easier to manage and is a classic way to process a group of instruments.
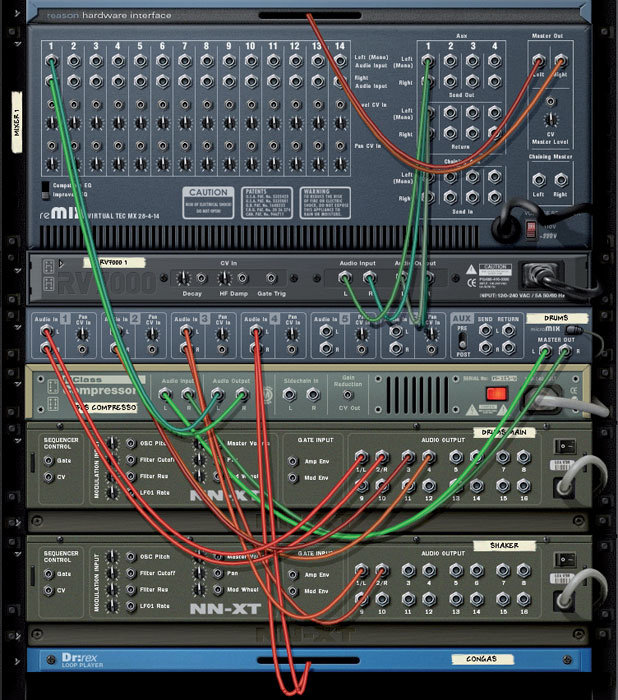
Many mixers use group faders or aux input channels to create submixes of other channels. For example, instead of all your drum channels going straight to the stereo mix, they can be routed to another fader, which then goes to the mix. This allows you to set the overall level of a group of inputs, and their levels relative to one another, independently. You can also apply effects to this submix, and the mix becomes easier to manage. Reason 's mixers have no in-built functionality of this kind (ie. group faders) or the ability to set different outputs for each channel. However, you can use multiple mixers to set up the same structure. The screen on the left shows an example, with drums and percussion (from two samplers and a loop player) being submixed via a Line Mixer. A compressor has been patched between the line mixer and the main mixer, providing 'bus compression' for the whole drum and percussion section. Another good place to see examples of the way multiple mixers can be used is in the Factory Sound Bank, or other Propellerheads Refills such as Piano, RDK, or the new Abbey Road Refill. Many of the Combinator instruments available in these Refills use complex internal mixer routings. Armed with a knowledge of how Reason 's mixers operate, you can leave auto-cabling behind and configure your own custom rack.
Mix Automation
Reason 's mixers can be automated in the same way as any other device in the rack. In fact, we devoted a whole article to this subject in the September 2006 issue of SOS (a search for "Reason mixer automation" at www.soundonsound.com will link you straight there). To get started, right-click on the mixer and choose Create / Sequencer Track for [Mixer 1], put Reason into record, and move some controls.


