Cut out nasty noises and soften your spiky guitar tracks in Reaper.
 The simplest way to soften an isolated picking transient is to split its Media Item, position a crossfade over the transient, and select the third or fifth option from the fade-shape shortcut menu.
Recording acoustic guitars on a budget can be a challenge and, although we've had a number of articles about maximising your capture quality in the past (check out SOS April 2010, for instance), the unfortunate reality is that most SOS readers end up having to make the best of compromised raw tracks more often than they'd like to. With this in mind, I'd like to use this month's column to pass on some trouble-shooting tricks I regularly use for the more common acoustic guitar problems that arise during my Reaper-based Mix Rescue remixes.
Pick A Guitar, Any Guitar
Pretty much every close-miked guitar recording that's ever been sent in to Mix Rescue has suffered from excessive picking noise. Unless you're really careful, it's an almost inevitable by-product of close miking, because the mechanical noises don't have the opportunity to dissipate in the air in the way they do when you're listening to the instrument for real. So how can you tame them?
If there are only a handful of occurrences, the simplest fix is a crossfade:
- Find the picking transient on the waveform.
- Split the Item just prior to it.
- Make sure the Auto-crossfade button is lit in the main toolbar.
- Drag across the end of the Item before the split, to create a crossfade covering the transient. (Alternatively, enable the 'Overlap And Crossfade Items When Splitting' option in the Media Item Defaults page of Reapers Preferences. There's an Action for toggling this too, if you don't want it on all the time.)
- Once the crossfade is in position, right-click just to the right of the crossfade to bring up the fade-shape shortcut menu.
- Select either the third or fifth options in this menu, which dip the gain by 6dB and 18dB respectively at the centre of the crossfade. Although you'd think that this magnitude of gain drop might stick out like a sore thumb, in practice the blip goes by so quickly that your ear can't really follow what's going on; all it hears is a softened transient.
You might have to finesse the crossfade length and position to get the most natural result, but overall this trick is robust enough to deal with just about any pick-noise related problem.
Getting Soft
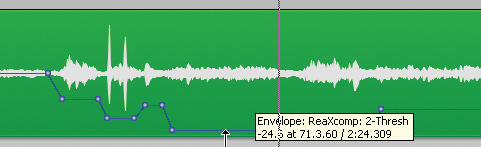
 Here you can see a ReaXcomp setup for heavy-duty pick-noise reduction tasks. However, it's such an aggressive setting that it'll only work both effectively and transparently if you automate its high-band Threshold control by ear.
Spot fixing becomes unfeasibly laborious, though, if pick noise is perforating your recording like a bed of nails, in which case plug-in processing will be more time-efficient. The first thing to try for milder problems is a dedicated full-band transient processor. Reaper has several different algorithms in its Jesusonic set, my favourite for this application being Michael Gruhn's TransientController, in the LOSER sub-directory. Just pull down the plug-in's Attack slider until you get the degree of softening you need, but do keep an ear pricked for any zipper-like distortion artifacts, which can sometimes creep in if you push this particular process too hard.
For heavy-duty pick-reduction tasks, however, ReaXcomp provides a pretty infallible backstop. From its default settings, the first thing to do is delete a couple of the bands, set the low band's Top Frequency parameter to around 2kHz, and then untick the 'Active' box at the top left-hand corner of its control tab so that only high frequencies are being processed. In band 2's controls, untick Auto Makeup Gain (you don't want ReaXcomp playing with your overall frequency balance), and then flick the Ratio slider all the way to the right and the RMS Size slider all the way to the left. The Attack and Release times can start at 1ms and 3ms respectively, which should suit most eventualities.
ReaXcomp should now move like greased lightning to hammer down level peaks above 2kHz — in other words, picking transients. It's such a ludicrously aggressive setting, though, that it can easily trash your sound (either by dulling the overall timbre unnaturally or by introducing distortion on note sustains), so you need to give it a bit of human input by automating its sensitivity. This isn't difficult to set up by clicking the track's Track Envelopes button and ticking the Visible box alongside the entry for ReaXcomp's 2-Thresh parameter. Now go through your guitar track adjusting the Threshold level to suit the performance as it changes, which shouldn't take more than about an hour even for the most serious of salvage jobs.
Stop Fretting
The same ReaXcomp setting can also work wonders with squeaks and scrapes, but it has to be said that some fret noises — especially those of longer duration — may be beyond its powers, simply because the dynamic EQ it applies isn't very sophisticated: it's effectively just a 2kHz high shelf. If you find such a recalcitrant customer, then it's probably time to get back into some region editing. First of all, you need to separate out the fret noise section by splitting the Media Item on either side. Apply a millisecond or two of crossfade at the edit points, making sure to use the equal-gain crossfade shape (both fade-in and fade-out uncurved) to avoid any potentially unnatural-sounding level lumps.
Once you've got the noise into its own Media Item, you can open its Item Properties and click the Take FX button to insert ReaEQ just on that snippet. You may need a little patience to arrive at the best EQ setting, and a decent high-resolution spectrum analyser (such as Voxengo's freeware SPAN) can be very handy here too, especially if the fret noise incorporates narrow-bandwidth HF 'whistles', as the worst tend to. You may also be able to get away with pulling the Item's main volume handle down by 6dB or so without anyone being the wiser about it.
Resonances & Harmonics
Another set of acoustic guitar problems originates not from noises, but from uncontrolled resonances. The most common scenario usually arises from a mic position directly over the instrument's soundhole, because of the strong 90–100Hz air resonation inside the guitar body. What you typically hear is two or three of the lowest notes leaping awkwardly out of the mix. Clearly, if your guitar is just strumming along and buried in the mix, then simple low-cut EQ will be a perfectly adequate remedy, but under more exposed conditions, it will incur an unacceptable loss of overall warmth, even if you meticulously train an EQ dip directly on the air-resonance frequency and carefully tweak its bandwidth by ear.
 Here you can see ReaEQ in action rebalancing pitched harmonics in an acoustic guitar recording. Notice how the EQ cuts are all very narrow, and that they're not all active simultaneously. This is because their Gain parameters are under automation control.
If there are only a few isolated imbalances, a bit of EQ automation should be man enough for the job, but where there are sporadic problems throughout the duration of your mix, it's probably better to bring ReaXcomp into action again. Once again, you shouldn't need more than a two-band setup, so just ditch the other default bands and then set the crossover somewhere around 150Hz; that frequency will usually benefit from tweaking by ear later on. This time, deactivate the high band, and un-tick the low band's Auto Makeup Gain. Attack and Release can start at around 10ms and 50ms respectively, in my experience, while the Ratio setting might be anywhere between 2:1 and 10:1, depending on the severity of the note unevenness. On occasion, you may be able to set a threshold for the low band that suits the whole track, but more often than not, some automation will also be required if you're to control the resonances firmly enough without compromising too much of the overall tone.
ReaXcomp won't be of any help to you with the other main resonance problem, though: over-prominent mid-range and high-frequency pitched harmonics. Almost every close-miked acoustic guitar recording tends to have these to some extent, but usually they're not worth worrying about, because they quickly get masked by other instruments in a full mix. However, if you have solo guitar parts with lots of chords and a good dose of compression, these harmonics can really start needling your eardrums, especially at louder playback volumes. The only solution I've found to this is to hunt down their exact frequencies (something like SPAN can help a lot with this, again) and then manually cut them with ReaEQ. However, you need to make sure each peak is razor sharp (ie. with a Bandwidth setting of around 0.1) so that neighbouring harmonics don't suffer unduly. Some automation of the band Gain controls will also be essential, so that each filter is only working when it's required, otherwise the phase response of too many simultaneous cuts will begin to do funny things to the overall timbre.
Audio Examples
If you want to actually hear the techniques described in this article, there are 'before and after' demonstration files available at /sos/may12/articles/reapermedia.htm.


