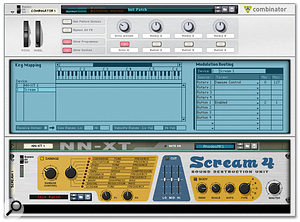
 The starting point for our live Combinator example is a Rhodes piano sampler patch.
In the first part of a mini-series on using Reason live, we look at how the Combinator and MIDI remote control can replace a live keyboard rig.
R eason is just as at home on stage as it is, well, at home, and there are many ways of using it as a performance tool. We're going to split these roughly into two categories: this month we'll look at how you can use Reason in place of (or in addition to) a keyboard player's traditional live rig; next time, we'll put the software to work as part of a DJ or live electronica performance.
Live Combis
Typically, a keyboard player's live setup might include a synth workstation, an electric piano or organ if they're lucky, and maybe a sampler. The keyboard player will carefully prepare and store programs on the master keyboard and sampler, that can be recalled with program change messages. Some programs will have keyboard layers and/or splits. Our goal this month is to do all this using just Reason running on a laptop, with a decent controller keyboard.
 At this stage we've added a distortion effect, and assigned some front panel controls.The key to using Reason in place of a live keyboard rig is to prepare a Combinator patch for each song in your set, or for each program change that you would have created in the hardware version. Each Combinator will contain the necessary instruments, with the correct patches, effects and keyboard mappings. Any real-time controls you might need, such as filter frequency, can be saved as assignments on the Combinator 's front panel. These controls can then be mapped to your keyboard or a MIDI control surface. Later, you'll see how patches can be recalled and Combis selected from the keyboard. If you get the setup right, you may not need to touch the computer for the whole show.
The simplest live Combis consist of a single instrument patch with some effects and front-panel controls. In this first example, we'll build a patch with a Rhodes piano and some effects. By mapping buttons to the effects' bypass switches, we can make it possible to use the Combinator like a Rhodes with effects pedals.
1. Create a new Combinator and add an NNXT sampler to it. Load up a Rhodes piano patch on the sampler: there's one in the Factory Sound Bank's Pianos folder.
2. Add a distortion device, by selecting the NNXT, then choosing Create / Scream 4 Distortion. The signal from the sampler will automatically route through the effects unit. Choose a nice subtle distortion setting, such as the Overdrive or Tape mode with the Damage control turned down a bit.
 The first finished performance patch, with bypass buttons and useful controls for the three effects. 3. Now add some front-panel controls for the distortion unit. Click the Show Programmer button on the Combi and select Scream in the device list. Assign Rotary 1 to Damage Control. Knob 1 will now control the overdrive level. Assign Button 1 to the Enabled parameter, and set the Min and Max values to 2 and 1 respectively. The first Combi button will now bypass or enable the distortion effect. Complete this step by labelling the two Combi controls appropriately.
4. Repeat Step three to add a Unison effect, assigning a rotary to the Dry/Wet control, and a button to the Enabled switch. Make sure you select the Scream before creating the Unison, so that audio is routed automatically.
5. Add a delay device, and map knobs to Dry/Wet, Delay Time (Steps), and the usual Enabled button. You can now save your patch.
As well as being able to change the effects from the front panel, you can save multiple copies of the patch with different knob settings. (For even more on basic Combinator building techniques, see the June 2005 Reason workshop.)
Some Good Factory Examples
The Factory Sound Bank includes a folder of Combinator presets named Performance Patches. These are all examples of live configurations, with various splits, layers, and control schemes, and can be a great source of inspiration. The 'Ac Bass+Ride & Rhodes Split' patch is a really nice example of an addictively playable split. I also highly recommend that you check out the patch called 'Vintage Warp Record'. This beauty requires that Reason be playing back to work properly. It's an example of what you can do when you start adding drum machines and step sequencers, and should give you an idea of where we're headed next month.
Doing The Splits
Apparently, there are people who can play keyboards with both hands at the same time. If you have this freakish talent you can take advantage of keyboard splits. Even us one-hand-at-a-time players can benefit from layering sounds. The Combinator makes it very easy to set up patches with multiple sound sources divided up across the keyboard. In the next example, we'll extend the Rhodes patch so that you can play a pad with your left hand.
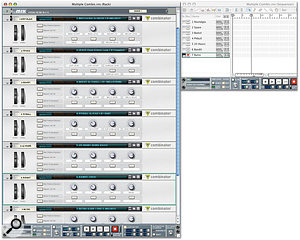
 The quickest way to switch between patches is to have multiple Combinators open and ready to go.
 Adding more than one instrument to a Combinator necessitates the use of a line mixer.
 The Programmer panel lets you create keyboard splits by assigning zones to each instrument in the Combi.
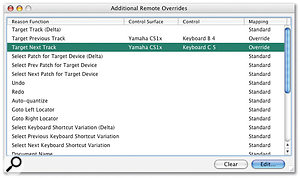
  The Remote Overrides window, where you can assign controls for changing patches and re-targeting your MIDI controller.
 An alternative to opening multiple Combinators is to load patches as you go along. 1. Click in the empty rack space at the bottom of your Rhodes patch and create a Malström synth. You won't be able to hear it at first because it won't be 'cabled in'.
2. Now that there are two instrument chains in the patch, you need a mixer, so create a Line Mixer 6:2 device.
3. Press Tab to revolve the rack. Connect the main outputs of the Malström to the first inputs on the mixer. Re-cable the outputs from the last device in the Rhodes device chain (which is the delay unit) into the second input on the mixer. Finally, connect the main outputs of the line mixer to the Combinator 's 'From Devices' inputs. You should now be able to hear both instruments when you play the keyboard.
4. Choose a pad sound: I've chosen 'Fundamentals' from the Factory Sound Bank's Malström patch collection.
5. Now you can set up the keyboard split. This is done from the left-hand panel of the Combinator 's Programmer, which has a keyboard zone map just like a sampler. By default, the two instruments in the patch are layered, because they are mapped across all the keys. Adjust the bars next to the NNXT and the Malström so that the sampler only responds to keys from C3 upwards, and the synth responds to keys below C3. You'll need to scroll the display left or right to find the ends of the zones.
6. Add front-panel controls as required. In the screenshot (below, right), I've sacrificed the original patch's Delay Mix control so I can control the mixer levels for each instrument.
Patch Switching
There's one complete Combinator patch done for a song. Once you have Combinator patches for all your songs, the next step is to decide how you will recall or switch patches during the gig. There are two different approaches, each with its own advantages and disadvantages. The first option is to have multiple Combinator s in the rack, with all the patches you need for the gig loaded up in them, in advance. The second is to use one Combinator and load up patches as you need them. Both of these methods can be done remotely from your MIDI controller. Let's take a look at them one at a time.
The screenshot above shows the multiple Combi approach. With this method, all your patches are open and ready; all you have to do is select which Combi your controller keyboard is focused on. When using this method, it's handy to have the sequencer window visible, as it shows you which Combinator is currently the target. Buttons or keys on your keyboard can be used to switch between Combinator s. To set this up, open the Additional Remote Overrides window from the Options menu (above). Double-click the Target Previous Track command in the list and choose a device and control to map to it. Repeat for the Target Next Track command. You can use keys instead of buttons. I've assigned the top two keys on my keyboard to switch patches. If you have a controller with endless rotary encoders, you can use the Target Track (Delta) option and scroll up and down the list of Combis with a knob.
With this method patch switching is instant; you can even start playing a new instrument over the dying notes of the previous one, but if your set calls for a long list of complex Combinator s, you may fall foul of CPU limitations, or have trouble keeping track of where you are. A simpler method without these problems is to use a single Combinator. However, although this approach is tidier and more CPU friendly, you will get a pause between patch changes as Reason loads your next saved preset.
If you choose to use a single Combinator, you need to save all your patches for the gig into a single folder, and in the order that you're likely to need them. They will then all be accessible from the Combinator 's patch browser, and Next/Previous Patch buttons (above,right). Again, patch browsing can be done from your controller keyboard, this time by mapping buttons, keys, or a rotary encoder to the Select Next/Previous Patch for the Target Device commands in the Additional Remote Overrides window.


