When is an EQ not just an EQ? When it's the Sonar 4 Producer Edition Sonitus EQ and you use it for some of the amazing processing tricks we're about to explain.
Although the Sonitus EQ bundled with Sonar 4 Producer Edition might not seem all that spectacular, it actually has a lot of hidden talents. For example, did you know it makes a great automatable phase shifter? Or models wah-wah pedals? Or that you're not limited to placing EQ pre- or post-effects, but can patch it both pre- and post-effects?
Sonar 4 Producer Edition includes per-track EQ that you can access via the Console View or Track View Inspector. With previous versions of Sonar, or Sonar Studio Edition, you need to insert EQ (or any other effects) manually in a track's FX bin by right-clicking on the bin, going to Audio Effects, then navigating to the desired plug-in. Even if you're using Sonar Producer, though, there can be advantages to inserting the EQ plug-in into the FX bin instead of using the per-track EQ... as we'll see in some of the tips that follow.
Four Stages Vs Six Stages
Even though you see only four stages of track EQ in the Inspector or Console View, the EQ is based on the Sonitus EQ and you can actually use all six stages by 'opening up' the per-track EQ to its full interface View. This also gives you the other advantages of the full interface: you can call up presets, use Undo, have separate settings for Setup A and Setup B, and so on.
It's possible to open up the full EQ View only if the EQ is actually enabled. To enable it you can either right-click on the plot and select 'Enable EQ', or click on the EQ module's power button toward the bottom of the EQ module. Now you can open up the View. In the Inspector or Console View, double-click on the EQ plot and you'll see the full equaliser. The other option is to right-click on the EQ plot and select 'Show EQ Properties'. Note that if you open up several EQs it appears that they replace each other in a single window, but they actually don't do that: each window stacks on top of the other, so you can separate these windows and view the individual EQs if you want to.
One possible problem is that if you make adjustments in band five and/or six of the EQ and then close the interface window, you won't see them in the per-track EQ display and you could forget about the adjustments you've made. However, with respect to track EQ, you can make sure that what you see is what you get by right-clicking on the EQ plot and choosing 'Reset Hidden EQ Parameters'. This turns off stages five and six. If this option is greyed out, it means that stages five and six are not enabled.
 Insert EQ into the FX bin, click on it, and drag it into whatever position you want in relation to the other inserted effects.
EQ: Before Or After Effects?
There are two main ways of dealing with this issue. If you're a fan of the Console or Inspector View, right-click on the EQ plot and choose 'EQ Pre FX' or 'EQ Post FX' — simple. But you needn't be limited to just 'pre' or 'post' effects: you can place the EQ anywhere in a chain of effects, including the middle, so the EQ is both pre- and post-effects. However, you can't do this with the per-track EQ. Instead, insert your EQ in the track's FX bin, along with whatever other effects you want to use. Click on the EQ's label in the bin (dragging on the enable/disable button doesn't do anything) and drag it into the desired position in the chain (see the screen above). Note that the signal flow in the bin goes from top to bottom (or left to right, if you use horizontal rather than vertical FX bins).
 The equaliser has been set up for the type of frequency response produced by a phase shifter; the six filter markers have been linked together, then armed for automation in a separate window.
Phase-shifter Effects
The Sonitus EQ is a natural for automated phase-shifting effects. After all, phase-shifting places several deep notches in the frequency spectrum and moves their frequencies up and down in unison. We can do this by linking all of the EQ's frequencies, then automating the response so that they all track together. However, you can't do this trick with the pre-track EQ; you'll need to insert an EQ into the track's FX bin and work with that.
- First, make sure that all six filter responses are set to Peak/Dip. Set Q to 20, but experiment with various values once you get things working. 20 is fairly sharp; the highest Q the Sonitus filter can attain is 24.
- Now place each frequency about an octave from the adjacent one, starting at 120Hz. Then pull down the gain fader at each frequency so that each notch has the greatest possible depth.
- To create phase-shift effects, we want all the frequencies to move together. No problem: drag a rectangle around all the filter markers (the circles labelled 1-6) to select them; they'll change from yellow to black (selected). When you move one filter marker, they all move together. (Incidentally, you can also Ctrl-click points to select markers, which do not need to be contiguous.)
- Now let's automate these moves. Right-click on the 'Equaliser' label in the effects bin, then select 'Arm Parameter'. This brings up a list of all automatable EQ parameters. Tick the boxes for 'Freq 1' to 'Freq 6', then click on OK.
- Click on the toolbar's Record Automation button, and as you move the linked markers, their motion will be recorded in the track as six separate envelopes. On playback, you'll see the EQ's curve move.
Assuming you have Producer Edition, what about using the four effects sliders in the Console view to automate phasing? You can do this, but with the caveat that you'll only be able to shift four of the stages, not all six. You'll also need to specify that the filter markers retain their same frequency relationship (an octave apart) as they're moved. To set this up:
- Start with the expanded EQ interface and edit the band 1-4 frequencies as desired (for example, 250Hz, 500Hz, 1kHz and 2kHz).
- Right-click on each of the four effects sliders and assign it to the desired parameters (Filter Freq 1-4).
- Now group all the sliders together: Right-click on each slider, select 'Group', then select the Group letter/color.
- Finally, right-click on any slider in the group, select 'Group Properties' and tick 'Relative' rather than 'Absolute' or 'Custom'. This ensures that all frequencies will move relative to each other and remain spaced one octave apart as they move.
 By adding lots of gain instead of taking it away, the phaser configuration can work as a resonator instead.
A variation on the above technique creates a resonator. This produces a series of harmonically-related peaks that impart a sense of pitch to the material being processed.
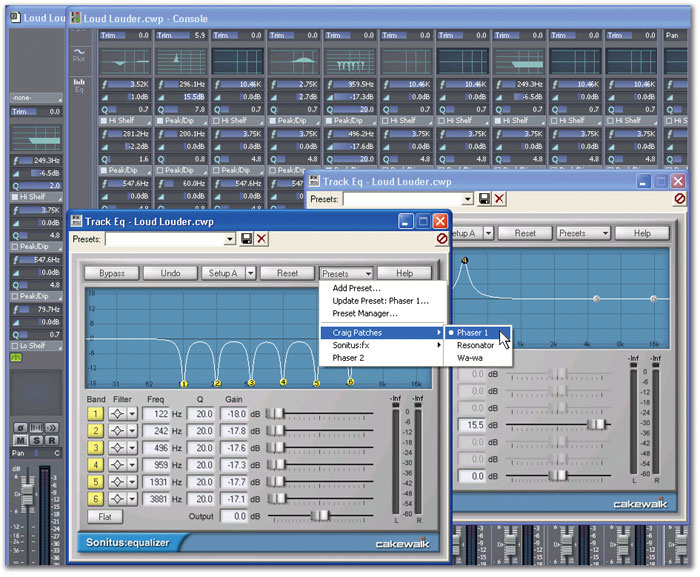
- As with the phase shifter, the filter type should be Peak/Dip. We want an exact octave spacing between the peaks, so it's worth typing the optimum frequencies into each Freq field (remember to hit return after typing in each one): 100, 200, 400, 800, 1600, 3200. Turn the Q all the way to 24, and gain to maximum as well. Be careful; with all those peaks you'll have to pull the output control way down to avoid distortion. (See screen at top left.)
- You use the resonator in the the same way as the phase shifter: select all the filter markers so that they move in unison, then vary their frequencies. The resonator adds a sort of 'tuned' effect, as it emphasises those notes that fall within the response peaks.
As you spent all that time typing in frequencies, why not save this as a preset? Go to the Presets drop-down menu, select 'Add Preset', specify the bank where you want it to live, and you can use the same curve again in other projects.
Before leaving the world of phasers and resonators, I should mention one other response that gives some very interesting sounds: a combination of the phase shifter and resonator settings ('phasenator', perhaps), where there are three peaks and three valleys. The tone resembles some of the vintage, stomp box-type phasers that used lots of regeneration. Because of the peaks, you'll need to pull back on the output level, albeit not as much as with the resonator.
 Yet another variation on the phase-shifter response produces yet another timbre-warping effect.
Changing The Display Resolution
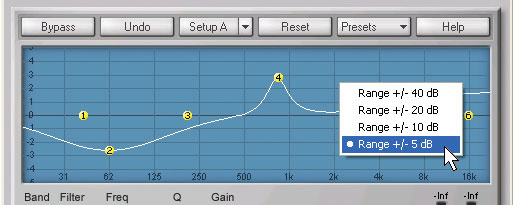
Here's a basic but highly useful feature: you can change the resolution of the EQ's graph in the interface. It defaults to an amplitude-axis range of ±20dB, but it's possible to right-click anywhere in the graph and choose ±40, ±10, or ±5dB as the range. The finer resolutions are very helpful with subtle settings; I usually use ±5dB, with occasional forays into ±10dB. By the way, if you change the graph's resolution in the per-track EQ, you won't see any resolution change in the channel-strip plot (frequency-response graph). Resolution changes are visible only in the full interface.
Vintage Wah-wah Emulation
We covered this trick in a more basic way in an early Sonar Notes, but that was before the Sonitus effects and the option to tie parameters easily to MIDI control, so it's time to revisit the subject.
The idea of sweeping an equaliser's band-pass filter to create wah-wah effects is not new, but most people find the end result unsatisfying compared to using a vintage wah-wah pedal. This is because in an EQ, frequencies above and below the peak remain at their normal levels, whereas with a wah-wah pedal, response progressively drops off either side of the peak. Fortunately, there's an easy way to simulate that effect.
 Wah-wah emulation: Track two has been cloned and flipped out of phase; the equaliser has been set up for a wah-wah type of response, and inserted in the FX bin for Track one.
- Start by clicking on the track number (in the Track view) for the track you want to process, then select 'Clone Track'. This creates a copy in a separate track.
- Now reverse the cloned track's phase by clicking on the track's phase button (Ø). If you play both tracks together, they should cancel and you'll hear no sound
- Next, insert the EQ in the FX bin for the track you want to process, then open up the EQ's interface. A good starting point is to disable all the stages except for stage four.
- Set response to Peak/Dip, Q to 7.9, and gain to 15dB or so. Sweep the frequency back and forth, and you'll hear a very cool wah-wah effect. And, of course, it's extremely editable — you can change bandwidth, sweep range, whatever you like.
But what's a wah-wah without a footpedal? We'll assume you have a synth in your studio somewhere that allows for footpedal control, so that when you move the footpedal, MIDI Continuous Controller #4 messages emanate from the synth's MIDI out. We can tie the two together with the real-time effects sliders that appear in the effects section (Sonar Producer only). However, there's a complication: you probably don't want the pedal to sweep the filter cutoff-frequency's full range, but only a portion of it. There's a way to do this, although it's a bit of a workaround.
- In the Console view, make sure the real-time control sliders are visible underneath the FX bin containing the EQ plug-in. If they aren't, click on the mixer toolbar's FX button until they appear. They should default to showing (from top to bottom) Freq 1, Freq 2, Freq 3 and Freq 4. If you followed what was suggested above, the filter is being controlled by Freq 4 and all other frequencies are turned off. Move the Freq 4 slider to verify that the peak frequency is indeed controlled by the Freq 4 slider.
 The Freq 3 and Freq 4 sliders have been grouped together. The Properties window allows Freq 3's slider to cover its full range, but here you can limit the Freq 4 slider response to cover a narrower range when the two are grouped and moved together.
- Right-click on the Freq 3 slider, and assign it to a Group. Then right-click on the Freq 4 slider and assign it to the same Group. Moving one should move the other one as well.
- Now right-click on the Freq 4 slider, select Group Properties and click on the Custom button. Click on the upper line to select it, then type '0' into the Start Value box, and '127' into the End Value box. This ensures that slider three covers its full range. Next, click on the lower line to select it. To limit the range of Freq 4's slider, type '1' into the Start Value box and '15' into the End Value box, then click on OK. Vary the Freq 3 slider (not Freq 4 — remember, they're grouped together). The EQ's Freq 4 filter marker should move over a restricted range from 175 to about 2500Hz.
- If you want to tweak the lower limit, move the Freq 3 slider all the way to the left (minimum value). Grab the Freq 4 filter marker on the EQ interface and move it where desired, or click on the Freq 4 numerical and drag it to the desired value. Then right-click on the Freq 4 slider, and select 'Set Start = Current'. Now, when you move the Freq 3 slider the Freq 4 filter marker should move over the newly-defined range. However, don't try this technique with the upper limit; for some reason, it doesn't seem to work.
- Now we have Freq 4 moving over a limited range when the Freq 3 slider moves over its full range. The last step is to tie Freq 3 to a MIDI controller. (We don't want to assign the controller to Freq 4, because the MIDI controller is presumably generating the full range of MIDI controller values, and we want Freq 4 to vary over the limited range we specified, which it will do only as part of a Group.) Right-click on the Freq 3 slider and select 'Remote Control'. Move the pedal (or other hardware controller), then click on 'Learn'. Click on 'OK', and now the wah frequency should move over its intended range in response to the hardware controller.
Still Think It's Just An EQ?
If you really want to push the envelope, bear in mind that some of these techniques just beg to be used in stereo — in other words, clone a track, as with the wah-wah example, but don't invert its phase, and insert an EQ into each track. Set these both to do phase shifting, but have different rates and sweeps going on in the different channels...very psychedelic!
Compare & Contrast
 Setup B is currently selected but, via the drop-down menu, is about to be copied to Setup A as well.
It has always struck me as odd that so few plug-ins have a compare mode, which was common in hardware processors. However, the Sonitus effects have a very useful compare mode, accessed via the effect's toolbar. There are two independent parameter setups for each effect (three if you also count Bypass): Setup A and Setup B. You can toggle between them by clicking on the Setup A/B button.
A drop-down menu provides further functionality. Suppose you're comparing two curves, you have curve B selected, and you decide that you like B better than A — but you think you can still do better. On the drop-down menu, select Copy to A and the curve in Setup B will be duplicated in Setup A. Now you can keep tweaking B, safe in the knowledge that the original is safely stored in Setup B if you want to revert to it. Obviously, you can also copy the curve from Setup A into Setup B.
If you change your mind, Undo will work with this function, but (as always) it affects only the last operation. Also note that the Reset function, which flattens the gain at all frequency points, works independently for the two setups, so that you can reset one without disturbing the other.

