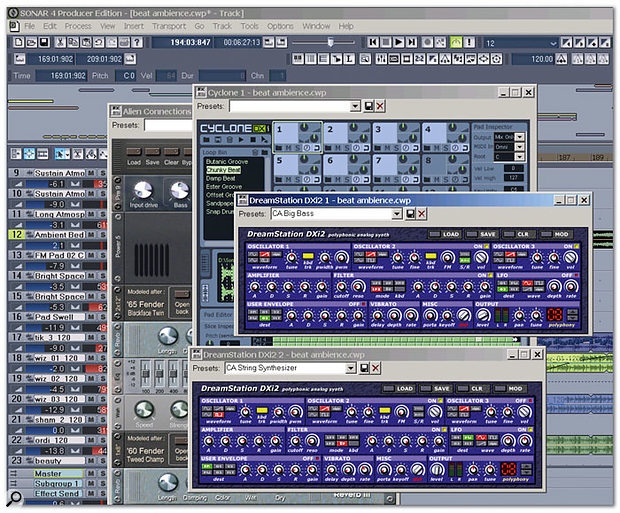
This modest little soft synth has been bundled with Sonar since version 1.0 and is very kind to your CPU resources, yet many Sonar users are still unaware of just how much you can squeeze out of it. We present some evidence.
The Dreamstation DXi2, a simple soft synth that was bundled with the original version of Sonar and keeps reappearing in subsequent versions, doesn't get a lot of respect. Compared to other soft synths, its sound is... well, let's just say it's not a Minimoog. But it does far more than most people realise, and with the right tweaking it can make some very satisfying noises — as we'll find out.
The Architecture
The Dreamstation is a 'virtual analogue' synthesizer with three multi-waveform oscillators and the following features:
- Oscillator 2 can work with Oscillator 1 to provide hard sync, ring modulation, and frequency modulation (FM). Oscillator 1 offers pulse width modulation, but the others do not.
- The amplifier has a dedicated ADSR (Attack, Decay, Sustain, Release) envelope, and a Gain control that crossfades between velocity control only and envelope control only.
- The filter (which also has a dedicated ADSR envelope) offers five modes: 12dB/octave low-pass, 24dB/octave low-pass, band-pass, high-pass and formant. However, in this instance, Gain controls the envelope level only and does not affect velocity. Unfortunately, there's no way to tie velocity to the filter cutoff.
- A User Envelope can control FM amount, Oscillator 1 pulse width, Oscillator 1 frequency, Oscillator 2 frequency, Oscillator 2 level or Filter cutoff.
- The LFO has sine, square, sawtooth or random output and can feed Oscillator 1, Oscillator 2, Filter, or Pulse Width (one at a time). There are separate Depth and Rate controls. An additional Vibrato section offers Delay, Depth, and Rate.
Other controls include Portamento time, Distortion, Output Level, Pan, Tune, and Polyphony (up to 16 voices). An additional option, Keyoff, when set to non-zero values, turns a note on for a specific period of time and is intended for percussive sounds.
Two Ways To Save
As you check out the following patches, I hope you'll want to save them. There are two ways to do this: into a folder, where you'll probably save all your patches; or into the list of presets, which is intended to be more of a 'greatest hits' collection of sounds.
To save to a folder of presets, click on the Save button, then navigate to the desired folder. If you go Programs / Files / Cakewalk / Shared DXI / Audio Simulation, you'll find the Dreamstation DXi2 folder, which is as good a place as any to save your sounds. Files are saved with a .DSI suffix. To save into the presets list, just type the patch name into the presets field and click on the floppy-disk button. To delete a preset, click on the X button.
Programming The Dreamstation
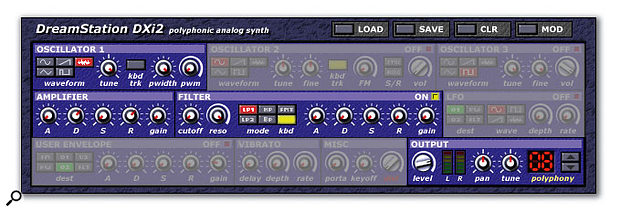
Each of the following patches highlights a particular aspect of the Dreamstation. As you program the patch parameter values, remember to turn on any elements that are needed. For example, if there are parameter settings for the User Envelope, make sure the User Envelope is turned on. To help make things clearer, sections that aren't used are greyed out in the accompanying screen shots. Also note that when references are given to calling up patches, these are the ones included with the Dreamstation. You call them up from the preset field. Let's begin by building a powerful bass patch, just to prove that it's possible. This fat sound uses all three oscillators and the filter.
- Call up patch 03-Sawtooth. Play a few keys; not very impressive, is it?
- Click on Oscillator 2's Off button to turn it on, and select its Sawtooth waveform.
- Adjust Oscillator 2's fine-tuning to -10 percent and you'll hear that distinctive 'beating oscillators' sound. Turn the Oscillator 2 volume control to 80 percent.
- Now turn on Oscillator 3, select Sawtooth for the waveform and set the fine-tuning to +10 percent. Turn its volume control to 80 percent.
- Let's rough up the sound a bit. Click on Oscillator 2's Ring button.
- The Amplifier Gain control is interesting. When it is set to 0 (counter-clockwise), MIDI velocity affects gain and the envelope has no effect. When it's fully clockwise, MIDI velocity has no effect and the envelope controls amplitude. Settings in between give a combination of envelope and amplitude control. As we're aiming for a bass sound and we want a reasonably constant level, set gain to 50 percent.
- For a fairly punchy effect, set the Amplifier's A parameter to 0, D to 80 percent, R to 20 percent and S to 80 percent, so that there's some level if you decide to hold a key down.
- Now to get rid of that buzz and give the sound some depth. Turn the filter On. I find that adding a bit of resonance really helps, even if you don't want a resonant sound, so start out with a 15 percent setting.
- Click on LP2 for a 24dB/octave filter response (LP1 is 12dB/octave).
- Set Cutoff to 35 percent, A to 0, D to 60 percent, S to 20 percent, R to 20 percent, and Gain for the desired amount of high-end kick. Try 42 percent for now.
- That's better, but we could give the sound more animation with a very subtle vibrato. Set Delay to 0, Depth to 5 percent and Rate to 30 percent.
- Finally, if you're going to be playing a single-note bass it might be as well to set Polyphony to 01. Sounds pretty good! For a dirtier sound, turn up the Distortion control in the Misc section.
When you go Insert / DXi Synth / Dreamstation DXi2, it doesn't matter whether you choose 'First Synth Output' or 'All Synth Outputs'. The Dreamstation is not a device with multiple outs, so you'll end up with a stereo output no matter what.
It's A Percussion Synth!
The Dreamstation makes a fine 'analogue' percussion synth. This electro-snare sound uses FM and modulates Oscillator 2 with a super-fast transient created by the User Envelope. Load the preset Effect 04Wind and make the following settings:
- Oscillator 2: Waveform, Sine; Tune, -7 percent; Fine Tune, 0 percent; Kbd Track, Off; FM, 100 percent; Sync and Ring, Off; Volume, 100 percent.
- Amplifier: A, S, Gain, 0; D and R, 23 percent.
- User Envelope: Dest, 02; A, D, S, R, 0; Gain, 20 percent.
- Turn off Oscillator 3, Filter and LFO.
- Set all Vibrato and Misc controls to 0.
Distortion makes a huge improvement in the sound of the following hard electro-kick drum. Keyboard tracking is turned off so that you'll hear the same pitch no matter where you play on the keyboard. Start with preset 01Sine.
- Oscillator 1: Tune, -37; Kbd Trk, Off.
- Amplifier: A and S, 0; D, 18 percent; R, 8 percent; Gain, 37 percent.
- User Envelope: Destination, 01; A, S, R, 0; D, 2 percent; Gain, 50 percent.
- Misc: Set Distortion at 55 percent.
Tuned White Noise
This ghostly, evocative sound makes good use of white noise but also shows how the 12dB/octave low-pass filter mode can come very close to self-oscillation. Start by calling up the preset Effect 04Wind.
- Amplifier: A, S, Gain, 0; D and R, 66 percent.
- Filter: Cutoff, 2 percent; Resonance, 100 percent; Mode, LP1; Kbd Track, On.
- Set all Envelope parameters to 0.
- Turn the LFO off.
You could alternatively choose BP (band-pass) filtering, for a broader, less resonant sound. Also note that you'll need to play this patch in the upper range of the keyboard. Hard sync patch.
Hard Sync
The Dreamstation does decent hard-sync sounds (i.e Oscillator 1's frequency is continuously reset by Oscillator 2's pitch) in the lower keyboard ranges, but it's important to choose the right waveforms and other options. This hard sync patch is fairly complex, but it does a good job of creating sync effects. Start by calling up preset 03-Sawtooth and edit the parameters as follows:
- Oscillator 1: Waveform, Pulse; Tune, 80 percent; Pulse width, 35 percent.
- Oscillator 2: Waveform, Sawtooth; Sync, On; Volume, 0 percent.
- Oscillator 3: Waveform, Sawtooth; Fine, +10 percent.
- Amplifier: Adjust for the desired dynamics. Try A and R, 0 percent; D, S, Gain, 60 percent.
- Filter: Adjust to taste, starting with LP2, On; Cutoff, 43 percent; D and S, 60 percent; A and R, 0 percent; Gain, 45 percent.
- User Envelope: Dest, 01; A, S, R, 0 percent; D, 50 percent; Gain, 20 percent.
For the best results, add some tempo-sync'd delay, and wiggle those pitch-bend and mod wheels. You might also want to add some gentle high-frequency roll-off with EQ.
Dreamstation Quick Tips
The Dreamstation was designed during the days when CPUs weren't as powerful as they are now, so it's possible to enable and disable oscillators and filters to save CPU power. But even with everything turned on, by today's standards the Dreamstation is very CPU-friendly. You can thus stack multiple instances without worrying too much about CPU load.
Here's a few things to bear in mind when you start to use the Dreamstation in earnest:
- You have to turn on Oscillator 2 before you can turn on Oscillator 3.
- If Oscillators 2 and 3 are on and you turn off Oscillator 2, Oscillator 3 will turn off too.
- Keyboard tracking cannot be turned off for Oscillator 3.
- If you look in Sonar 's online help, you won't find anything under ' Dreamstation ', nor will you find context-sensitive help if you hit F1. Instead, right-click anywhere on the Dreamstation itself to call up its own Help menu.
- Click on 'Clr', toward the upper right, to wipe all existing settings and load a default preset.
String Synthesis
The Dreamstation can do an excellent imitation of old string synthesizers. This patch demonstrates how modulating pulse-width with two different modulation sources, then adding vibrato to all three oscillators, produces a big sound with lots of movement. This is another involved patch: the only unused sections are the User Envelope and Misc controls. Start with Preset 05Pulse. String synth patch.
- Oscillator 1: Waveform, Pulse: Tune, 0 percent; Kbd Trk, On; Pulse width, 26 percent; PWM, 13 percent.
- Oscillator 2: Waveform, Sawtooth; Tune, 0 percent; Fine, +7percent; Kbd Trk, On; FM, 0 percent; Sync and Ring, Off; Volume, 100 percent.
- Oscillator 3: Waveform, Sawtooth; Tune, 0 percent; Fine, -7 percent; Volume, 100 percent.
- Amplifier: A, D, R, 65 percent; S, 75 percent; Gain, 41 percent.
- Filter: Cutoff, 66 percent; Resonance, 8 percent; Mode, BP; Kbd Trk, Off; A, 35 percent; D, 0 percent; S, 100 percent; R, 65 percent; Gain, 0 percent.
- LFO: Dest, PW; Wave, Sine; Depth and Rate, 50 percent.
- Vibrato: Delay, 5 percent; Depth, 6 percent; Rate, 37 percent.
- Set all Misc controls to 0 percent.
- Polyphony: At least eight voices so that decays don't steal notes.
A little post-processing with reverb won't hurt; the Sonitus reverb's 'Cathedral' preset is a good choice.
FM Synthesis
This shows how the Dreamstation 's FM synthesis can produce brass-like 'filtered' attacks, but without the use of conventional filtering. It won't put normal FM synths out to pasture, but it's another facet of the Dreamstation.
- Click the Clr button to create a default patch.
- Osc 2 Amplifier: A, 47 percent; D, 0 percent; S, 100 percent; R, 20 percent; Gain, 100 percent.
- User Envelope: Destination, FM; A, D, S, 62 percent; R, 20 percent; Gain, 32 percent.
- Vibrato: Delay, 33 percent; Depth, 3 percent; Rate, 37 percent.
- Misc: Portamento, 1 percent.
- Polyphony: Greater than 01.
For expressiveness, try increasing Oscillator 2's FM Level parameter. You can also produce very different sounds by varying the Amplifier and User Envelope Attack controls. FM brass patch.
The Secret Weapon: Processing
Now that you have some sounds, you'll find that following them with a processor or two can add another dimension and still not drain too much CPU power. I like the Amp Simulation effect for a really nasty, industrial sound, while modulation (chorusing, say) adds space. As an example, with the 'String Synthesizer' patch, insert the Sonitus Modulator into the Dreamstation audio path, and call up the 'Slow Ensemble' preset. Set the Mix parameter to about 35 percent and the result wiill be a more spacious, spread-out sound.
EQ can also help. In the case of bass patches, I usually roll off about 4dB of highs with a high shelf starting at about 5-6 kHz, cut mids by a couple of dBs at 500Hz and add some low-frequency boost with a low shelf at about 150Hz.
Further Information
Check out the Dreamstation tip in Sonar Notes January 2004 (available at www.soundonsound.com). This describes layering two instances, one set for no velocity to provide a constant sound, the other set for considerable amounts of velocity so that playing harder brings in another sound. The end result is a much more dynamic effect. Also see 'Tweaking the Dreamstation' box in Sonar Notes September 2004, which covers using the FM function and the Tape Sim processor.
Methods Of Automation
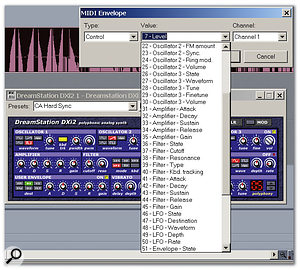
The Dreamstation offers more automation options than most DXi devices. The value drop-down menu not only lets you select an envelope parameter, but also provides a useful reference for which MIDI controllers match particular Dreamstation parameters. For example, Controller 22 controls the Oscillator 2 FM Amount parameter.
Envelopes
Right-click on the MIDI track driving the Dreamstation and go Envelopes / Create Track Envelope / MIDI. The MIDI Envelope dialogue box appears, with three drop-down menus (see screen above). For 'Type', choose 'Control' and you'll be presented with a list of all automatable parameters, along with their matching controller numbers.
External MIDI Controllers
(This includes fader boxes and so on). Put the MIDI track driving the Dreamstation into Record mode, then move the hardware knob or slider whose controller number corresponds to the Dreamstation parameter you want to control (or move several at once, for that matter). You can view the list of automatable parameters and their controller numbers via the 'Envelopes' procedure described above.
Front-panel Control Motions
As when using external MIDI controllers, put the MIDI track in record mode and simply operate the Dreamstation controls. These motions will be recorded as MIDI continuous controller values. When you create a MIDI continuous controller message (as with the last two methods mentioned above), don't forget that these can be converted into envelopes using Sonar's 'Convert MIDI to Shapes' function. To do this, in the Piano Roll view use the Select tool to drag a rectangle around the controller data you want to convert into a track envelope. Then go Edit / Convert MIDI to Shapes. A 'Convert MIDI to Shapes' dialogue box appears. Enter the type of controller, controller number and channel of the selected data, then click 'OK'. This creates an envelope and simultaneously deletes the MIDI controller data.


