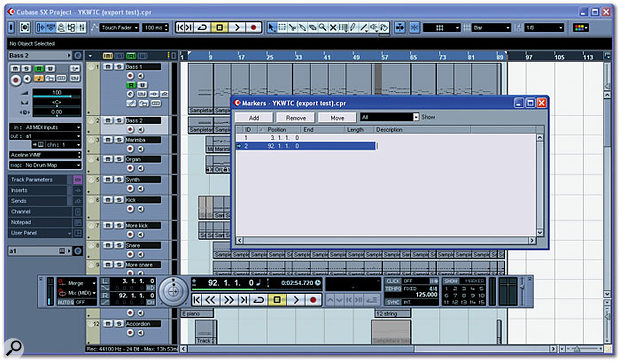
 Here, I've placed Markers at the left and right locator positions, and we can see that the song is 89 bars long.
If you like Cubase's sequencing capabilities but prefer to mix your projects in another application, there's a hurdle to overcome: getting your soft-synth parts from one to the other.
It pains me to say this in an article aimed at Cubase users, but I don't really like mixing in Cubase. It doesn't offer side-chaining, the mixer is hard to navigate, the bundled plug-ins are mediocre and I find it difficult to work with a large mix on my laptop screen. I prefer mixing in Pro Tools, especially as PT gives me access to some great plug-ins that aren't available in VST format.
That's fine when I'm working with a project that's predominantly based on multitrack audio, such as a band session. However, a lot of the music I work on is generated from the ground up using MIDI and soft synths, and when it comes to sequencing, my preferences are the other way around. Pro Tools won't let you edit multiple MIDI parts in one window, and more importantly, doesn't work well with several of my favourite soft synths. My ideal compromise, therefore, is to get MIDI backing tracks together in Cubase, before exporting them to Pro Tools for mixing. Similarly, if you ever want to give a Cubase Project to someone else to mix, you'll probably need to turn it into a set of multitrack audio files first.
However, doing this can be a colossal pain in the arse, because Cubase really doesn't make it easy to export individual soft-synth parts as audio files. There's no way to incorporate soft-synth parts in an OMF dump, for example; nor is it possible to use the 'Bounce Selection' command on MIDI parts. What's more, the Freeze function works on entire Instruments, rather than channels or MIDI tracks, so it offers no way to export multiple MIDI Parts routed to a single VST Instrument as separate files. Instead, you're faced with having to solo each MIDI track individually, select 'Export Audio Mixdown' from the File menu, choose a meaningful filename, decide whether it needs to be stereo or mono, and then wait for it to bounce before going on to the next one. Unless, that is, it's possible to automate the process...
You Just Keep Me Hanging On
To my mind, the really tedious thing about the track-by-track method I've just described is that you can't just leave the computer to get on with it. Every track has to be named manually, so you have to be watching your computer for the entire time you're creating the export files. After some experimentation, I found that if you don't mind a little extra work at the start and end of the process, there is a way to eliminate this particular bugbear.
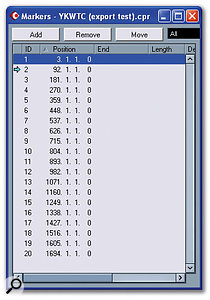 I want to export around 20 Parts, so I've created 20 Markers, each 89 bars apart.As you might expect, this involves a slightly tortuous use of Cubase's Macro function. This can't be applied to things like entering filenames, so it's not possible to automate the track-by-track export process; instead, a bit of lateral thinking is required. It might not be possible to automate the export of a different file for each track, but it is possible to automate the export of a single file containing all the Parts in a song. The idea is to automatically copy every MIDI Part in the song forward to a space of its own on the Project window, thus 'stringing out' all the MIDI (and audio, if you wish) Parts one after another. A single 'Export Audio Mixdown' will then create one long stereo file with all the Parts in, which can be chopped up and re-sync'ed in Pro Tools, or any other editing and mixing application.
As I said, this does require a little preparation. First, we're going to use Cubase's Markers to tell it where to place all the parts on the Project window, so you'll need to delete any Markers that already exist in your song. Second, you'll need to make sure that all the tracks you want to include in the export are visible and adjacent to one another on the Project window — the method I'm proposing will work with both MIDI soft-synth and audio tracks, but you don't want them separated by Group tracks, and you don't want to include the tracks that represent the audio outputs from soft synths. Third, you'll need to hide any automation tracks by choosing 'Hide All Automation' from the Project menu. Fourth, set the left and right locators to the start and end of the song. The process is made much easier if you set them both exactly at bar divisions (which is easily done if you have Snap to Grid turned on). Fifth, delete or mute any unwanted Parts on tracks to the right of the song (I often use this area as a holding bay for unsuccessful takes and so forth).
Now, set the Project Cursor to the position of the left locator and hit Ctrl+M to open the Markers window. Click Add to add a Marker at that position, then set the Project Cursor to where the right locator is and add another marker. If you have set the locators to precise bar divisions, you should now easily be able to work out the length, in bars, of the gap between left and right locators. Write it down, it's going to come in very useful!
 Once you've created a Macro, it will appear in the Macro group of commands (upper window), where you can assign a keyboard shortcut to it. From this point on, the basic idea is to create a further Marker for each additional MIDI track you want to export, and have each Marker separated by the figure you have just written down. So if, for instance, your first Marker falls on the first beat of bar three, and the second Marker on the first beat of bar 83, that makes your song 80 bars long, and you'll need to create additional Markers at the starts of bars 163, 243, 323, 403 — and so on. The easiest way to do this is to hit the Add button on the Marker window and manually enter the bar number by double-clicking in the Position column.
If your song has tempo changes, you'll need to do some additional editing to the tempo track, copying the tempo map between the left and right locators and duplicating it rightwards as many times as you have Markers.
The final stage of preparation is to ensure that every track has an Event that begins exactly at the position of the left locator — otherwise, the Paste command won't take account of any empty space at the start of the track, and things will get out of sync. Set the Project Cursor to the left locator again, and choose Split at Cursor from the Edit menu to split any Events that start before the left locator. Where you have MIDI tracks with space at the left locator, you'll need to either drag the bottom left-hand corner of the first Event back to the left locator to enlarge it, or create a blank MIDI Event at the left locator position. If you do the latter, it's easy to copy and paste the same Event to multiple MIDI tracks.
Macrobionics
To summarise: at this point, you should have a set of Cubase Markers, each separated by the length of your song; a set of MIDI tracks adjacent to one another on the Project window, all containing at least one Event that starts exactly at the position of the left locator; and a large area of blank space to their right. OK, we are now in a position to write the Macro that will place each element of your song into its own area of blank space on the Project window.
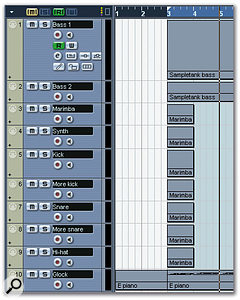 In order to stop the tracks going out of sync when they're copied, I've created empty Parts and used the Split at Cursor command to ensure that they all contain Parts that begin exactly at the left locator. The basic idea is that we begin by selecting the topmost MIDI track we want to include in the file export. Our Macro will select all the Events on that track, copy (or cut) them, skip to the next Marker, and paste them. It will then move to the next track and repeat the procedure; and because each Marker is separated by the length of the song, each track's MIDI parts will be pasted into a song's-length space of their own. A single Export Audio Mixdown will then create a long file with all the parts rendered separately.
Begin by opening the Key Commands window from the File menu and click Show Macros. Hit New Macro and name it as you see fit. The Macro itself needs to contain five commands. The first two are Select All on Tracks and Copy, both of which are found in the Edit group of commands. Next up is Locate Next Marker, from the Transport group, then Paste from the Edit group, and Down from the Navigate group. Finally, you'll want to assign an unused key command to this Macro; in my example, I've used Alt+E.
To try this out, make sure that Cubase's transport is rewound to the left locator and, in the Arrange window, select the topmost of the group of tracks you want to export. Now press Alt+E, or whichever key combination you've chosen for your Macro. You should see everything on that track between the left and right locators duplicated at the right locator position, and the selection will move to the next track down in the list. Press Alt+E again, and you should see everything on this track duplicated, this time further to the right. Press it again, and the contents of the next track down will appear still further to the right, and so on for as long as you have tracks and Markers to play with.
 Here, I've used my Macro on the first four tracks. Pressing Alt+E (the key command I've given it) again will copy the contents of the Kick track to the empty space to the right of the arrangement.When you've gone through all the tracks you want to export, set the right locator to the new end of the Project (this will now be a scary number in the thousands of bars!). Unless you want to export the rough mix as well as the individual files, move the left locator to the place where the right locator was (ie. the second Marker in the Project). You can now choose Export / Audio Mixdown from the File menu. Even if you don't tick the Real-time Export box, Cubase will take a fair while to export such a long file, but at least you can just leave your computer to get on with it. Bear in mind that if you're exporting to Pro Tools in particular, it's a good idea to use split stereo format, because otherwise PT will have to convert it at the input stage.
Slicing & Dicing
This isn't a Pro Tools workshop, but I'll quickly describe the method I use for importing and chopping up the resulting file. It's marginally less convenient than just using Import / Audio to Track to bring in a load of separate audio files, but still fairly painless, and I'm sure that something similar can be achieved in other mixing applications of choice.
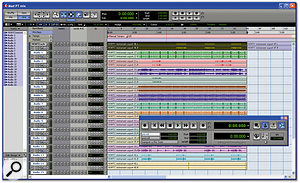 Chopping up all the elements within Pro Tools is easy as long as you know the exact length of the song...
First, open a new Pro Tools Session, choose Import / Audio to Track and import the file you've just created. Now set the tempo in Pro Tools to match that of the Cubase Project (if your Cubase Project used tempo changes, it's best to export a MIDI file from Cubase containing the tempo map and import that into Pro Tools). Create as many new stereo audio tracks in Pro Tools as there were Parts in your Cubase Project — this can be done in one go using the Ctrl+Shift+N (Mac: Command+Shift+N) shortcut. Now switch on the Keyboard Commands Focus in Pro Tools and put it into Grid Editing mode.
Remember that number of bars we wrote down earlier? Let's continue to imagine that it's 80. Place the edit cursor on the long audio region you've imported at bar 80 and hit 'B' to divide it. Now put Pro Tools into Shuffle Edit mode, grab the song-length region of audio to the left of that divide and drag it down to the empty track below. You'll see that the remainder of the long audio region snaps back to bar one, and the shorter region you've chopped out remains highlighted. Press 'P' to move the edit selection back up to the long region, press 'B' again, and you should have another song-length region to deposit onto another track. Repeat until everything has been distributed onto its own track, and you should be ready to mix, with only the niceties such as naming tracks to worry about.
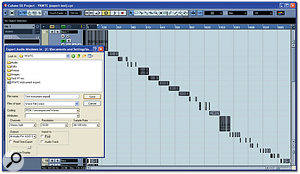 The entire Project ready to export.
One drawback with this method is that it can be rather wasteful of tracks (which are always at a premium in LE versions of Pro Tools), because everything is exported in stereo. When you export tracks individually from Cubase, you can choose to make them mono; if you can be bothered to do this, it does make for a more economical export. However, you can always throw away half of the stereo file in Pro Tools if you don't need it, and doing it in stereo means you no longer have to click endless warning dialogues when you export as mono. The method I've outlined also has one big advantage over the more obvious alternative. It does involve a lot of preparation, but once you've done this work — making sure that every Part starts in the same place, setting up the Macro and positioning all your Markers within a Project — repeating the export procedure is a doddle. This is very handy if you later decide that the song tempo needs a slight tweak, or you find that it's in the wrong key for your singer.
