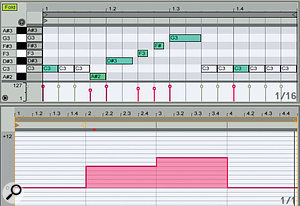
 1: The top MIDI clip serves as a template for a one-bar, 16th-note, chromatic-scale step sequence. The notes on the left are guide notes for the clip Fold operation. To program your step sequence, select a note, activate it if it is deactivated (grey) and move it with the up and down Arrow keys. Use the Shift key to move notes by octaves. The clips at the bottom illustrate different grids and scales.
If you're a fan of step sequencing, Live is more than up to the task. MIDI clips in Session view offer a fully featured approach to step sequencing that requires minimal setup and no additional software or hardware. With not too much effort you can build a basic step sequencer from Live's MIDI Effects devices and use the knobs on any supported MIDI control surface to program it. Max For Live users can download a huge assortment of free step sequencers developed by other users. Furthermore, many commercial hardware and software step sequencers work well with Live.
So, as you'll have guessed by now, our subject this month is step sequencing. I'll start with a description of the MIDI clips method, which has become my favourite approach, and then delve into the alternatives.
A Step Sequencing State Of Mind
 2: This one-bar, 16th-note step sequence uses velocity and note length to emulate a step sequencer's velocity, gate time and tied note options. The unlinked, four-bar controller lane at the bottom automates a Live Pitch device to transpose successive one-bar repetitions of the step sequence.
Any time you enter notes in a MIDI clip with the mouse when Snap to Grid is enabled (Options menu), you are basically step sequencing. But starting with a template MIDI clip containing a note on each grid division and then activating and deactivating notes and moving them up and down to change their pitch is much more in the spirit of hardware and software step sequencers.
Screen 1 shows a typical step-sequencing clip template. The sequence is one bar long with a note on each 16th-note division. Notice that all notes not on a beat are deactivated — if you play this sequence you'll hear only notes on the beats. Being able to activate and deactivate notes is more authentic than inserting and deleting them, and you do it from Live's Edit menu or from the note's context menu (right-click or Ctrl-click). If you have a keyboard shortcuts utility such as QuicKeys (www.startly.com), set up a shortcut for this.
Notice the stack of deactivated notes on the left. They serve as guide notes, so that when you Fold the clip, step-sequence notes are restricted to the chromatic scale from C3 to B3. To edit the step sequence, select individual notes and use the up and down Arrow keys to move them to the desired pitch (hold the Ctrl or Command key to move between notes). If you hold Shift, the notes move in octaves — this is how you extend the range while staying within the guide-notes scale. To change the root of the guide-notes scale, unfold the clip, select all notes and move them up or down. Alternatively, you could use a Pitch effect to transpose the clip.
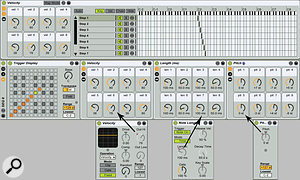
 3: The step sequencer (middle) uses separate MIDI Effect Racks for velocity, note length and pitch. The Macro Knobs of each rack set the eight steps of the sequence. The Scale effect (named 'Trigger Display') at the left is a visual aid: the orange squares turn green in response to incoming notes. Setup for the Velocity rack's chains is shown at the top, with the Velocity, Note Length and Pitch effects at bottom.Most step sequencers let you edit note duration (aka gate time) and velocity. Here you use note length and the clip's Velocity editor for that. Some step sequencers also offer controller lanes for automating device parameters. Live's clip envelopes provide that function. Use them to send MIDI CC messages as well as to automate the controls of any plug-in on the same track. Don't forget that you can unlink clip envelopes. For example, you could automate the Pitch knob of Live's Pitch MIDI effect to transpose different repetitions of a one-bar step sequence (see Screen 2).
For sequences longer than one bar, simply lengthen the one-bar template and duplicate its base notes. My preference is to stick to one- or two-bar clips placed in adjacent clip slots and use Follow Actions to move among them. For polyphonic step sequences, either add notes to the clip or place several monophonic clips on separate tracks routed to the same instrument. Combining the two separate-clips approaches gives you much more flexibility for creating and manipulating asynchronous loops. Also keep in mind that you can use Live's Groove Pool to move beyond the rigid time of step sequencing.
Building A Sequencer MIDI Effect Rack
 4: The iPad application StepPolyArp combines a step sequencer with an arpeggiator. The arpeggiator pattern transposes individual sequence steps.
This alternative approach combines separate MIDI Effect Racks for velocity, note length and pitch to create an eight-note sequence. Each rack has its eight Macro Knobs mapped to control the values of its parameter for the eight notes in the sequence. If you have a supported MIDI control surface such as the Akai APC40, you can use its knobs to control the Macro Knobs and thereby set velocity, note length and pitch.
The setup is the same for velocity, note length and pitch. Create a MIDI Effect Rack with eight chains, load an instance of the corresponding MIDI effect (Velocity, Note Length or Pitch) into each chain and map the relevant control to the Macro Knob corresponding to the chain number (see screen 3). Set the rack's chain selector so that each chain receives a different note — I've used C2 through to G2, but any eight notes will do. Collect the three racks in a new MIDI Effect Rack, making sure that the Pitch rack comes last. Now use a MIDI clip containing the notes used in the chain selectors to drive the step sequencer — the timing and order of the notes in the clip determine the timing and order of the step sequence.
 5: Three different MFL step sequencers available free from www. maxforlive. com. You can build a 16-note sequencer by combining two eight-note sequencers in separate chains of a new MIDI Effect Rack. The trick is to modify one of the eight-note sequencers to be triggered by a different set of eight notes. Another interesting modification is to use an arpeggiator instead of a clip to trigger the sequence.
Step Sequencing In MFL
Much more sophisticated step sequencers are possible in Max For Live, and many free ones are available on the web. Three from www.maxforlive.com are mentioned below. Generally these contain their own clock and do not need to be driven by a clip or an arpeggiator. Some are set up to be used with control surfaces such as the APC40 or Novation Launchpad.
- ML185 Sequencer is an eight-step sequencer modelled after a vintage Roland System 100 module.
- BeatGenSeq-Mod is a combination beat generator and drum sequencer.
- LaunchpadStepSeq_b5 is programmed from a Novation Launchpad.
Commercial Alternatives
A variety of both hardware and software step-sequencing alternatives are compatible with Live. Here's a brief look at three of them.
If you're a Mac user, probably the most sophisticated software step sequencer is Numerology (www.five12.com). It comes in both stand-alone and plug-in (AU and VST) versions. The stand-alone version works as a Rewire slave to send MIDI to Live and has more features, but in most cases, the plug-in version is sufficient. Numerology is modular in design. You build note and controller sequencers from basic modules, and the possibilities are endless. For example, you could use a single multi-lane sequencer module for pitch, velocity and gate or stack separate note, velocity and gate sequencer modules to generate asynchronous patterns with different rates and sequence lengths for pitch, velocity and gate time.
If you own Native Instruments' Maschine (www.native-instruments.com), it's a fairly simple matter to program one or more of Maschine's Groups as a step sequencer. Use the Source tab in the Maschine VST plug-in to set each of the Group's Sounds to MIDI Out. Then select each of the Sounds and, on the hardware, use Knob 2 (Base Key) to set the MIDI note the Sound sends out. Hold the Grid button to set the step size (for all Sounds). Then press the Step button to enter step-sequencing mode, start Live running and use the pads to enter notes for the currently selected Sound — each pad corresponds to a different grid division. If the grid contains more divisions than there are pads, use Buttons 7 and 8 above the LCDs to move between sections of the grid.
If you have an iPad, the combination arpeggiator and step sequencer StepPolyArp from Laurent Colson (www.laurentcolson.com) is loads of fun. You enter notes on a grid that can range from one to 32 steps and then play notes on an on-screen or external keyboard. If you hold one note, you get a standard step sequence transposed to the held note. If you hold several notes, they are arpeggiated to transpose successive steps of the step sequence.
