Having dealt with walls and floors, we move on to the floors and ceilings of the studio, with a view to reducing sound leakage even further.
When soundproofing a studio, walls are arguably easier to treat than floors and ceilings ‑ and ceilings are undoubtedly the trickiest, as gravity is against you all the way. Even so, there are relatively simple steps that can be taken which yield worthwhile improvements.
In the home studio where major structural changes are impractical, floors can present a problem unless you happen to be fortunate enough to have the studio in a room with a concrete, ground‑level floor. Much of your noise‑generating equipment, such as amplifiers, drum kits and speakers, is likely to be located on the floor, which means that steps have to be taken to prevent as much of this sound as possible from entering the structure of the building via the floorboards. Because wooden floors are relatively light compared to walls, they allow a lot of sound to leak through, as well as acting as efficient conductors of structure‑borne sound.
There are several strategies for uprating a conventional wooden floor, the cheapest (and least effective) method being to install a heavy hair‑felt underlay beneath the studio carpet. On its own, this will only result in a slight improvement, but a significant improvement can be made by isolating all the noise producing equipment from the floor. For example, monitors and speaker cabinets can be placed on blocks of foam rubber, inflated inner tubes or small isolating rafts made of slabs of chipboard atop a Rockwool base. Isolating monitors from the shelves or wall brackets using lumps of Blu‑Tak also helps.
Drum kits are a particularly tenacious source of noise and there's no cheap and simple solution. This is because a large amount of sound energy is coupled directly to the floor via the bass drum pedal and spurs. The techniques discussed will reduce the noise level slightly, but to make any impression on the noise produced by a drum kit, some form of floating floor is necessary.
Constructing A Floating Floor
A floating floor has nothing to do with water; it's simply a term describing a floor construction where the floor surface is mechanically isolated from the rest of the building. In a professional studio, this might take the form of a heavy chipboard or wooden floor mounted on acoustic isolators, and in larger studios, the floor may even be made of concrete and suspended on springs. The surface of the new floor doesn't actually come into direct contact with the walls or existing floor of the room, which greatly reduces structurally‑borne sound. Some coupling is inevitable because of the small air gap between the floating floor and the original floor, but this may be discounted in most instances. However, in professional studios where there is a need to keep out traffic noise or the sound of underground trains, the floating floor may be built above a void several feet deep.
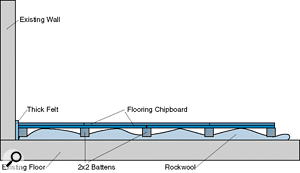
 Figure 1.Heavy concrete floating floors are obviously inappropriate for home studio use, but there are ways to build a lightweight floating floor that are within the scope of a competent DIY enthusiast and which don't use up more than a few inches of headroom. Because of their lower mass, such floors will obviously be less effective than a floating concrete floor, but they can still be surprisingly effective.
One way to build a floating floor is simply to line the floor with rockwool insulation and then build a chipboard floor directly on top of it. This should be built up on wooden battens; two or more layers of chipboard are needed to create a rigid and suitably massive surface. The chipboard should be laid so that the joints in the bottom layer don't coincide with any of the joints in the top layer and a thick felt barrier should first be fixed around the walls so as to prevent the edge of the floor coming into direct contact with the walls. Figure 1 shows how such a floating floor might be built.
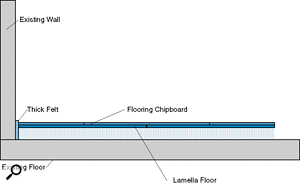
 Figure 2. A Lamella floor construction.An easier way to make a floating floor is to use a purpose‑built material known as Lamella, which is tongued and grooved flooring chipboard backed with a tightly packed Rockwool material. All the rockwool fibres are perpendicular to the board, rather like a giant scrubbing brush. Again, a hard felt strip would be fitted around the room, rather like a felt skirting board, and the Lamella boards placed directly onto the existing floor. Once the basic floor is laid, another one or two layers of chipboard can be added on top; the various layers should be both glued and screwed. Figure 2 shows how a Lamella floor is fitted.
This type of flooring may be used as the base to build a lightweight studding/plasterboard room‑within‑a‑room (this type of construction will be explored in Part 5 of this series).
Partial Floor
If a complete floating floor is impractical, consider building a partial floor or floating raft to keep the louder instruments, such as drums or guitar amplifiers, off the floor. A partial floor may be built in exactly the same way as the lightweight floating floors described earlier, but is free‑standing. The raft must not touch the walls at any point; you can ensure that it does not by tacking glass fibre, felt or Neoprene strip around the edge. This method won't produce such good results as the complete floor, but it can be a useful compromise where headroom is limited.
Ceilings
Floating floors are held down by gravity, but ceilings aren't quite so easy to deal with. The mass law still applies, so you won't gain much by sticking acoustic foam tiles to the ceiling. A heavy suspended ceiling is the answer in a professional studio, but it's less practical to implement than a floating floor in a home environment and many modern rooms lack the necessary height. Fortunately, there are alternatives.
Before even considering any form of false ceiling, you should consider putting a hair‑felt underlay beneath the carpet of the room above. If the upstairs room belongs to someone else, they may still co‑operate as long as you pay! In itself, this will provide only a limited improvement, but if you are prepared to work on the structure of the existing ceiling as well, there are further gains to be made.
First, remove the ceiling plaster or plasterboard to expose the joists and the floor above. If this is made from conventional floorboards, then fill any visible gaps with a mastic gun. Once this is done, the next step is to fit barrier mat or deadsheet between the joists, as shown in Figure 3. A commercial deadsheet is available under the name Revac, and is made from mineral loaded plastic material that looks rather like thick, black lino. This may be fixed into place using staples or galvanised roofing tacks. Because the deadsheet is heavy and pliable, it is very effective at converting sound energy into heat.
Once the barrier mat has been fixed, the spaces between the joists can be stuffed with Rockwool and the underside of the joists covered with two or more layers of 12mm plasterboard with a surface skim of plaster.
A slightly more ambitious approach is to fit new joists between the originals, as shown in Figure 4. These may be fixed to the wall with joist hangers, and because they are between the existing joists, little headroom need be lost. The advantage of this approach is that there is a higher degree of structural isolation between the ceiling below and the floor above. There is no attempt to isolate the structure from the side walls, but because there is no sound being injected directly into the ceiling structure (as there most certainly is with a floor), this is far less important.
Lamella flooring and Revac deadsheet may be obtained from Siderise in the UK. www.siderise.com
Practical Studio Design: Part 1 The Principles Of Soundproofing
Practical Studio Design: Part 2 Soundproofing Doors And Windows
Practical Studio Design: Part 3 Building And Improving Walls & Partitions
Practical Studio Design: Part 4 Floors & Ceilings
Practical Studio Design: Part 5 Room‑Within‑A‑Room Construction


