Elastic Audio in Pro Tools can do more than time‑stretching: it can also be your route to some killer pitch‑based mixing techniques.
Elastic Pitch often gets eclipsed by its bigger brother Elastic Audio, so this month we're going to bring this somewhat neglected feature out of the shadows. I hope that when we look at some of the things you can do with it, we'll get your creative juices going.
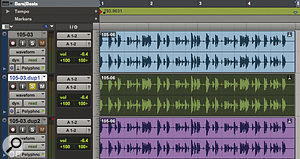
For a basic example of working with Elastic Pitch, consider the four‑bar acoustic guitar part in the screen, right My basic four‑bar acoustic guitar loop.. To be able to use Elastic Pitch, the first thing I need to do is enable Elastic Audio on the track, by clicking on the Elastic Audio plug‑in area in the track title section in the Edit window, just under the automation Read button
 Activating Elastic Audio: you'll need to use Polyphonic mode for Elastic Pitch work.. Then I must select Polyphonic from the drop‑down menu; the other Elastic Audio plug‑ins will work for time‑stretching, but only the polyphonic one will work for Elastic Pitch.
Now I'm going to make two copies of my track, either using the Duplicate function in the Track menu or by copying the regions onto empty tracks; you can do this by holding down the Alt key as you drag the regions, which will make copies rather than just moving them. I also tend to hold down the Ctrl key (Mac) or Start key (Windows) to make sure the region doesn't move sideways at all as I drag it onto another track. I've created two copies of my original track, both with Elastic Audio activated.
Next, I highlight one of the regions on the new duplicate tracks, right‑click and select Elastic Properties from the contextual menu (you can also reach this window by selecting Elastic Properties from the Region menu or by using the shortcut Alt + numeric 5). The Elastic Properties window displays the properties for the highlighted region, and it's worth leaving it open to save you constantly right‑clicking a region to get it back. The Elastic Properties window lets you perform real‑time pitch‑shifting on a region‑by‑region basis.
Now I'm going to use the rightmost of the two Pitch Shift options (Cents) at the bottom of the Elastic Properties window to shift the first of my copies five cents up. You can do this by clicking, holding and moving the mouse up or down until the desired value is shown, but I find it easier to type in the numbers using the numeric part of the keyboard — for +5 cents, just highlight the cents box and type '5' and Enter. On the second of my copies I'm going to do the opposite — shift it five cents down (type minus, '5' and Enter on the numeric pad). With the original panned centre and the pitched copies panned hard left and right, this will give me a lovely chorused guitar sound. You can take the pitch‑shifting further on lead guitar parts where the instrument is playing a monophonic line rather than chords — try settings around plus and minus 20 cents.
Extreme Harmonies
Even more extreme settings can produce interesting harmony effects. For instance, I can take one copy up a fifth by setting the left‑hand Pitch Shift option to +7 semitones, and take the other copy down a fourth by setting it to ‑5 semitones. You may find it more subtle if you drop the level of the pitched tracks by 6dB or so, so they don't dominate the original part. You can, of course, go for a full octave up and down by setting the Semitone box to plus and minus 12 semitones.
Be aware that you cannot automate Elastic Pitch, because it is a region‑based process. However, you can divide a recording up into single‑note regions to edit individual notes. It is best to use Tab to Transient to help you create the edits for this. Turn it on by highlighting the Tab to Transient button just below the zoom tool button in the toolbar Activating Tab to Transient makes it easy to isolate individual notes within a larger recording.. Place your cursor a little way before the start of the note you want to isolate, hit the Tab key on the keyboard and when the cursor is at the start of the desired note, use Command-E (Mac) or Ctrl-E (Windows) to place an edit at the cursor position. Once you've created your one‑note regions, you can adjust their pitch separately using the Elastic Properties window or Transpose window (see above).
These techniques will work on a variety of material: try the harmony idea on backing vocals, for an instant choir, or use small amounts of detuning on string parts to fatten them out. This also works well on brass sections too. In fact, this technique reminds me of the '99s' trick I was taught long before Pro Tools came out, when the AMS RMX16 was king, and cost a king's ransom too! The '99s' preset was a setting that provided two detuning effects, up and down by one percent. I remember first using it on a brass section recorded on a Studer two‑inch multitrack... those were the days!
Elastic Pitch & Drum Loops
Take a look at the screenshot, top right In this example, we're going to use Elastic Pitch to emphasise the different elements of a drum loop. . It shows a four‑bar drum loop and, as before, the first thing I've done is to duplicate it. My aim is to pitch up just the snare-drum elements by a seventh, so I begin by using Tab to Transient to create regions for each of the snare hits. In this loop, however, some of the snare hits, including the first one, are not clean but played together with the kick drum, so I use copy and paste to replace these kick and snare hit with a clean snare hit from elsewhere in the loop, such as the second snare hit.
With a full set of clean snare hits, I can then delete the other regions to leave just snare hits, then select them all and use the Elastic Properties window to pitch them up seven semitones. When I play the original loop with the pitched‑up snare hits, they give the snare much more bite and punch.
With this in mind, I could also try isolating the kick-drum hits and pitch them down a fourth for a deeper, thicker kick sound. (With this particular loop, I found this worked better when I used the AIR Kill EQ to filter off from the duplicate kick track.) The finished product: I've used Tab to Transient to cut out the kick and snare hits on my duplicate tracks, then applied Elastic Pitch to pitch the snare hits up and the kick hits down.
You can use similar techniques on a bass line. Try adding a bass loop to the new drum loop, make two copies as before, and detune the two copies by around plus and minus 30 cents. Then pan the copies hard left and right and you will have an amazing wide stereo bass line. If it sounds muddy at the low end, you could shift the copies up a full octave (+12 semitones) as well as applying a small amount of detune, say plus and minus 10 cents. Again, you may want to pull the level of the copies down so they are around 6dB lower than the original.
Too Many Tracks
These techniques will add tracks to your Session at quite a rate, and all this real‑time pitch‑shifting will eat up processing power too, so when you are happy, you could choose to render pitch‑shifted files. Click on the Elastic Audio plug‑in selector icon, and from the pop‑up menu, change it from Real Time Processing to Rendered Processing. Pro Tools will chug away and create rendered, processed files, taking the CPU load of all that real‑time pitch‑shifting off your machine.
Transposing Regions

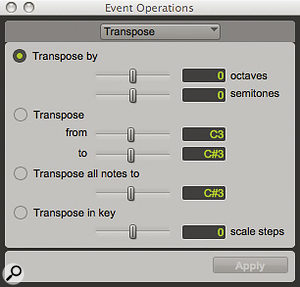
There is another way of changing the pitch of a region. Instead of right‑clicking or selecting Elastic Properties in the Region menu, you can go into the Event menu, and from the Event Operation submenu, select Transpose. The Transpose window offers a more comprehensive range of transposition options than Elastic Pitch does, but on the down side there is no fine pitch adjustment, so you can't do small amounts of detuning from this window.
