 Cubase comes with a number of preset project templates... but it's probably better to roll your own.
We've all experienced the frustration of having the brilliant germ of an idea slowly drain away as we get our recording software organised with all the inputs, outputs, tracks, effects and virtual instruments we need to capture it. You might not even remember what 'it' was by the time you've reached the point where you're ready to hit record.
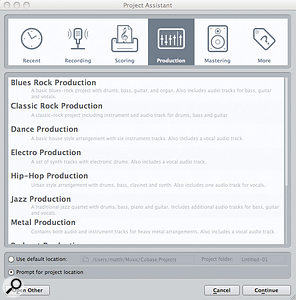
Creating your own project templates is one of those useful housekeeping jobs you can do when you're in a less creative mood. You'll reap the rewards when your mood changes, because a well thought‑out project template will enable you to get up and running in a single click. In Cubase 5, when you select File / New Project, the Project Assistant provides you with a number of preset templates, but good though some of these may be for newbies, it's better to roll your own — because that way, you'll end up with something that's properly tailored to your specific needs.
So what should and what shouldn't you include in a project template? A good template should be pre‑loaded with all the essentials you're likely to need in a project, but should also enable you to get up and running quickly and easily — and that's not always an easy balance to strike. The template needs to be free from all those unnecessary extras that make a project cumbersome to use, and you need to avoid packing it with anything that means the template takes an age to load, or, if you're planning to do any low‑latency monitoring, or play virtual instrument parts in via MIDI, anything that increases latency.
If the type of projects you do varies (I might do anything from a sole acoustic musician to a full, programmed orchestral score, for example), it's probably also a good idea to create a series of different templates, each fine‑tuned to the requirements of these different recording and mixing tasks.
Ins & Outs
 Make sure you have the various input and output channels of your audio interface specified within the VST Connections dialogue box before starting work on your Project Template.
As a starting point, select the 'Empty' template project from the Project Assistant's 'More' tab. By default, this template contains nothing aside from any input and output channels that you have already configured in the Devices / VST Connections dialogue box. So it's worth making sure that you have the various ins and outs of your audio interface suitably labelled and activated (via Devices / Device Setup), so that they appear in the mixer window of any new project. This is particularly useful if you have a large number of input channels and use them in a consistent fashion (a group of inputs used for a drum-kit setup is one example). In fact, if you tend to change audio interface setups regularly, or if you have different standard microphone setups for certain tasks, you can create dedicated templates specifically for the I/O configuration in this box, via the Presets drop-down menu.
On The Buses
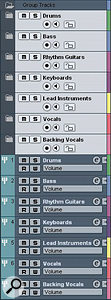
 With a colour coded Folder and a Group Channel for each major instrument group, you can keep your project organised right from the start.
With the I/O sorted, we could start creating a series of audio and MIDI tracks... but to keep things organised, and make the creative process easier when inspiration strikes, I prefer to start 'backwards', by creating a suitable set of group and folder tracks. How many of these you require, and how you use them, will vary according to the type of project you're creating a template for. For example, with a standard rock band you might set up a separate group track for each of the drums, bass, rhythm guitars, keyboards, lead/solo instruments, lead vocals and backing vocals. Alternatively, for basic orchestral work you might require groups for strings, woodwind, brass, keyboards/harps and percussion, although you could obviously make this more sophisticated with, for example, subgroup channels for the different string sections, all feeding the 'master' string‑section group).
The big advantage of using group channels is that those broad‑brush mixing tasks, where you're establishing the overall balance between the key instrument groups in your project, become much easier to manage and automate: you can mute, solo or apply effects to these channels, as well as creating a custom Mixer window to show only the group tracks.
Keeping Track
 A series of tracks (in this case, just audio tracks) can be pre‑configured within each folder track.
Having created the group tracks, I like to organise the tracks that form each group into folder tracks — perhaps even putting the groups into the relevant folder too. That way, you can open up a folder when you need to do work on the elements within a group (for example, recording or balancing the various rhythm guitar tracks or backing vocal tracks) but, if required, can hide all the other tracks to avoid distractions, and keep everything easy to navigate.
In each folder, I've found it useful to create a number of empty tracks, so I can get started recording as soon as the template is opened for a new project. You might not want to create dozens of empty tracks, as that defeats the object of keeping things simple, but half a dozen or so makes for a good start. Unless I know I'm only going to need one track type, I find that a mixture of audio and MIDI tracks in each folder is best. I also tend to include a combination of mono and stereo audio tracks, for maximum flexibility.
Although this might seem like I'm adding potentially unecessary elements, by approaching the template in this way I can include some suitable generic track names ('Rhythm Gtr 1', 'Rhythm Gtr 2' and so on), which can be a time-consuming process that you don't want to have to do again and again with each new project. Not only will naming make project navigation easier, but it will also mean that any audio recorded on those channels will be appropriately named (there's nothing worse than trawling through lots of files called audio_01 and so on!).
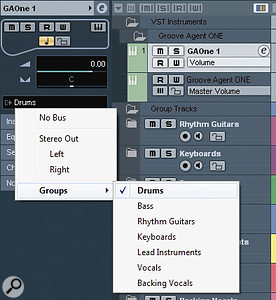
For audio tracks and VST instruments, an important final step is to make sure the output of each track is set to the appropriate Group channel, rather than the main stereo output.
Bells & Whistles
 Make sure the main output (or outputs) from any included VST instrument are routed to the appropriate Group Channel.
It's difficult to pre‑configure software instrument sounds to cover every eventuality, but it's worth including anything you commonly use. Depending on the style of music, this might include, say, an acoustic piano, your favourite drum tool, or basic ensemble patches for each of the major sections of an orchestra.
However, while it might be tempting to stuff your template full of the biggest and best sample‑based instruments, this isn't the best approach: if you do, the project will take an age to fire up, while you wait for all the sample layers to load. It's much better to keep things simple: for composition purposes, for example, a basic 'working' patch is probably all you require to get started. If you tend to automate certain parameters of an instrument (say, the filter cutoff and resonance of your favourite synth), it might be worth adding automation lanes for those parameters.
Just For Effect
![]() Including some of your favourite Insert effects on each Group Channel (in this case compression and tube emulation) is also useful.
Including some of your favourite Insert effects on each Group Channel (in this case compression and tube emulation) is also useful.
It can be be useful to add some send effects to your template, although, again, it's best to keep things simple. The obvious choices would be two effects channels containing a basic reverb and a delay, but, as I hinted earlier, try to avoid anything that will add to the system's latency. If you like to use a convolution reverb in your mixes, for example, you might be better off using an algorithmic one for recording, and substituting it later in the project for mixing duties — and the same goes for any DSP effects from the likes of the UAD or TC Powercore cards. Sends to your effects from each of your main group channels, or any key individual tracks like the lead vocal, can also be assigned, so that if you need a bit of reverb to add to your initial rhythm guitars or guide vocal, it's ready and waiting to go.
You don't need to stop there: if you like a little transparent compression across most of your major instrument groups, just add suitable compressors as insert effects on each of your group channels. Similarly, when working on pop and rock material I regularly apply a touch of tube emulation to each of my instrument groups, so I've created a template that pre‑loads my favourite tube and tape emulation plug‑ins.
The simple guide here is that anything you have found yourself regularly using in previous sessions can be added to your template for speed of access, even if you leave it switched off in the first instance — but try not to overdo it, or you'll probably put yourself off using the template!
What Else?
There is a range of other useful things you might do to customise a project template for your needs. Colour‑coding your tracks according to their instrument group can help to provide a useful visual cue when you're browsing through a complex project. Personally, I also like to add ruler, arranger and marker tracks to my templates, as I tend to use them a lot. It can also be useful to customise your initial window layout, as this will be recalled when the template is opened: for example, you might customise your transport panel to show only the key features you regularly use.
The final step, of course, is to save your new project template via the File / Save As Template menu option. Next time the creative spirit happens to drop by, your shiny new (and hopefully perfect) project template will be waiting for you under the 'More' tab of the Project Assistant.
