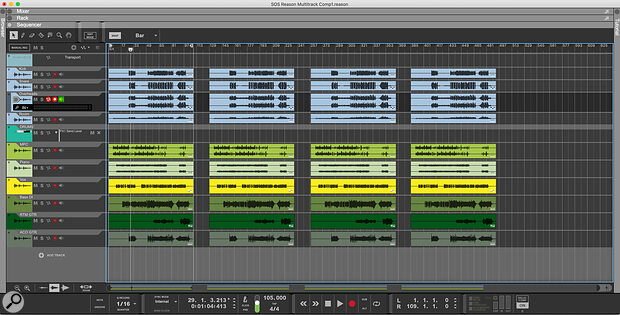
 Screen 1. Recording multiple takes down the timeline is a quick and safe way to work, especially if you’re playing in the band as well as running the session.
We consider three different approaches to running a tracking session and comping takes in Reason.
In our March 2021 workshop, we explored how to approach a traditional multitrack recording project in Reason, looking at how to capture a basic set of mics and inputs and set up the mixer for cue monitoring. We got as far as recording, and I promised to return to look at ways to manage multiple takes. So this time we’ll consider three different approaches to running a tracking session and comping takes, along with some Reason features designed for these tasks.
Keep It Rolling
Some people like to simply ‘leave the tape rolling’ and record multiple takes of the whole band successively down the timeline (Screen 1). The advantage to this approach is that it requires minimal intervention during the session, so is particularly useful if you are playing on the track as well as engineering. It’s also very clear to see and access what you’ve done, as it doesn’t involve duplicate tracks or hidden take lanes.
If your plan is to pick a favourite full take at the end of session then this simple workflow has a lot going for it. However, if you’re likely to want to mix and match (comp) the best bits from different takes you need to bear a couple of things in mind. First, you’ll want to be working to a click so that everything at least starts on the bar, and stays more or less lined up. Otherwise it’s going to be difficult to put different takes together. The other thing applies whatever method you use: take notes as you go, to save time later.
Some people like to simply ‘leave the tape rolling’ and record multiple takes of the whole band successively down the timeline.
Alts
The second option is to record each take on a set of fresh tracks, alongside your previous takes. Like the linear approach, this keeps everything you record on screen and is easy to keep track of. It has the extra advantage that all your takes are lined up, making the process of comping easier. The downside is that your Reason project will grow very quickly with many duplicate tracks and mixer channels.
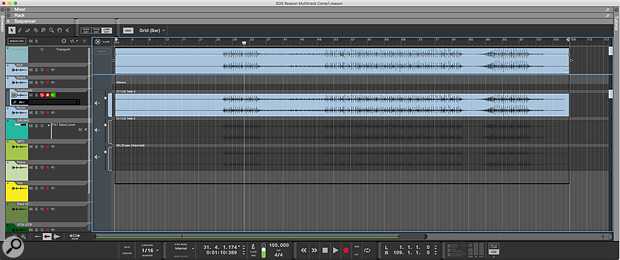
 Screen 2. Reason’s Alt take feature duplicates your record tracks and mutes the last take.
Reason has a very handy feature if you want to go with this method. When you’ve finished your first take, click the ALT button next to the Record button in the transport, or hit the ‘6’ key on the numeric keypad. Duplicated (but empty) tracks will be made of all tracks that are currently record armed. The new tracks will be armed, and the old tracks will be muted and disarmed. You should be able to just hit record and go for another take.
Going Over The Top
The final method is to simply record each take directly over the top of the last. No, I’m not being wantonly destructive or pushing an Albini-esque preference for complete takes. Being able to do this is in fact the beauty of Reason’s more advanced multiple take and comping workflow. Any time you record over the top of existing audio in a track, or punch into the middle of another take, it looks like you’ve overwritten what was there, but in the background Reason keeps each pass as separate layers for you to audition and edit later.
So why not always do this? Well with this option it’s not so immediately obvious where all your stuff is, and if the band are likely to say, ‘hey can we jump back to take 3 and redo the triangle’ you could probably do without rolling each track back to that layer. This is because there’s no way to quickly view, select or edit the active take across multiple tracks simultaneously. This is a particular nuisance for handling phase‑coherent tracks, like a miked drum kit or miked and DI’ed guitars.
But don’t let me put you off! If you take the time to get your head around how to access and comp takes using this feature (which we’ll hopefully do in a minute) it’s really powerful. It’s definitely the way to go when punching in on individual tracks, and there is a partial workaround for the drum thing.
Comping
Whichever method you used to record in your takes, you’re probably going to want to pull together some parts from different takes to get the best final version. The typical workflow is: audition and find the best complete take (or trust your notes/memory); find bits that work better in other takes; put them together.
If you used the sequential recording approach, auditioning is as simple as moving along the timeline. When you find the take you like best, it’s a good idea to copy it to another location down the timeline and work on it there so that you have a safety copy to come back to. It’s then a matter of manually copying parts to the master version.
If you used the Alt Tracks method, you can mute/unmute each set of tracks. As this is a lot of clicks, it can be worth quickly assigning the tracks from each take to their own submix group so you can solo them in turn. With Alt Tracks takes are aligned, so you can audition candidates in context with each other. If you cut partial takes together, you can assemble directly onto the initial ‘best take’ or create another new Alt track as the master.
 Screen 3. You can simply record over the top of previous takes and Reason will keep everything neatly stacked in the background.
If you recorded via overwriting, your takes can be found in each audio clip’s Comp Edit view, accessed by double‑clicking the clip. Screen 3 shows what I see in my Drum Overheads track after the last of three takes. The takes are stacked from most recent to earliest going top to bottom, and the last take will be active. To switch to a different take just double‑click it in the stack. It will get highlighted, and will also appear in the top lane which shows the composite live track output. Yes, I’m afraid that if you want to audition a complete multitrack take you’ll need to open the clip in each track and select the version.
It may be worth it, though, because it’s so easy to pick and edit from sections of takes in different tracks. We looked at how this works in detail back in the SOS February 2016 issue in the context of vocal comping and tuning. To split a take switch to the Razor tool (or hold Command/Ctrl) and drag out a selection in the track. Moveable markers will appear at the bounds. You can now double‑click within the markers to select the active take in that section (see Screen 4). To temporarily override the markers you can click the speaker icon at the left of any take to audition it. To add a crossfade click and drag just above a marker.
 Screen 4. Comping of individual tracks is easy in Comp Edit mode, although not so well suited for multitrack takes.
Multitrack Comping Workaround
The limitation of the clip comping method in Reason is that you can only work within one track at a time, and Reason currently has no system of edit groups. This is problematic when needing to edit across all tracks at once, or trying to comp multi‑miked drums that must stay together. There is a workaround that you can try for drums, though.
Comp edit markers can be copied and pasted between tracks. In our example project, I comped the drums by starting with just the Overhead mics. I soloed this track and opened the clip. The Overheads were enough to work with for assembling the best parts from my three takes. I then selected and copied the edit markers and copied them. I also took a quick screen grab so I could see which sections I’d chosen. I then pasted the markers into the other drum tracks and quickly selected the same sections by double‑clicking. Yes it’s a faff, but it did save some time earlier in the project not needing to create and manage multiple tracks.
