 The control room at Half-Ton Studios, after moving into the larger space but prior to upgrading the desk and monitors. There was some basic treatment in place, but more would be needed to address the low-end response.
A DIY approach to control room acoustics can go a long way, but sometimes it pays to get the professionals involved.
For this feature, I'm going to stray into somewhat new territory for me and talk about studio control room acoustics. In recent years I'd acquired some extra space in the warehouse where my studio is based, and needed to make some significant changes to the overall layout of the studio. These were dramatic enough to involve me moving the control room into what was the old live room. The move coincided with me upgrading my console and monitors, but despite feeling I had a decent enough understanding of the essential principles of setting up a good listening room, when I began to work in my new space I quickly realised I had some issues that went beyond my know-how, and made the call that I needed some outside help. I ended up working with acoustician Douglas Doherty from DACS Audio, and with his help I'm going to talk you through the process we went through to turn an initially quite problematic space into a very workable control room. The majority of the time — and money! — was spent on addressing the low-end balance in the room, and that's what I'm mostly going to be covering here.
My New Room
In hindsight I really was asking for trouble. My new control room is quite square [see 'Why Are Square Rooms Bad?' box later], with dimensions of 4.4 x 4.3 m, with a height of 2.4m. It's a free-standing room built from stud work and plasterboard, with a Rockwool–filled 100mm cavity. I knew enough to know that this could create some issues, but without going into the details, there were a number of practical reasons why I chose to use that room to set up as a listening space.
As is so often the case in smaller rooms, it was the bottom end that presented itself as the major problem. There was an audible dip in low-frequency volume in the middle of the room, which was very close to where the listening position was initially set up. I was also quite underwhelmed by the stereo imaging, and despite being able to work, it was taking me longer than usual to sign off mixes. Despite getting used to these issues somewhat, it was also creating problems when working with other people in the room. Volume differences below around 120Hz were quite dramatic depending on where you were standing in relation to the speakers. And, whilst it can be quite handy to stick the bass player at the bass-heavy back of the room when mixing, if it's too much it can create communication problems!
Getting Started
After chatting with Douglas over the phone, he suggested the problems were bad enough that he would need to visit the studio and work out the best course of action. In our initial conversation, we talked about the practical concerns of my setup at the studio — like what I needed to retain, space–wise, in the room — and touched on the thorny subject of budget. It's important to make sure you're on the same page with this stuff, as acoustic solutions can vary in price dramatically. I explained that I had some experience with building my own acoustic panels and was confident, up to a point, that I could go DIY with much of the prescribed treatment to keep costs down.
When I met Douglas at my studio, his immediate concern — apart from the shape of the room! — was the location of my speakers. I had my monitors around three feet away from the rear wall, which put my listening position perilously close to the middle of the room. Douglas proceeded to quickly demonstrate to me why a small square room can be so problematic and why the middle of the room is possibly the worst possible place to put your listening position. Through my main ATC SCM20ASL monitors he played me a series of low–frequency sine waves — pure tones at a specific frequency — at 20Hz intervals and got me to walk around the room. The result was quite shocking. At 60Hz and 120Hz especially it was like someone was turning a volume knob up and down as you walked from the corner of the room to the centre. Later tests revealed there was as much as a 20dB difference at the extremes! As you can imagine, these two frequency ranges are pretty essential areas in a mix, and it was not surprising I'd been having a few issues getting bass guitars and kick drums to sit right.
Testing Your Room
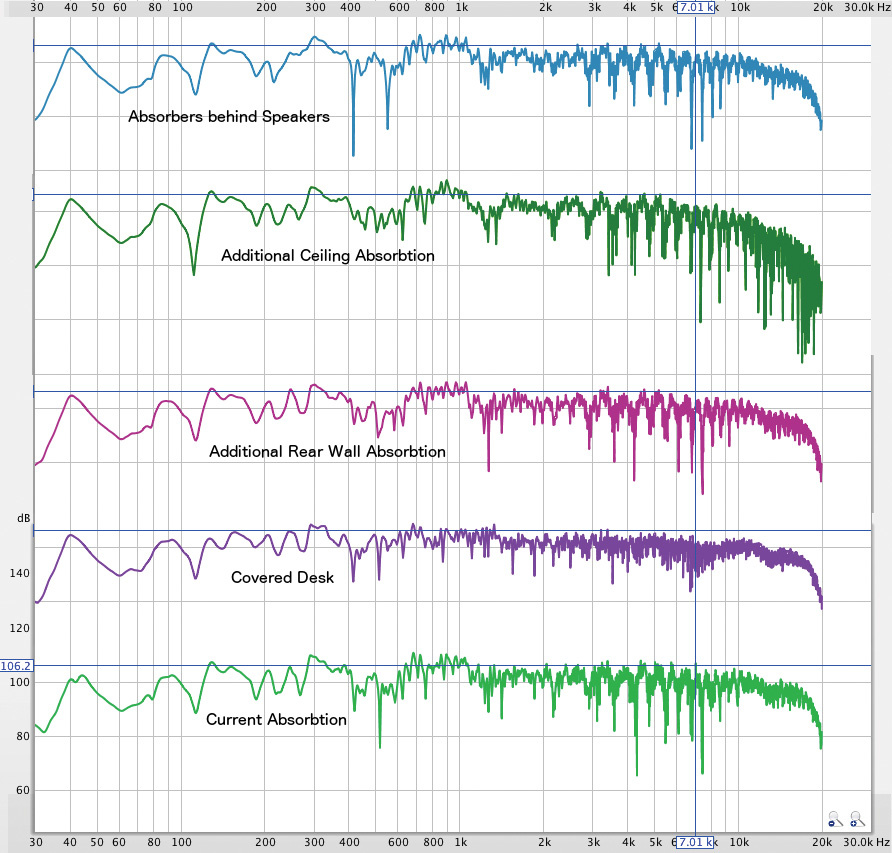 I'm not going to go into great detail about testing a room, but it's a relatively simple process if you have a decent-quality capacitor microphone. There are various free or inexpensive software packages available for testing and producing graphical information, and they typically will lead you through the process. I ended up using a program called Room EQ Wizard, and it did everything I needed it to do in order to get a handle on what the problems were. A word of warning though: when you start down this route of testing your space I think you need to be committed to seeing the project through. Unless you're fortunate to have a naturally good room acoustically, it can look quite dramatic when you see a series of large dips and peaks from 20Hz-20kHz. I'm not suggesting ignorance is bliss, but once I could see the problems in my room visually, it often played on my mind when I was struggling with a mix. Once I got a bit further down the line with this project — and with Douglas' encouragement — I began to trust what my ears were telling me rather than constantly testing the room at every stage. When I did measure any response, it was helpful to have Douglas on hand to explain a little about how to interpret the graphs. He offered the following advice:
"There are issues with measurements. Firstly they are often made in just one place. It is worth measuring at different points around the listening position and comparing the responses. Smooth the displayed response to 1/6th octave; this reflects what you hear and allows you to see better the general shape of the response. Changes when you measure at different heights indicate that you need to control floor/ceiling reflections, and changes from side to side indicate that you need to control side-wall reflections. Do not expect a ruler–flat response!"
Realistic Expectations
Managing expectations is an essential part of the process of creating a good listening environment in a room that has not been purpose built. Once Douglas had highlighted the problems with my room it was a case of looking at what was realistically achievable with the physical limitations of the space, my budget, and what also needed to be able to happen in the room, musician-wise. It's also not remotely shallow to admit that acoustic treatment in a space that will see clients needs to look good. Acoustic treatment can, and should be, a mix of function and art. Douglas was also very keen to stress that the goal here was not to create a ruler–flat room when tested and that such a goal would be impossible anyhow, especially in a smaller room. Our priority was to create a better listening space, or sweet spot, where critical mix decisions could be made with a greater degree of confidence. This 'spot' was likely to be quite small and in my case would be where I would normally sit between the speakers. As a natural by-product of us doing this, though, Douglas explained that we should also see a decent improvement in the balance of the room as a whole.
Listening Position & Speaker Placement
Before discussing any acoustic treatment, the first thing Douglas wanted me to do was to get my monitors and listening position into a better area of the room. I was surprised when the first thing he wanted me to do was to get the monitors as close as physically possible to the wall behind. He explained and demonstrated using a special tape measure (marked with quarter–wavelength frequencies so you could immediately see the cancellation frequency) that the distance from the wall behind creates some cancellation at a specific frequency depending on the distance.
 One of the biggest early improvements came from moving the speakers closer to the rear wall, which not only opened up more floor space, but moved the listening position away from the centre of the room.
Doing this in my room pushed this frequency higher, which made it less problematic and easier to treat. The other major advantage of us doing this was that it enabled us to move the mixing desk further towards the back wall, meaning the listening position was roughly a third of the way into the room rather than near the middle. As an added bonus, this opened up precious space in a small room that can often have four or five band members, with guitar pedalboards on the floor and so on. The result of these initial changes was very encouraging when listening to some reference material. Now that I was aware of the problems, though, it was a little unnerving hearing the level of the low frequencies change when you moved out of the sweet spot!
Low-frequency Treatment Options
Douglas pointed out to me very early in this process that addressing low-frequency problems in smaller rooms is not easy and could often be a point of frustration for him in his work. Off–the–shelf foam products, or shallow Rockwool–style panels, would not even come close to improving the sorts of problems that I was experiencing. Improving the imaging and mid– to high-frequency response would be relatively straightforward (more on this later), but tackling issues below 150Hz would require a significant amount of commitment, treatment and possibly a bit more of a budget for an acoustician to work with!


 The custom membrane traps were made professionally and designed to absorb energy specifically around 50Hz.My acoustic DIY solutions in my studio, up to this point, had been based around purely Rockwool–style designs, including 100mm–deep 'broadband' panels and 'superchunk'-style corner traps. Douglas explained that these were OK up to a point, but in order to address serious low-frequency issues with these types of designs you would need panels with depths upwards of 1200-1500 mm deep to make a difference! This was simply not an option for me in my space, so I was keen to explore alternative solutions. On reflection, this was a fascinating part of the process for me as Douglas skilfully allowed me to steer myself to a solution that was right for my situation, rather than telling me what to do. This typically involved me throwing out an idea based on my piecemeal knowledge and then, with some guidance, explaining to me why it wouldn't work! Ideas included some pretty dramatic ones such as physically extending the back of the room into the adjacent corridor, turning the whole of the back wall into a giant bass trap, or somehow utilising the space above the room. These ideas actually had some merit from a physics point of view, but would have had a detrimental impact on the room's soundproofing, security and my wallet!
We ended up settling on a solution that would involve treatment solely within the existing space and not involve any room alterations. After thinking it through between my meetings with Douglas, I began to get more comfortable with the idea that it would be a good investment for me to spend a little more money. I'd also decided that it was important that whatever we did decide on was 'modular' and could be moved to another space if need be. Well–built, good–looking acoustic treatment could be a sound investment that would help me in my work for years to come and also have some resale value if necessary. Douglas was great in terms of helping me keep costs down where possible, and we arrived at a solution where I could build some of the treatment myself and then combine this with some bespoke treatment, which would be made and installed by a craftsman Douglas works closely with.
We decided to focus on positioning as many membrane–style bass traps — more on these designs later — as these would not only offer real effectiveness at lower frequencies but also do so without encroaching on the workable space in the room. Key to this plan was targeting corners and points in the room where two walls joined, as these are the most effective places to target low frequencies. Douglas helped explain why: "Corners are where pressure builds up, so a three–element corner — two walls and ceiling or floor — has the biggest pressure build-up, so damping pressure there will be most effective. You can experience this bass build-up just by playing music then putting your ear close to the wall, then to a corner." From a practical point of view, we could also do most of this without it affecting the usable space in the room.
Prepare To DIY
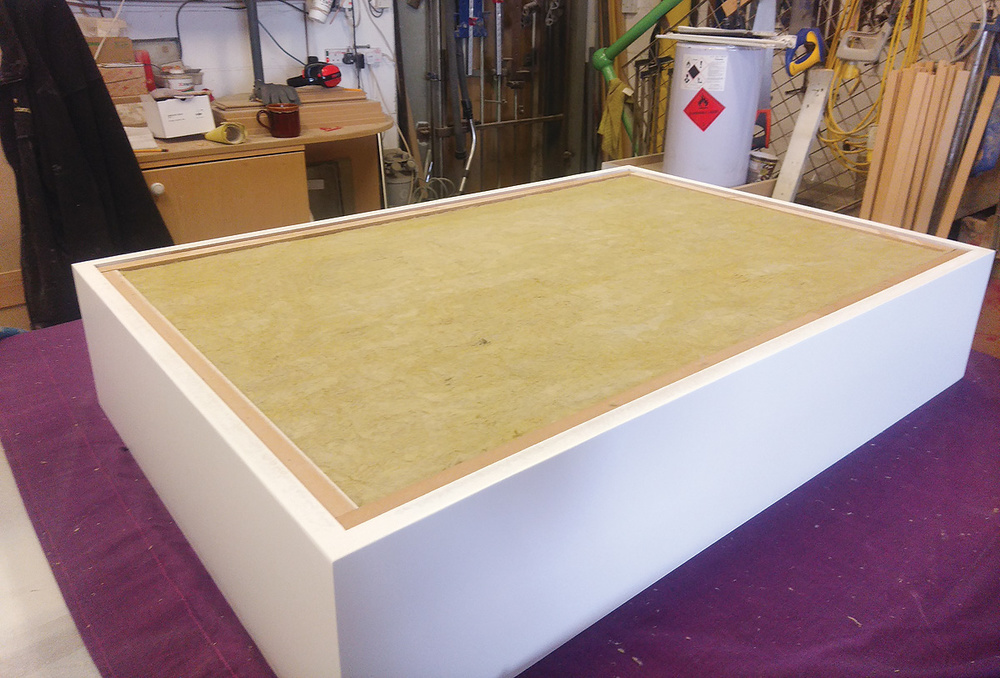
My part in the building process was to build eight large Rockwool–filled panels, along similar lines to what I had used in my previous control room. These would be deeper than what I currently had though, and Douglas prescribed panels that were 1200mm long, 600mm wide and, importantly, 200mm deep.
The panels would also have a sheet of 6mm MDF tightly positioned a quarter of the way inside the Rockwool filling; this 6mm MDF sheet acts as a resonant membrane damping low frequencies.
I've built a lot of these types of panels over the years, and I'd really encourage you not to be afraid of giving it a go as the carpentry skills are minimal. If you have a home studio and want to get a bit more serious about treating your room in a non-structural way then you could do a lot worse than building something along these lines. The material I used to build these eight large panels cost just over £300, and it took me just over a day to assemble. Here are a few practical tips based on my experience:
- Don't bother using good-quality wood if you're not planning on having any of it exposed. I found a local mainstream building merchant who laser–cut me all the materials I needed for the frames out of 18mm MDF. This was cheap, and as every part of the panel was perfectly cut to size it was quick and easy to assemble. The same merchant also supplied the 6mm internal sheet I needed. Your measurements need to be precise though, so check and then check again!
- Shop around for the Rockwool filling as prices vary a lot. It usually comes in different weights or densities. I used 60kg, which was the medium option. These typically come in sheets that are 1200 x 600 mm so design your panels so they can be put in with minimal handling. If you do need to adjust, a standard hand saw works well, but I recommend using a facemask and wearing gloves. Rockwool is itchy stuff!
- If you care about the look of the finished product, then get specific good–quality acoustic fabric. This could be nearly half your budget but is worth every penny, in my experience. The essential function from a physics point of view is that the material is 'breathable'; but to get a crisp, professional finish I've found that you need to be able to get a decent amount of tension when fixed to the panel. You could also round off edges and corners of the MDF slightly. I used a good–quality staple gun to fix the fabric to the back of the panel, and this was by far the most time–consuming and tiring part of the build. Think through how to get as many panels as you can out of a roll of fabric. Make sure it's tightly stretched across the panel and practice your corner folds before committing staples!
Getting The Pros In
Building the panels was relatively easy, and as well as helping with the low-frequency issues in the room, they also served as broadband absorbers that generally got the room feeling more under control. As mentioned, the plan was also to introduce a number of proper membrane–style bass panels that would sit where the walls meet the ceilings. Often referred to as 'soffit' panels, these are effective for controlling frequencies centred around 50Hz, and use heavy vinyl stapled to the front of an insulation-filled box. The vinyl membrane resonates and absorbs the low-frequency energy. The Rockwool–filled enclosure, which must be sealed, interacts with the vinyl and prevents the cavity resonating like a drum.
I'd decided that building this type of panel was out of my comfort zone DIY–wise, and while other designs can be more forgiving in terms of aesthetics and build quality, these technically needed to be done right in order to work correctly. I was also delighted not to have to do any more work on building the things! Douglas recommended I work with a company called Pro Lignum, who are based not too far away from me, and the company's director, Paul Scrutton, visited my studio to take precise measurements of what was to go where. Once I'd committed to spending the money on getting these panels done I can't tell you how refreshing it was to have someone come in and take care of the whole process for me. Douglas and Paul consulted with each other on my requirements, and Paul took care of the installation quickly, and to a much higher standard than I would have done myself. I had 12 of these panels made and they were positioned as close as possible to where the wall meets the ceiling, around almost the entire room.
To give you a rough idea of the cost involved, a 1200 x 600 mm vinyl bass absorber was around £130, plus VAT.
The Difference
 One of the DIY broadband absorbers in situ. Wood diffusion panels were hung over the top of these absorbers to reintroduce some HF back into the room.Could I notice a difference straight away? Absolutely. The first test I did was to walk between the far corner of the room towards the middle with some bass–heavy material playing from my speakers. There was still a small dip in the lower frequencies, but it was significantly less than before and was now into the realms of it actually being useful to check a mix in different areas of the room. A quick test with Room EQ Wizard confirmed that although there remained some dips around below 120Hz, there had indeed been some significant 'smoothing'. As we'd talked through and planned what was going to be realistically achievable in my space, I was really pleased with where we'd ended up. It also looked great!
At this point the main plan for smoothing out the low-frequencies was in place, and it was now about looking for other areas of improvement. As we now had quite a lot of absorption in the room it was feeling a little too 'dry'. We addressed this by introducing some (very nice–looking) diffusing panels that I could hang over my existing acoustic panels so experiment with placement at my leisure and fine-tune as I went along. The theory was that these should allow the panels to retain their general absorption but also put some mid–range energy back into the room. There was also an issue in the room around 600Hz that we were fairly sure was a result of the large ceiling cloud I had in place above the mixing desk, but this felt manageable for the moment. We were also getting quite a bit of comb-filtering from reflections off the desk itself — a common issue, but for another article!
I would like to quickly mention that getting my main monitors positioned on some good–quality isolating stands made a noticeable difference. I ended up using the IsoAcoustics ISO LR8 stands, and as well as helping give a greater feeling of clarity to the low and mid frequencies, they enabled me to optimise my speaker position. We followed the well-trodden path of trying to create a triangle of equal distances between the two speakers and your ears when sitting in the main listening position. Fine–tuning this improved the stereo imaging a great deal, and it was at this point that the room began to sound and feel like a proper listening space, and I was excited to get to work on my latest batch of mixes.
The whole point of acoustic treatment in a listening room is about confidence; confidence that what you are hearing is accurate enough to make the right decisions when recording and mixing.
Key Points To Take Away
Embarking on this process hammered home to me the importance of assessing whether you need professional guidance on a project like this, and I would definitely recommend getting some help from an objective acoustic expert if you're semi-serious about treating a room, even if it's just for a basic consultation. I've gone the other way many times, trying to cross-reference advice on forums and books, and to be fair the information is all out there if you have the time and focus. The whole point of acoustic treatment in a listening room, however, is about confidence; confidence that what you are hearing is accurate enough to make the right decisions when recording and mixing. For me, I don't want to always be second-guessing what I'm doing, and my clients are paying me so they in turn can feel confident about what I'm doing to their music.
Most of this article is about how I tackled the low-frequency problems in my room, and I really hope I've highlighted just how much commitment can be involved to see any real improvement. By using purely foam–based products, or a thin Rockwool panel or two in the corners of you're room, you might feel like you're treating the issue — I've been there myself. But I hope I've explained, with Douglas' help, that it requires a great deal more thought to improve the low–frequency balance of a smaller listening room. The vast majority of the financial outlay for me was the membrane absorbers that I had built for me and positioned around the top part of the room. My reasoning was that these were an investment in myself and would, ultimately, make more of a difference than a new piece of outboard equipment or microphone!
It's important to point out that the process I've described happened over a period of months, and I was busy working in the room before and during the process. Even if your room is fundamentally flawed, you can still produce good results by getting to know the space and implementing a series of listening checks, like using headphones and external playback devices (and even listening to mixes in your car). I've always found using reference mixes helpful as well. I've talked about confidence, but the other primary motivation for me to seriously improve my room was efficiency. Budgets are not getting any bigger for recording and mixing projects, and it's essential for me to be able to turn around mixes quite swiftly sometimes. I can't always check every mix on half a dozen playback systems. I wanted to feel confident that what I was hearing on a day-to-day basis was accurate enough to translate well in the real world, without having to compensate mentally. Ultimately, that's what I feel I now have in place.
 The control room at Half–Ton Studios in its present state.
Many thanks to Douglas Doherty of DACS Audio for his help with this article.
Why Are Square Rooms Bad?
Every room has a fundamental frequency at which it resonates, like blowing over the top of a bottle. In fact, in a room, there are three fundamental resonant frequencies, set by the length, width and height of the room. Each of these dimensions will also resonate at two, three, four (and so on) times their fundamental frequency. We aim to reduce the number of coincident frequencies that will reinforce each other, making a bump in the frequency response. This means that if two dimensions of the room are the same or very close, then there will be lots of coincident frequencies causing bumps in the response. This is why square rooms can be especially challenging to treat acoustically.
Typical Room Resonances
| LENGTH | Frequency | Pitch* |
| 3.1m | 55Hz | A1 |
| 3.1m | 110Hz | A2 |
| 3.1m | 165Hz | E3 |
| 3.1m | 220Hz | A3 |
| WIDTH | Frequency | Pitch* |
| 2.8m | 61Hz | B1 |
| 2.8m | 122Hz | B2 |
| 2.8m | 183Hz | F#3 |
| 2.8m | 244Hz | B3 |
| HEIGHT | Frequency | Pitch* |
| 2.3m | 74Hz | D2 |
| 2.3m | 148Hz | D3 |
| 2.3m | 222Hz | A3 |
| 2.3m | 296Hz | D4 |
* give or take a few cents
Let's look at a typical room and start with the fundamentals. In the table above, we can see that there are bigger gaps the lower you go: for each dimension, there is an octave between the first two resonant frequencies, and they are all at important musical frequencies. In the room illustrated here, the three dimensions provide different resonances, but there are nevertheless gaps. In practice it means that in this room, the A string of a bass guitar will be reinforced by room resonance, as will the B and D immediately above, but E2 to G2 will not. This can make the E2‑G2 drop out very noticeable, and the A1, B1 and D1 notes stand out very strongly.
Half-Ton Control Room
| LENGTH | Frequency | Pitch* |
| 4.4m | 39Hz | D#1 |
| 4.4m | 78Hz | D#2 |
| 4.4m | 117Hz | A#2 |
| 4.4m | 156Hz | D#3 |
| WIDTH | Frequency | Pitch* |
| 4.3m | 40Hz | D#/E1 |
| 4.3m | 80Hz | D#/E2 |
| 4.3m | 120Hz | A#/B2 |
| 4.3m | 160Hz | D#/E3 |
| HEIGHT | Frequency | Pitch* |
| 2.3m | 74Hz | D2 |
| 2.3m | 148Hz | D3 |
| 2.3m | 222Hz | A3 |
| 2.3m | 296Hz | D4 |
* give or take a few cents
Half‑Ton's results, above, show just how problematic near–square dimensions can be. Bass absorption is the only way to deal with this — but it can only reduce the differential to an acceptable level. In addition, it is important to check that your bass absorbers absorb the frequencies which are problematic. Even in a small room like the first example, you need the absorber to have peak absorption down at 50Hz.
Douglas Doherty, DACS Audio