
With the fundamentals covered in previous versions, Studio One 4 branches out to explore new creative possibilities.
For me, version 3 marked the moment when Studio One caught up with the competition. PreSonus had ticked all the boxes, appropriated all the features, and designed an interface that was familiar enough to attract casual Cubase users while being serious enough to pull in seasoned Pro Tools professionals, and vice versa. It was no longer the underdog, and no second fiddles needed playing: Studio One had pulled in the high production values and become a decent DAW that deserved your attention. So, when you’ve already caught up with the rest of the market, what do you do with the next update? PreSonus decided to get creative.
Where version 3 was perhaps all about mixing, production, arranging and audio processing, version 4 is about giving producers, songwriters and music makers more compositional tools for the writing of music. Amongst the new features are a Chord Track for songwriting and development, ripple editing for arranging, pattern creation and step sequencing. The sample‑based instruments get you sampling as well as playing, AAF import makes the move from another DAW even easier and Song import lets you pull that cool chorus out from another project to work into something else.
GUI
PreSonus have mostly retained the look of Studio One 3, but there are some minimal adjustments to the interface: a narrowing of the meters, a flattening of the faders, track colours now bleed into the labels, and the little icons on clips are just slightly bigger. Notepad‑style scribble strips are available on pretty much everything for note‑taking and recording whatever details you want to add. Areas around the arrange window are a shade lighter, reducing the contrast marginally and making it seem a tad flatter. All tiny touches, but just enough to fool your brain into thinking you’re in a fresh space. The appearance is adjustable, and they’ve added a Luminance slider to the Appearance editor. Slide it all the way to the right and it will take you back to the horrors of version 2. (There’s no appreciable change, either functional or visual, to the Project mastering window of Studio One, which is still as grey and blue as ever.)
Ch‑ch‑ch‑ch‑chord Changes
Chord Tracks are appearing on a lot of DAWs at the moment, and PreSonus go all in with their implementation. A Chord Track runs along the top of the arrangement, below the timeline, and displays the chordal structure of your song. This can be purely informational, but where it gets interesting is where you use it to modify and control the harmonic content of your music. Any tracks that you’ve set to follow the Chord Track will snap themselves to those chords — and this includes not only MIDI and instrument tracks, but audio tracks as well.
With MIDI, it’s easy. Studio One already knows and understands the notes on the track and can identify the chords being used. Change the chord in the Chord Track and the notes are moved to conform. With audio it’s a little bit different, because Studio One is not going to know the harmonic content of your audio without a bit of analysis and processing. So, from the right‑click menu, you select Detect Chords, which does exactly what it says, with the names of the detected chords appearing along the bottom of the audio clip. Once the chordal structure is known, Studio One can transpose the audio in real time to follow the Chord Track. And it’s not just transposition: you can also change the chord type and quality, and the audio happily follows.
Choosing and experimenting with chords is done with Studio One’s chord wheel. You can choose keys and chords, types and qualities, root notes and intervals. You can create chords by clicking on the virtual piano keys, or play them in from your MIDI controller. It’s all non‑destructive, and simply turning off the Chord Track returns all the audio and MIDI to where you started. There are some nice workflow touches, such as the ability to select all the chords of a single type and have them change together, and the way that all clips that have been adjusted feature a little processing icon on the lower left corner. If you are using Studio One’s integration with PreSonus’s Notion notation software, this Harmonic Editing can make creating lead sheets a lot easier and faster.
 Create and edit chords in the Chord Wheel, and the harmonic content follows the Chord Track.
In practice, the reality of using the Chord Track with audio is a little, shall we say, experimental. When I applied the chord detection to guitar tracks, I found that it would start the chord in the transitions rather than on the downbeat, and I’d need to open the audio editor to snap them all into place. (You can quantise the chord start point, but I would find that the chords were not necessarily off the beat, just not on the right beat, and so quantising had no helpful effect.) I also encountered the odd slur as the audio pitch‑shifted if it wasn’t precisely on the beat, and a bit of editing was required to tighten that up.
With a bit of editing, though, instrument recordings generally coped quite well with the pitch‑shifting, while vocals have their own thing going on. Perhaps unsurprisingly, Studio One doesn’t detect chords in vocal parts very well, and then when I applied chords from the Chord Track, they would tend towards unintentionally classic Auto‑Tune effects. There are some mode options to massage the results a little, and ‘Parallel’ seems to work best for vocals, maintaining the relationships between the notes in the chord and giving the least amount of leaping about. ‘Narrow’ mode shifts each note to its nearest counterpart in the chosen chord, and I found this best for keys and strummed instruments. There’s a ‘Bass’ mode for keeping a bass line to the bottom note, and ‘Scale’, which snaps the notes to a scale. Finally, ‘Universal’ mode doesn’t require chord detection in the audio and is best kept for crazy stuff.
Having control over the chord type and intervals gives you a lot of creative possibilities as you develop a song. If you are working purely in MIDI then this is without a doubt a completely invaluable writing tool. Once you bring in audio then it tends to become more of a useful aid to development, though for instrumental parts, if your playing is bang on the money or if you spend a bit of time editing the chord positioning, the results can be really rather good. The Studio One manual does point out that the Chord Track has its limits, and that audio pitch‑shifting will always generate some artifacts. It goes on to recommend the re‑recording of audio parts to fit the final chord progression, which sounds like a good idea to me.
Ripple Edit
Another tool that will particularly appeal to songwritersseeking to make structural changes to their music is ripple editing, activated using a toggle button on the toolbar. With ripple editing enabled, material after a selection is moved leftwards to fill in the gap when you cut, and moves rightwards to make space when you paste. This is also very useful for editing spoken‑word material, where you don’t want to introduce gaps.
Pattern Play
There are two revolutionary developments in Studio One 4’s MIDI editing facilities, the first of which is that you no longer have to edit percussive notes in a piano‑roll: there’s now a classic drum grid editor that makes the experience far smoother. Click the button in the editor to switch between piano roll and drum editor and you even get a drumstick mouse cursor, while a click of the spanner icon lets you get minimal and show only the note lanes you want to edit. It’s simple and effective — where has it been for three versions?
 The new Drum Editor gives you a drum stick and a grid in place of the piano roll.
The other development is Patterns, a pattern‑based step sequencer for creating switchable and loopable melodic phrases and percussive parts. Simply insert a pattern clip onto the timeline and get to work. There’s a range of resolutions and up to 64 steps, and you can work either in a melodic mode with a piano keyboard up the side or a percussive mode where each MIDI note is given a lane.
In melodic mode, it initially feels very much like a piano‑roll editor until pattern elements start to creep in to remind us why we like this style of sequencing. It’s a step sequencer, so this is not about recording a performance, it’s about programming a pattern of notes in a grid. In step record mode, each time you press a key on your MIDI keyboard it records the note into the next step. You don’t have to worry about timing or length, as that’s taken care of by the global gate control. Whether it’s done through painting with the mouse or step recording over MIDI, playing with notes in Patterns is a whole load of fun, which is not something I often feel about the piano roll.
Even better is step automation. At the bottom of the editor, you get a lane of parameter automation that’s applied per step. Along with the usual Velocity there are two Patterns‑specific parameters called Repeat and Probability, both of which are a lot of fun. Repeat adds a ratchet effect to the note, letting you pull in a roll of up to 10 repeats, and Probability gives you a percentage likelihood of the note on that step sounding. This quickly introduces a humanising feel to your patterns. Although each step can contain multiple notes, automation is applied to every note in that step.
You can, in fact, automate anything you like here. If you are using the Studio One instruments such as Mai Tai then all you need to do is right‑click a knob on the instrument GUI and select ‘Edit Pattern automation’ to have it added to the pattern automation lane. This is separate from track automation, and only appears in the pattern editor. With third‑party VST Instruments, things are slightly less fluid; there’s a ‘three dots’ button which reveals all the available parameters within the VSTi, but these are not always helpful or easily navigable. However, you can also drag a parameter to a pattern automation lane by opening up the mapping editor in Studio One’s plug‑in container. This shows the last‑moved controls, which makes finding the one you need much easier.
Beat That
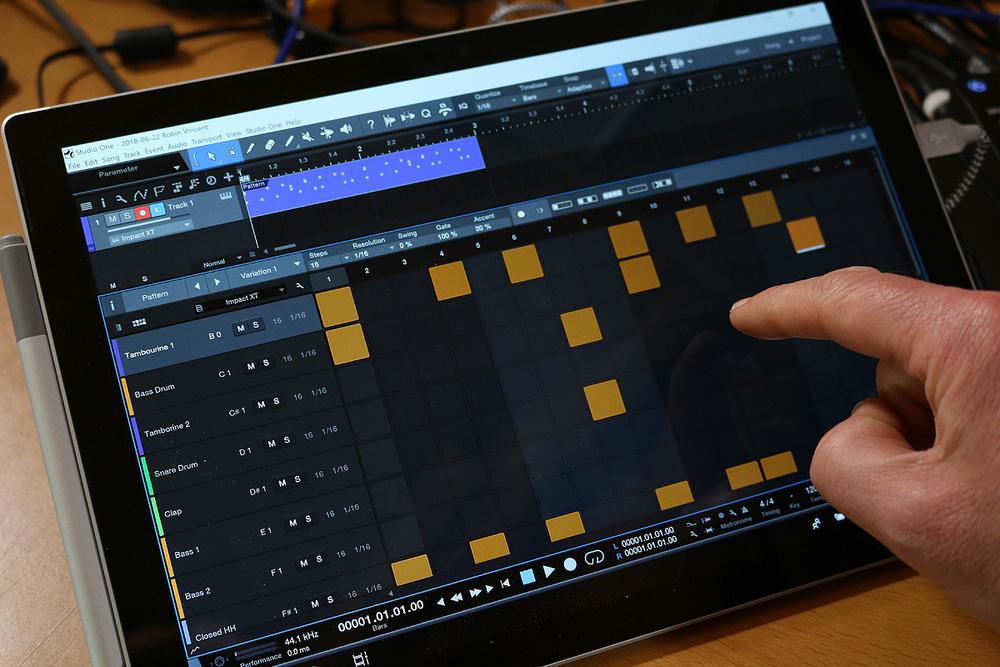
The Patterns feature really shows its versatility in the drum, percussion or ‘Rhythmic Mode’, which is particularly good when coupled with the Impact XT drum machine. The lanes represent MIDI notes that trigger the various drums in a kit, and when using Impact XT, these lanes are automatically labelled for you. As with the Drum Editor, you can filter out the notes you’re not using and focus on the beats at hand. The lanes have their own mute and solo buttons, and individual pattern lengths and resolutions, so you can conjure up whatever polyrhythmic combinations of timings you want. There are also additional tools in this mode, such as lane filling in full, 2nd or 4th steps and the copy/paste of patterns between lanes. All the same automation lanes are available in this mode, making full use of the Repeat and Probability functions.
 The Probability option on each note in a melodic Pattern adds considerable potential.
There have been some grumblings on the Internet about the Repeat function and Impact XT, with some people complaining of clicks caused by Impact not retriggering on a zero‑crossing point, which is particularly obvious on kicks. It doesn’t happen when using the Sample One instrument, or when manually recreating the pattern in the drum editor, and one solution seems to be to turn off Choke in Impact XT. Another criticism is that you can’t take a lane out to a piano roll like you can in some other DAWs, which means you can’t adjust the pitch of hi‑hats and snare rolls as is common in trap‑style music. There are workarounds, but they are long‑winded and out of character with the usual slick Studio One workflow.
Within a pattern you can create an infinite amount of variations and then scatter them across your Song, where they will happily integrate alongside standard MIDI clips and automation on the same track. When you copy a pattern in the arrangement, be aware that it becomes a connected ‘ghost’ copy that always refers back to the original and gets edited regardless of which copy of that pattern you are editing. If you want to edit a duplicate pattern independently of the original, you need to separate it out first.
Patterns can be saved for use in other projects by dragging them to the browser, where they appear as ‘.pattern’ files. PreSonus’s web site talks about how “there’s a new library of inspirational drum Patterns and Variations Patterns in the Musicloops format for easy, drag‑and‑drop saving and export”, and after a fair bit of digging around in the browser I did come across a folder of ‘Musical Files’, inside which was a folder called ‘Impact XT Kits and Sounds’. This does indeed house patterns and variations, and they are indeed pretty fabulous. Drag them across and they load up with an instance of Impact and the right kit all ready to go. These are great, so it’s a shame they are so difficult to find. They need their own tab, or a more obvious location where you can find them and add your own creations.
 Percussive Patterns can feature different lengths and resolutions across multiple lanes, helping to create complex polyrhythms.
Instrument Improvements
Both of Studio One’s sample‑based instruments, Impact XT and Sample One XT, have been overhauled for version 4. The first thing these improvements bring is some very welcome colour. Sometimes it feels as though Studio One is in competition with Ableton Live to come up with the dullest‑looking GUIs, but load up Impact or Sample One and prepare to be startled. There’s a range of colours you can step through, all of them of a very pleasing hue, and in general, the tweaks PreSonus have made to the GUIs are excellent. The previous versions of these instruments seem terribly basic and dated in comparison.
Impact XT has eight times as many pads as the preceding version, so now each preset kit can contain a whole load more than 16 samples. Each group of 16 pads gets mapped across your keyboard, so you could reach them all if you had enough keys; otherwise, they are tabbed in the interface. Each pad can be routed to one of 16 stereo or 16 mono outputs. The Pitch, Filter and Amp controls are retained from the previous version, but the filter is now a 24dB/octave design with added Drive and Punch controls.
You can pull samples in from anywhere and drop them onto pads; holding Shift while you do so will have loops automatically sliced across multiple pads. It’s so easy.
 Patterns combines seamlessly with the new Impact XT sampler.
Sample One XT shares the same ease of use, except that in this case, when you hold Shift the loop will be sliced across the keys, ready to play in a Recycle‑style. The big new feature in Sample One XT is the ability to record audio. Yes, you can actually sample into the sampler! You can record from any physical input or track or bus routed in from the Console. Recording can be triggered manually or using a gate threshold, which can automatically slice up drum parts for you. The same Pitch, Amp and Filter controls as are found in Impact are available, along with an LFO, but these act over the whole instrument, not individual samples. PreSonus have added two effects banks, offering seven effects modules including delay/reverb, a gater, EQ and distortion.
The flow when working with these instruments is truly remarkable. Pulling samples from the browser, your desktop or from an audio track, even just pulling in a selected region is a complete breeze. You can knock together a fully functional instrument or drum kit in no time at all. The mapping is simple, the envelopes are obvious, the editing straightforward. There’s nowhere to get bogged down: it’s a smooth instrument‑building experience.
 Sample One XT now incorporates live sampling.
As Sample One XT expands itself into a fully fledged sampler, it begins to encroach on the role of Presence XT and its optional editor and instrument builder. I suppose you could see Sample One as a RAM‑based performance sampler and Presence as a disk‑streaming library sampler. Sample One is certainly easier and faster to use, but Presence can handle larger instruments with multiple layers of velocity and has more modulation abilities. Studio One provides a file exchange facility which lets you export your instrument from Sample One as a ‘multisample’ file that Presence can open. It’s a very cool feature although I don’t quite understand why it can’t be saved in this format as a preset that appears in the Sample One preset list. Instead, you have to save it somewhere else and then dig around to find it and drag it into Presence, which just seems a little disconnected.
Go With The Flow
Studio One is all about the workflow. The rules of navigation and tool access established in version 3 have been followed through with new creative possibilities. Whether these have been dreamt up by PreSonus or borrowed from elsewhere, they all fit in nicely with the flow. The way audio moves from browser to track, track to sampler, sampler to Impact is just so smooth.
The Patterns bring a gloriously simple and creative melody and percussion generator right into the midst of your music. It’s not a plug‑in, or something you route into the DAW: it’s right there on your timeline. The one thing missing, perhaps, is any form of randomisation that would allow you to quickly generate a melody and scale‑quantise it with the Chord Track, or auto‑generate interesting rhythms.
The Chord Track is well implemented, and the chord wheel makes it a doddle to experiment with different harmonic structures regardless of your musical ability. And, as it runs with the Arrange track and into Scratch Pads, it fits right into the existing flow of things, even if the audio side of it isn’t quite what I expected — it’s occasionally seamless and sometimes transparent but, more often than not, requires a bit of help to do something remarkable. Ultimately, though, Studio One 4 delivers an impressive bag of features that make music‑making faster, easier and more rewarding.
Multi‑touch
Version 3 introduced Studio One users to the possibilities of multi‑touch technology. Although it wasn’t always a smooth experience, it was really good in places; incremental updates have improved upon the implementation, and version 4 consolidates this support. There’s still no documentation on how to use the touch facilities, and the only mention of them in the manual is unchanged from version 3, referring users to an enabling setting in the options that doesn’t exist (or maybe it’s an option only in the Mac OS version?).
You can now rearrange plug‑ins in the console with your finger and copy them from track to track. Selecting different tracks, either in the Console or the arrange window, is pretty much instantaneous. Navigation in and around the arrangement is super‑quick with one‑finger scrolling and pinch‑to‑zoom either horizontally or vertically. When it comes to selecting clips and moving or editing, we are reintroduced to our old friend the tap‑and‑pause. This is still most annoying in the piano roll, a place where being able to quickly tap in notes would be of most benefit. As it is, you can double‑tap to enter a note quickly or tap‑and‑pause for the note to appear. Automation also benefits from a double‑tap, and you can also tap‑and‑hold for a second and then draw in a more freehand way. This has been improved a bit, so that you can now start drawing from anywhere rather than having to grab an existing handle first. You can now also move plug‑in GUIs without going through the tap‑and‑hold activation.
This need to frequently pause was my biggest complaint about the touch implementation in version 3, and version 4 improves things, but doesn’t remove it completely. I still maintain that if PreSonus moved from single‑finger navigation to a two‑finger navigation mode, like all other touch‑enabled DAWs, it would allow them to get rid of the tap‑and‑wait/hold/pause that is so detrimental to the workflow.
On a positive note, touch in the pattern editor is completely awesome. Tap and the note appears immediately! There’s no mess and no waiting around: tap and it’s there, just as in any other piece of touch‑enabled music software. The automation is the same — instantly touchable — which makes you wonder why it’s still a bit rubbish in the MIDI editor and the new Drum editor. And the pinch/zoom in the pattern editor is simply fabulous. More of this please, PreSonus, and less of the waiting around for notes to appear and actions to activate!
ARA 2.0
Studio One 4 has fully implemented and is ready for version 2 of the Audio Random Access plug‑in protocol. It’s a technology that allows audio processing from software such as Celemony’s Melodyne to be edited and applied directly in the timeline. Version 2 is considerably more versatile, allowing for simultaneous multitrack editing and promising a much smoother experience. But it’s still not quite available at the time of writing.
I was able to check how the Chord Track and Melodyne relate to one another, as you can imagine them coming into conflict. As far as I can tell, launching the Melodyne editor for a clip disables the effect of the Chord Track on that clip, and it remains disabled until the Melodyne editing is removed or rendered to the audio.
AAF & S1 Song Data Import/Export
One function that’s been sorely missing in previous Studio One iterations is the ability to import projects from other DAWs. Likewise, it has not previously been possible to pull in parts of other Studio One Songs into the active Song. To remedy the first omission, version 4 now has fully integrated AAF import and export. You can drag an AAF file into the arrangement and all the tracks and layout are perfectly realised, and AAF is also available as an option in the Save As... dialogue.
Importing data from other Songs is almost as easy. When you Import Song Data and select a Song you get a list of all the available tracks. Choose which tracks you want and they appear in your new Song. This only works with saved Songs, not templates, which is a little strange; also, it’s only about track data and won’t bring in effects busses. However, if you go back into the original Song and enable some automation for a bus then it will appear in the track list and you can import it.
Artist Or Professional?
For this review, I tested the ‘full fat’ Professional version of Studio One 4. The much more affordable Artist version does not include the Chord Track or the new import/export options, but does feature the new Patterns and Drum editor. As in version 3, advanced features such as the mastering functionality, Melodyne integration, Scratch pads, extended effects chains and video playback are also absent from Artist 4, but perhaps the most significant omission is support for third‑party VST and AU plug‑ins.
Pros
- Chord Track fits the workflow perfectly.
- Patterns are versatile and too much fun.
- You can now sample into the sampler.
- AAF import/export and song import.
Cons
- The action of the Chord Track on audio needs work.
- Patterns need their own library.
- Multi-touch still not as smooth as it could be.
Summary
Studio One 4 is a musician’s update, aimed more at the makers than the mixers, and takes Studio One from a place that hosts your creativity to one that enables and explores it.
information
Source Distribution +44 (0)20 8962 5080