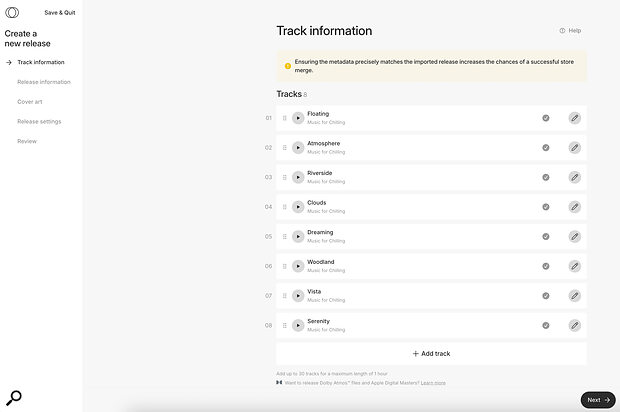
 Five tabbed pages make it easy to create a new release, and the first is the Track Information page.
Whether it’s existing releases or new tunes, SOS For Artists can help you get your music out... well, pretty much everywhere!
Last month, when announcing our new SOS For Artists (SOSFA) service, we promised to follow up each month with practical workshops to show you how to get the best out of it. In this first column, we’ll don our record label hats, and take you through the Distribution section of our platform.
Some of you might just want to get your tunes out there, while others will be taking the commercial side of things much more seriously. We’ll cater for both audiences, as we explain just how easy it is to get your material onto download and streaming platforms, and offer some tips on getting the most out of your releases.
Import Duty?
The Distribution tab presents you with two options. One is to add a brand new release, and you’ll need to choose this if you haven’t submitted any tracks to download stores previously. The other is to import an existing release, and will be handy for those who’ve already been releasing and promoting music. This option transfers ownership of your music from your current service, ensuring that everything remains intact in stores where you’re already listed — because the last thing you want when switching is to lose your existing plays and playlist entries! It’s important to note that imports happen on an individual release basis. This means that if you have multiple albums in your catalogue, you’ll need to import them individually. Also bear in mind that you’ll also need a screenshot from your current distributor as proof of ownership before an import can take place.
To import a release, grab from Spotify the URL of the album/track you want to import and paste it into SOSFA. You’ll then see your track listing appear. Next, a bit of admin is required. You need to upload your artwork and audio, and ensure that any metadata is accurate; it will bring in your ISRC codes, label name and date of release automatically. There are also a couple of shortcuts that let you select a completed track and reuse the metadata across all other tracks in the release.
It’s definitely easier if you gather all release assets together before going ahead with an upload, and if you’ve never released music before, there are a few more things you should consider. Apart from the music itself, for example, you’ll want to include any remixes, your artwork and probably more besides. So, below, we’ll examine these requirements in more detail...
Prepping For Release
Your finished, mastered track should be in the correct format. Because it will be distributed to a wide range of download stores, some of which offer high‑quality recordings to listeners, it’s best to upload it in either WAV or AIFF format, at CD or broadcast quality (16‑ or 24‑bit, 44.1 or 48 kHz). That way, you’ll get the best quality on the high‑quality services, while those that use lossy compression can do the conversion automatically (and only once!). It’s also worth using a format that can retain metadata — AIFF, Broadcast WAV or 320kbps MP3, for example. To some extent, that allows you to future‑proof your files, should you need to submit tracks to music supervisors for sync purposes at some point.
If you prepare stems routinely during the production process, they can more easily be used for remixes or sync later on...
If you’ve commissioned any remixes (or created some yourself), have these ready to go. And, even though you don’t strictly need them for your release, consider having stems ready too — if you prepare stems routinely during the production process, they can more easily be used for remixes or sync later on. For instance, you might have separate files for the lead vocal, all backing vocals, all guitars, drums, percussion, basses, keyboards, strings, and effects returns. Or if you really want to, you could have a separate track for every voice and instrument. But the most essential one is the lead vocal, as quite often remixers will choose to replace many or all of the other parts.
Every track needs an ISRC code. This is an international standard for identifying your track and contains the release year and label identifier. If you’re just releasing as a solo artist, don’t stress: an ISRC code will be allocated by the platform automatically when you upload. But if you’re setting up a record label, you may want to allocate your own codes, so your releases consistently have the same identifier. This is easily done by contacting PPL (Phonographic Performance Limited) if in the UK or the RIAA (the Recording Industry Association of America) if in the US. (There are equivalent bodies in the EU and elsewhere). They will issue you with a three‑digit code. If you were assigned the letters ABC, your ISRC code would be COUNTRY + CODE + YEAR + 5 DIGIT RELEASE NO. For instance: UK‑ABC‑25‑00001. Each different version of your track needs its own ISRC code, and if you’re planning on pursuing sync, then give your stems their own codes too.
Barcodes are another lifelong identifier for your releases, and we recommend letting the platform allocate this; you can purchase your own barcodes if you wish but it’s often an unnecessary expense. An internal catalogue number is something that you choose yourself for allocating to album and EP releases, and labels will often use something along the lines of their label name followed by a three digit number. However for distribution purposes, a number is allocated to your release automatically.
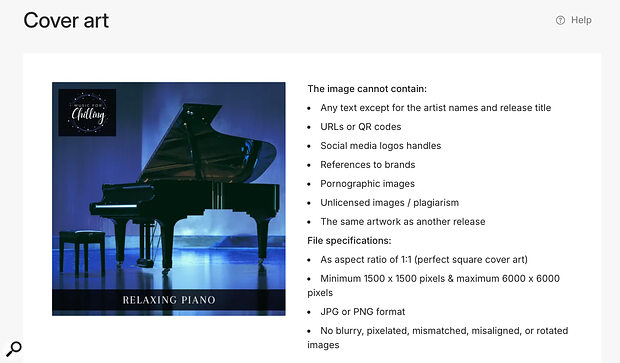 Each release needs its own artwork, and as with your audio, it makes sense to upload a high‑quality version that will work best on the stores that use larger images.
When it comes to artwork, most imaging software such as Photoshop, Affinity and the pro version of Canva gives you what you need to create your artwork assets. Note that you’ll generally need to submit a 4000px square image at 300dpi — that might sound like a pretty large file, but some stores do request hi‑res images. It’s a good idea while you’re at it to export a smaller JPG version for websites and social posts. When choosing your software, it might be worth bearing in mind the need to create assets for your website and social platforms for promoting your release. Having a landscape and a square promo template should cover most of your needs (unless you’re also posting to Instagram, which, following their recent update, now has its own dimensions of 1080 x 1350). And some software, Canva for instance, can be used for creating short‑form videos — the recommendation is to create a short promo in portrait (1080 x 1920) view that can be used as a YouTube short and Instagram reel, and a shorter version can be exported to use as a Spotify canvas. Longer videos are a whole separate topic — we may come back to that another time.
Then it’s time to add the metadata to your tracks. This is best done in a dedicated app, such as Metadatics, but it’s also possible to use the iTunes Music app. You can add the track title, artist name, release name (to indicate whether the overall release is a single or part of an EP or album) and the smaller version of your artwork. It’s a good idea to add the tempo of your track (in bpm) too, and your website address in the notes section.
At this stage, we’d also suggest making sure that you’re ready for your promo campaign. For instance, ensure that you have email capture on your website, so that new fans of your release can sign up for updates. Also have your social posts uploaded and scheduled, to fit around your release.
Uploading To SOS For Artists
With the hard work out the way, you’re ready for the fun part! Once all of your assets are in place, head over to SOS For Artists’ Distribution tab to upload and schedule your release. In the Distribution section, the first tab is where you can upload all of your tracks. Within each track entry you can add the title, ISRC, the names of your artists, remixers and any other contributors. This is also where you specify the genre, which can help to ensure your music reaches the right audience. There are 24 main genres, each with numerous sub‑genres, so you may need to do a bit of searching to find what’s closest to your sound. If you’re releasing a single with remixes, you can also identify different versions of the track by adding the mix title.
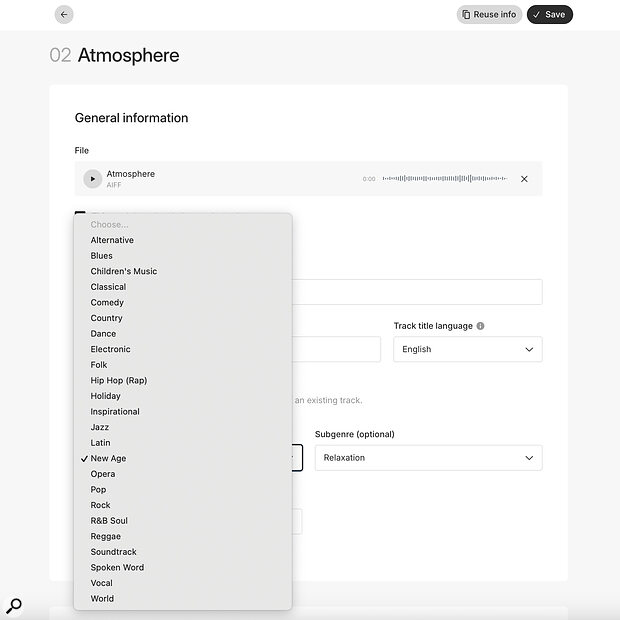 We might not all like to pigeonhole our music, but assigning the right genre to your track can help to get it in front of the right listeners.
In the second tab you can identify the overall release information, whether for a single track, an EP or an album. Again you can add the title and genre, plus add in your label name and master rights holder information (you as an individual or your label name). The third tab is for uploading your artwork. The fourth is for choosing the stores and social platforms you’d like your release distributing to, and there’s the option to filter out certain countries here — while distributing your track is pretty easy, promoting a release is not a small job, and it can often be a good idea to seek out labels in territories where you’d like to build a strong presence, and let them handle distribution and promotion for that country, since they’ll have knowledge and contacts that you don’t. (More on the promotion side of things in the separate box.) You can also set your release date here, and although the platform can push releases to download stores as quickly as 2‑7 days, an eight‑week lead time is recommended to get the most out of your campaign, and to make sure that your track is present across all stores globally before going live.
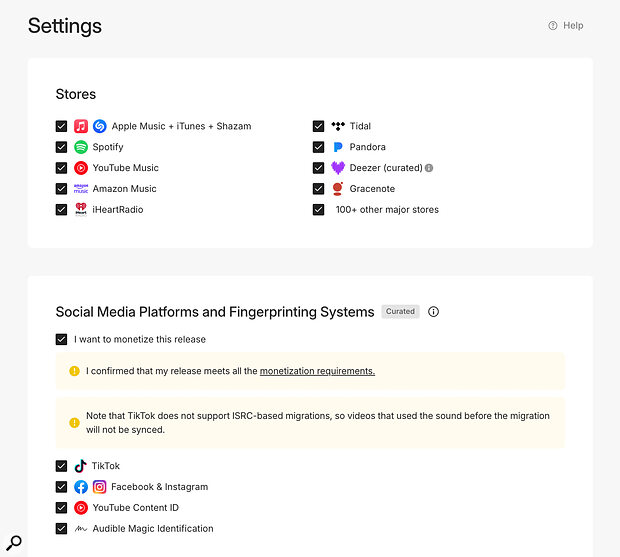 The Settings page is where you specify which stores and services will list your music — you can specify the main ones individually, and well over 100 smaller ones collectively.
A final tab lets you check all of the data you’ve input, before approving the terms and clicking that submit button. Then, it’s over to the distribution team for the final checks before pushing your release to the stores.
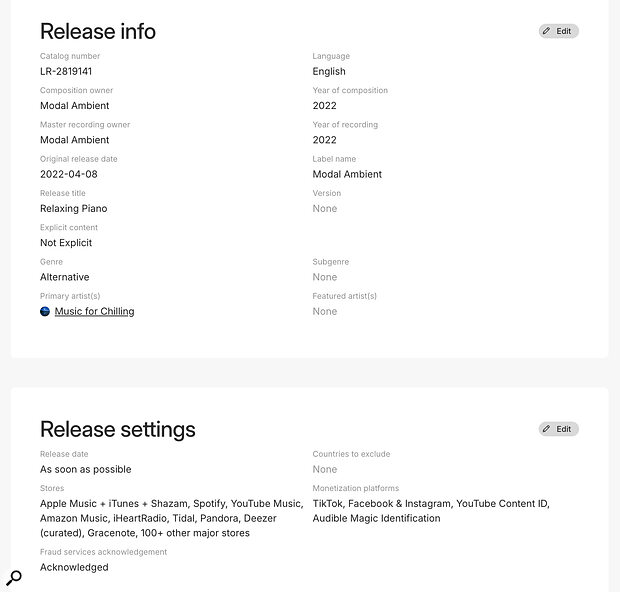 A final summary page allows you to check that everything’s correct before you commit it to distribution.
Promotion
If you want to be productive while you wait for your track to come out, consider using that time to plan which playlists you want to add your track to, and start building your own playlists that will incorporate your track. You can also upload your track to BBC Music Introducing and similar sites if you’re new on the scene, push your track out to radio stations and DJs, claim your Spotify For Artists profile and upload your canvas artwork, set up promotional gigs, submit press releases and schedule all of your social posts.
Also be sure to register your release with PPL and PRS (and their non‑UK equivalents): these are royalty collection agents, but one deals with your master recording while the other deals with performances of your music. It’s a good idea to add your release to MusicBrainz and Discogs databases too, for further exposure. (This is where you find out what record labels do for their share of the cash!)
There’s about an eight‑week reporting time from download stores. After that, you should start to see on SOSFA some stats for which countries or cities are connecting most with your music, and that could help you to plan future campaigns and tours. And hopefully, if you’ve done a good job of promoting, you’ll even start to see some income that you can invest in your next release!
